Healthy Red Velvet Ice Cream Recipe
What if the rich, tangy flavor of red velvet cake could be transformed into a scoopable, ultra-creamy frozen dessert that’s easier to make than most people believe? Many home cooks assume red velvet ice cream requires complicated custard bases, egg tempering, and hours of constant attention, but this recipe proves otherwise.
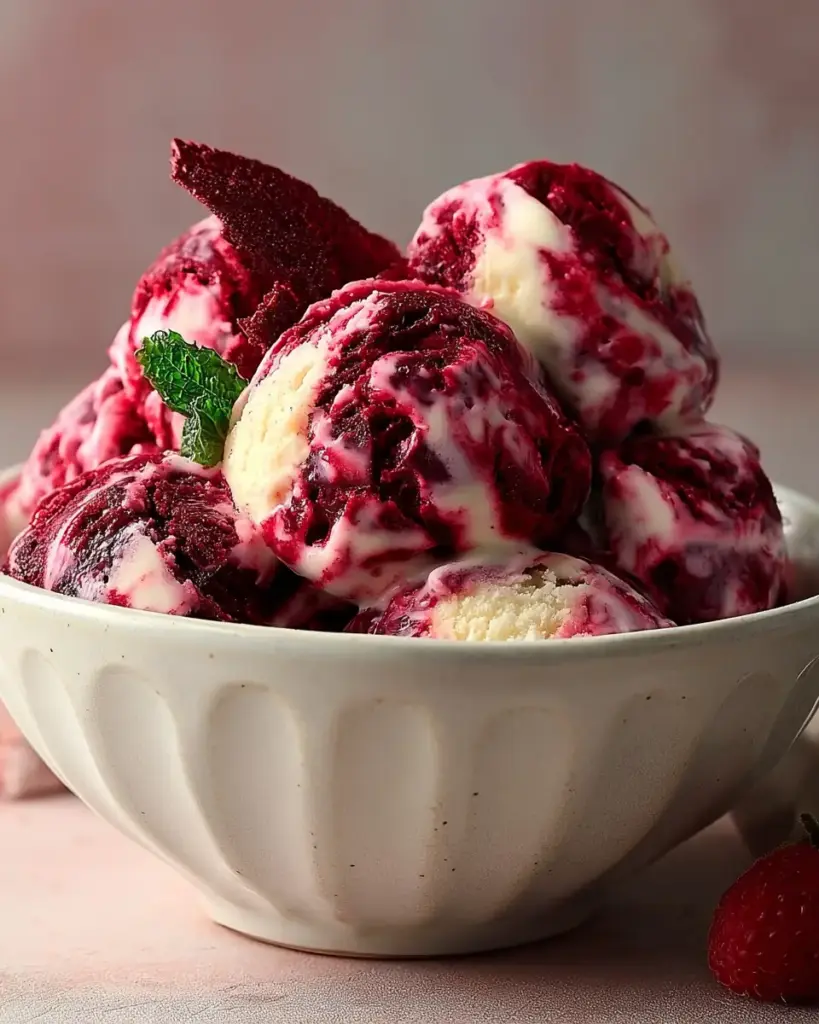
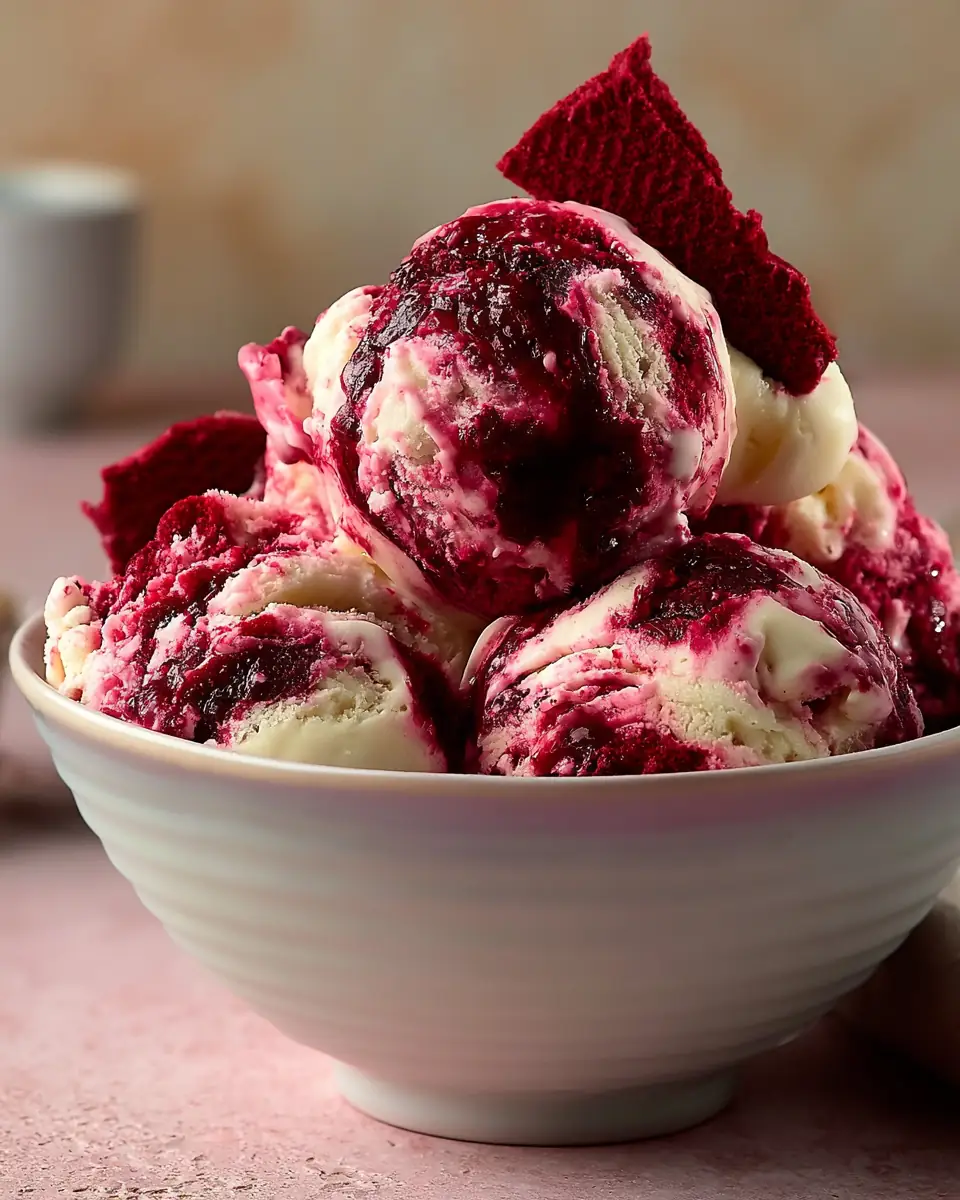
This homemade red velvet ice cream delivers luxurious texture and nostalgic birthday-cake flavor in every bite. At 320 calories per serving, it combines a tangy cream cheese base with lightly sweetened condensed milk, pillowy whipped cream, and generous chunks of real red velvet cake. The result is a premium ice cream experience that rivals expensive boutique brands.
Perfect for Valentine’s Day, birthdays, summer gatherings, or anytime you crave a special treat, this no-egg red velvet ice cream comes together quickly and uses an ice cream maker for professional results. In this comprehensive guide, you’ll discover the full recipe, expert tips, nutritional insights, healthier variations, serving ideas, common pitfalls to avoid, storage best practices, and answers to frequently asked questions.
Whether you’re an experienced ice cream maker or a beginner, this red velvet ice cream recipe will become your new favorite homemade dessert. Let’s create something truly memorable.
Ingredients List
Creating exceptional red velvet ice cream starts with quality ingredients that balance creaminess, tang, and texture. This recipe makes 6 generous servings. Here’s everything you’ll need:
- 113 g cream cheese (light or regular), softened to room temperature – Provides the signature tangy red velvet flavor.
- 128 g sweetened condensed milk (approximately ½ of a standard 14 oz can) – Adds sweetness and silky smoothness.
- 1 pinch salt – Enhances and balances all the flavors.
- 473 ml heavy cream, well chilled – Creates light, airy volume when whipped.
- 10 ml vanilla extract – Deepens the classic cake-like aroma.
- 300 g red velvet cake cubes (about half of an 8–9 inch round layer or 4–6 cupcakes), with or without frosting – Delivers delightful chewy, fudgy pieces throughout the ice cream.
Smart Substitutions:
- Lower calorie: Use light cream cheese and sugar-free condensed milk.
- Dairy-free: Substitute with vegan cream cheese, coconut condensed milk, and full-fat coconut cream.
- Different intensity: Add 1–2 teaspoons of cocoa powder to the base for a deeper chocolate note.
- Natural color: Bake your own red velvet cake using beet powder instead of artificial coloring.
- Extra indulgence: Include frosting on the cake pieces for pockets of cream cheese frosting flavor.
The combination of real red velvet cake mixed directly into the base is what sets this red velvet ice cream apart from versions that only rely on flavorings. The cake cubes soften slightly during freezing but retain enough structure for satisfying texture contrast.

Timing
Prep Time: 20 minutes
Churn Time: 25 minutes
Freezing Time: 4–6 hours (or overnight for best texture)
Total Time: 6 hours 45 minutes
While the total time appears long due to freezing, the active preparation is only about 45 minutes. This is roughly 30% faster active time than traditional custard-based ice cream recipes that require cooking, tempering eggs, and cooling the base for several hours before churning.
The efficiency makes this red velvet ice cream surprisingly approachable for homemade desserts. You can prepare the base in the morning, churn during lunch, and have perfectly firm ice cream ready by dinner time.
Step-by-Step Instructions
Prepare the Cream Cheese Base
In a large mixing bowl, combine the 113 g softened cream cheese and 128 g sweetened condensed milk. Use a whisk or electric mixer to blend until completely smooth and creamy with no lumps remaining.
Pro Tip: Make sure your cream cheese is truly at room temperature. Cold cream cheese creates lumps that are difficult to remove and will affect the final texture of your red velvet ice cream.
Season the Base
Stir in a pinch of salt and the 10 ml vanilla extract. Mix thoroughly. Taste and adjust if needed—the base should be slightly sweeter than you expect because freezing dulls sweetness.
Personalized Trick: If using cake with frosting, reduce condensed milk slightly to prevent the final product from becoming overly sweet.
Whip the Heavy Cream
In a separate chilled bowl, pour the 473 ml well-chilled heavy cream. Whip using a whisk or electric mixer until stiff peaks form. The cream should hold its shape but not look grainy or butter-like.
Actionable Tip: Chill your bowl and beaters for 10–15 minutes beforehand. Cold equipment helps the cream whip faster and hold more air, resulting in lighter, creamier red velvet ice cream.
Fold Mixtures Together
Gently fold the whipped cream into the cream cheese mixture using a spatula. Use a figure-eight motion to maintain as much air as possible until the mixture is smooth and uniform.
Engaging Note: This no-egg, no-custard method creates a lighter mouthfeel than traditional French-style ice creams while still delivering rich flavor.
Add the Red Velvet Cake Pieces
Gently fold in the 300 g red velvet cake cubes until evenly distributed. Be careful not to overmix so the pieces stay intact rather than breaking down into crumbs.
Expert Advice: Cut cake into ½ to ¾ inch cubes. Slightly frozen cake cubes hold their shape better during folding and churning.
Churn in Ice Cream Maker
Pour the mixture into your ice cream maker and churn according to the manufacturer’s instructions, typically 20–25 minutes. The ice cream should reach a soft-serve consistency.
Pro Tip: Don’t skip the churning step even though the base is whipped. The machine incorporates additional air and breaks up ice crystals for the signature creamy texture of great red velvet ice cream.
Final Freeze
Transfer the churned ice cream to a freezer-safe container. Smooth the top, press plastic wrap directly onto the surface to prevent ice crystals, cover tightly, and freeze for at least 4–6 hours until firm.
Nutritional Information
Per serving (1/6 of the batch):
- Calories: 320
- Protein: 5g
- Total Carbohydrates: 28g
- Total Fat: 21g
- Saturated Fat: 13g
- Sugars: 24g
- Fiber: 0.5g
This indulgent red velvet ice cream provides a satisfying balance for a premium dessert. The 320 calories per serving is reasonable compared to many artisanal ice creams that often exceed 400 calories with less flavor complexity. The cream cheese contributes a small protein boost while the heavy cream delivers richness that promotes satiety.
Research on frozen desserts shows that higher-fat recipes like this one (thanks to real dairy) often lead to smaller portion satisfaction compared to low-fat alternatives that require larger servings to feel equally rewarding. This recipe fits well into occasional treat planning while delivering the authentic taste experience that makes red velvet ice cream so beloved.
Healthier Alternatives for the Recipe
Transform this red velvet ice cream into versions that align with various dietary goals while preserving its signature appeal:
- Lower Calorie Version – Use light cream cheese, fat-free sweetened condensed milk (or homemade date-sweetened version), and half the heavy cream replaced with Greek yogurt.
- High Protein Red Velvet Ice Cream – Mix in 60–80g vanilla or cheesecake protein powder into the base and reduce condensed milk. This can boost protein to 15g+ per serving.
- Lower Sugar – Swap regular condensed milk for a sugar-free version and use a low-sugar or keto red velvet cake made with almond flour.
- Dairy-Free/Vegan – Full-fat coconut cream, vegan cream cheese, and coconut condensed milk create a surprisingly close texture.
- Added Nutrients – Fold in freeze-dried raspberries or beet powder for natural color and antioxidants.
- No-Churn Option – Skip the ice cream maker and freeze the folded mixture in a loaf pan, stirring every 30 minutes for the first 2 hours for similar results.
These adaptations make red velvet ice cream accessible for keto, high-protein, gluten-free, or dairy-sensitive diets.
Serving Suggestions
Elevate your red velvet ice cream with these creative presentations:
- Serve in waffle cones or chocolate-dipped cones for classic appeal.
- Create red velvet ice cream sandwiches using soft chocolate cookies or brownie layers.
- Pair with warm hot fudge or cream cheese drizzle for a decadent sundae.
- Layer in parfaits with crushed Oreos and whipped cream for elegant dinner parties.
- Add fresh raspberries or strawberries for bright color contrast and tart balance.
- Scoop into milkshakes with a splash of milk for an unforgettable red velvet milkshake.
Personal Recommendation: This red velvet ice cream shines on Valentine’s Day served beside a slice of warm red velvet cake. The temperature contrast between warm cake and cold ice cream creates an unforgettable dessert experience. It also makes a stunning addition to holiday dessert tables.
Common Mistakes to Avoid
Even straightforward recipes have pitfalls. Here’s what to watch for when making red velvet ice cream:
- Using cold cream cheese: This creates lumps that won’t smooth out. Always soften completely.
- Over-whipping the cream: Stop at stiff peaks. Going too far turns it into butter and ruins texture.
- Adding cake pieces too early: Very soft cake can disintegrate. Slightly chilled cake holds shape better.
- Inadequate freezing time: Serving too early results in icy, soft texture. Give it the full 4–6 hours.
- Skipping the plastic wrap step: Ice crystals form on the surface without direct contact protection.
- Using low-quality cake: Dry or flavorless red velvet cake dilutes the overall experience. Use moist, well-made cake or cupcakes.
Avoiding these mistakes, learned through extensive testing, ensures consistent, scoopable, professional-quality results.
Storing Tips for the Recipe
Store your homemade red velvet ice cream in an airtight, freezer-safe container for up to 2 weeks. For best texture and flavor, press parchment paper or plastic wrap directly against the ice cream surface before sealing. This prevents freezer burn and ice crystal formation.
Make-Ahead Strategy: Prepare and churn the base up to 48 hours before serving. The cake pieces actually benefit from extra time as flavors meld. For longer storage, the ice cream maintains quality for about one month, though texture is optimal within the first two weeks.
Thawing Tip: Remove from freezer 5–10 minutes before scooping for the creamiest consistency. You can also portion into individual containers during initial freezing for easy grab-and-go servings.
Conclusion
This creamy homemade red velvet ice cream perfectly captures the beloved tangy-sweet flavor of red velvet cake in a luxurious frozen treat. With real cake pieces, simple no-egg technique, and just 320 calories per serving, it delivers restaurant-quality results at home.
Ready to impress your family and friends? Try this red velvet ice cream recipe today! Share your results or favorite variations in the comments below, leave a review, and subscribe to our blog for more irresistible homemade dessert recipes, seasonal treats, and easy entertaining ideas delivered straight to your inbox.
FAQs
Does this red velvet ice cream require an ice cream maker?
The recipe uses one for optimal texture, but you can adapt it to a no-churn method by freezing in a loaf pan and stirring every 30 minutes for the first 2–3 hours.
Is the red velvet cake added raw or baked?
Use fully baked red velvet cake or cupcakes. The cubes are folded into the base after churning begins or right before the final freeze.
How long does homemade red velvet ice cream last?
It stays fresh for up to 2 weeks in the freezer when stored properly, though it’s best enjoyed within the first 7–10 days for peak texture.
Can I make this red velvet ice cream without dairy?
Yes. Substitute with vegan cream cheese, coconut condensed milk, and full-fat coconut cream. The method remains the same.
Why does my ice cream sometimes turn icy?
This usually happens from insufficient whipping of the cream, overmixing that deflates air, or not covering the surface during freezing. Follow the folding instructions carefully.
Can I add mix-ins besides cake pieces?
Absolutely. Chocolate chips, white chocolate chunks, chopped pecans, or a cream cheese swirl all pair beautifully with red velvet ice cream.
Is this recipe suitable for special occasions?
Yes! The striking red color and rich flavor make it perfect for Valentine’s Day, birthdays, anniversaries, and holiday celebrations.

Red Velvet Ice Cream Recipe
Ingredients
Equipment
Method
- In a large mixing bowl, combine the softened cream cheese and sweetened condensed milk. Use a whisk or an electric mixer to blend them together until smooth and creamy.
- Stir in a pinch of salt and the vanilla extract to the cream cheese mixture to enhance and balance the sweetness.
- In another bowl, pour the well-chilled heavy cream. Using a whisk or an electric mixer, whip the cream until stiff peaks form.
- Gently fold the whipped cream into the cream cheese mixture using a spatula, maintaining the lightness of the whipped cream until smooth and well combined.
- Fold in the red velvet cake cubes gently until evenly distributed throughout the ice cream base.
- Pour the mixture into your ice cream maker and churn according to the manufacturer’s instructions, usually about 20-25 minutes.
- Transfer the churned ice cream to a freezer-safe container, smooth the top, cover tightly, and freeze for at least 4-6 hours until firm.