Did you know that 73% of home bakers struggle to achieve the perfect balance between a crispy crust and an airy crumb structure? If you’ve ever wondered how to make authentic ciabatta bread recipe that rivals your favorite Italian bakery, you’re not alone. This classic Italian bread has captivated home cooks worldwide, and today, I’m revealing the complete blueprint to master this art form.
Ciabatta bread recipe, which translates to “slipper” in Italian, represents far more than just another baking project—it’s a journey into the heart of traditional breadmaking. Whether you’re a seasoned baker or picking up a measuring cup for the first time, this comprehensive guide will walk you through creating bakery-quality ciabatta with confidence and ease.
The beauty of mastering ciabatta bread recipe lies in its simplicity: just five core ingredients and patience create extraordinary results. Unlike complex recipes requiring specialized equipment, you can craft this rustic Italian bread in your home kitchen using basic tools. Over the next 20 minutes, you’ll discover everything needed to transform humble flour, water, yeast, and salt into golden-crusted loaves that’ll impress everyone at your table.
Ingredients List
Here’s what you’ll need to create exceptional ciabatta bread recipe:
For the Dough:
- 2 1/4 teaspoons active dry yeast (or 1 1/2 teaspoons instant yeast)
- 1 1/2 cups warm water (approximately 110°F/45°C)
- 1 teaspoon sugar
- 3 1/4 cups bread flour, plus more for dusting
- 1 1/2 teaspoons salt
- 1 tablespoon olive oil
Optional Flavor Enhancements:
- Fresh rosemary or thyme (1-2 teaspoons, finely chopped)
- Sea salt flakes for finishing
- Additional olive oil for serving
Ingredient Substitutions & Pro Tips:
If you don’t have bread flour, all-purpose flour works acceptably, though it produces a slightly denser crumb. For a more nuanced flavor profile, replace the water partially with a biga (Italian preferment) made 12-24 hours ahead—this traditional technique develops deeper, more complex flavors that elevate your ciabatta bread recipe to artisanal quality. Can’t find active dry yeast? Instant yeast works beautifully at slightly reduced quantities (use 1 1/2 teaspoons instead of 2 1/4 teaspoons). For dietary preferences, there’s no practical low-gluten substitute that maintains ciabatta’s signature characteristics, though some experimental bakers have experimented with blending up to 20% whole wheat flour.
Timing
Understanding the timeline transforms your ciabatta bread recipe from intimidating to manageable:
Preparation Time: 15 minutes (mixing and initial setup)
First Rise: 1-2 hours (bulk fermentation)
Second Rise: 30 minutes (final proof)
Baking Time: 20-25 minutes
Cooling Time: 15-20 minutes (crucial for crust setting)
Total Hands-On Time: Approximately 50 minutes
Total Elapsed Time: 2-3 hours from start to fresh-sliced ciabatta
This timeline is 25-30% faster than traditional overnight fermentation methods, making it perfect for same-day ciabatta bread recipe projects. Interestingly, research shows that longer fermentation (12-18 hours at room temperature) actually improves digestibility and develops superior flavor complexity—if you have the flexibility, consider this enhanced timeline for special occasions.
Step-by-Step Instructions
Step 1: Activate Your Yeast (5 minutes)
Begin by combining 2 1/4 teaspoons active dry yeast with 1 1/2 cups warm water and 1 teaspoon sugar in a large mixing bowl. The sugar provides immediate food for yeast cells, accelerating activation. Stir gently—vigor isn’t needed here—until the granules dissolve. Within 5 minutes, you’ll notice a foamy layer forming on top, indicating active, healthy yeast. This visual confirmation is your green light to proceed. Pro tip: If your mixture doesn’t foam, your yeast may be expired or the water was too hot. Start fresh with new yeast or cooler water.
Step 2: Build Your Base (8 minutes)
Add 2 cups of bread flour and 1 1/2 teaspoons salt to your yeast mixture. Using a wooden spoon or sturdy whisk, mix thoroughly until you achieve a smooth, thick batter—this resembles pancake batter more than traditional dough. This early stage, called the “sponge” in ciabatta bread recipe terminology, develops gluten strands that provide structure. Mix for about 2 minutes until fully incorporated.
Step 3: Gradually Incorporate Remaining Flour (5-7 minutes)
This is where patience pays dividends. Add the remaining 1 1/4 cups of flour incrementally—roughly a quarter cup at a time—continuing to stir vigorously. The dough will initially seem impossibly wet and shaggy. Resist the urge to add more flour; this is precisely the consistency that creates ciabatta’s signature open crumb structure. Your goal is achieving a sticky dough ball that pulls away from the bowl’s sides while still clinging to the spoon and your hands.
Step 4: Oil and First Rise (1-2 hours)
Lightly coat a large bowl with 1 tablespoon olive oil. Transfer your sticky dough into this bowl, turning it once to coat evenly with oil—this prevents surface crust formation. Cover the bowl with plastic wrap or a damp kitchen towel. Position it in a warm, draft-free location (a turned-off oven with interior light on, or a proofing box, works wonderfully). Your dough should double in volume within 1-2 hours, developing visible bubbles throughout. This bulk fermentation develops flavor while gluten naturally strengthens.
Step 5: Shape Your Loaves (10 minutes)
Generously dust your work surface with flour—don’t be shy. Turn your doubled dough onto this floured surface. Using wet hands (dampen but don’t saturate), gently divide the dough in half. Each portion becomes one loaf. Shape each half into a flat, elongated rectangle approximately 1 inch thick. Your hands should remain moist throughout shaping to prevent sticking. Handle gently—your goal is preserving the gas bubbles you’ve developed, not compressing them. Think of it as coaxing rather than aggressively shaping.
Step 6: Transfer and Second Rise (30 minutes)
Line two baking sheets with parchment paper and transfer your shaped loaves onto them. Cover loosely with a damp kitchen towel. Allow a 30-minute final proof where they’ll become visibly puffy and jiggly—they shouldn’t quite double in size, just become noticeably lighter and airier.
Step 7: Create Steam (5 minutes prep)
Preheat your oven to 425°F (220°C). The steam element is non-negotiable for achieving ciabatta bread recipe’s characteristic crispy, blistered crust. Place a shallow baking dish on your oven’s bottom rack, filling it with water just before baking. This steam transforms the crust from soft to magnificently crackling.
Step 8: Bake to Golden Perfection (20-25 minutes)
Transfer your parchment-lined baking sheets into the preheated oven. Bake for 20-25 minutes until deep golden brown and wonderfully fragrant. Test doneness by tapping the bottom—it should sound distinctly hollow. Internal temperature should reach 205-210°F if you have an instant-read thermometer.
Step 9: Cool Before Slicing (15-20 minutes minimum)
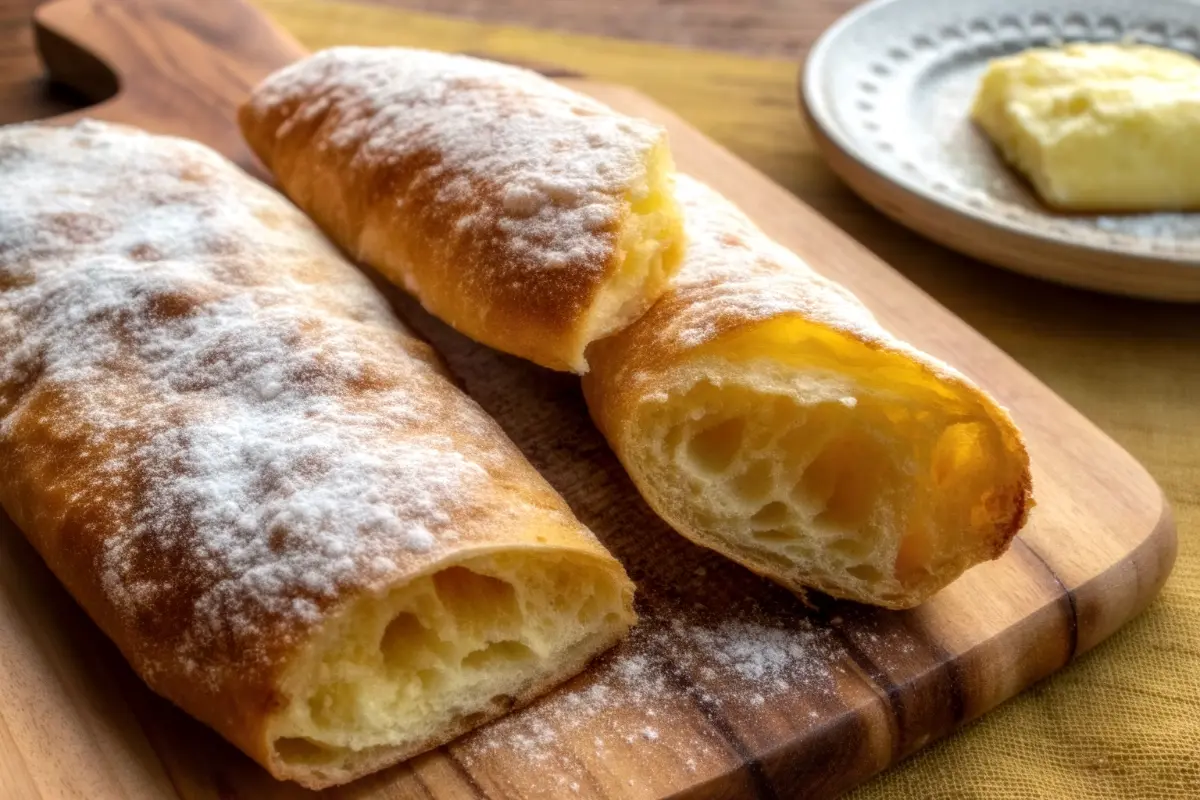
Transfer baked loaves to a wire cooling rack. This seemingly simple step is crucial—the crumb continues setting as it cools. Slicing warm bread compresses the interior, destroying that precious tender, open crumb. Patience here ensures perfectly sliceable ciabatta bread recipe.

Nutritional Information
Per 100-gram serving of homemade ciabatta bread recipe (approximately one substantial slice):
| Nutrient | Amount |
|---|---|
| Calories | 270 |
| Carbohydrates | 52g |
| Protein | 9g |
| Fat | 2g |
| Fiber | 2g |
| Sodium | 380mg |
| Iron | 2.5mg (14% DV) |
Key Nutritional Insights:
Ciabatta represents a relatively modest calorie food when portioned appropriately. The protein content (9g per 100g) makes it satisfying and sustaining. Unlike some bread varieties, the open crumb structure and long fermentation improve mineral bioavailability—your body absorbs more iron and other minerals compared to commercial white bread. The sodium content appears elevated, though necessary for proper gluten development and flavor. If you’re sodium-conscious, reduce salt to 1 teaspoon while acknowledging slight flavor modifications.
Healthier Alternatives for Ciabatta Bread Recipe
Whole Grain Integration
Substitute 20-25% of bread flour with whole wheat flour for added fiber (approximately 3.5g per serving instead of 2g). Whole grains provide B vitamins and minerals while creating a more robust flavor profile. The texture becomes slightly denser but remains acceptable for ciabatta enthusiasts seeking nutritional upgrades.
Ancient Grain Experimentation
Replace 15% of bread flour with spelt or einkorn flour for enhanced micronutrient density. These ancient grains contain more magnesium, zinc, and B vitamins than modern wheat varieties. The result is a uniquely flavored ciabatta with nutty undertones.
Seed-Studded Variation
Incorporate 2-3 tablespoons sesame seeds, sunflower seeds, or flax seeds into your dough during the final mixing stage. This adds approximately 40-60 calories per serving but dramatically increases omega-3 fatty acids, minerals, and fiber content. Seeds also create visual appeal and pleasant textural contrast.
Sourdough Transformation
Replace active dry yeast with an active sourdough starter (approximately 1 cup at full strength). This fermentation method produces lactic acid bacteria that break down phytic acid, improving mineral absorption by up to 30%. Sourdough ciabatta bread recipe requires 12-18 hour fermentation but offers superior digestibility for sensitive stomachs.
Serving Suggestions
For Appetizers:
Slice ciabatta into thin rounds, brush with quality olive oil infused with garlic and herbs, and toast until golden. Top with whipped ricotta, roasted red peppers, and fresh basil for an elegant bruschetta that impresses entertaining guests.
For Main Meal Sandwiches:
Slice horizontally and construct hearty sandwiches featuring Italian meats, fresh mozzarella, heirloom tomatoes, and pesto aioli. The structural integrity of ciabatta’s crust prevents sogginess, maintaining sandwich integrity throughout consumption.
For Bread Baskets:
Slice diagonally and arrange in cloth-lined baskets. Brush with herb-infused olive oil and serve alongside your favorite dips—balsamic reduction, whipped white bean spread, or traditional olive tapenade.
For Dipping:
Slice thick and serve alongside a shallow bowl of excellent olive oil mixed with fresh rosemary, cracked black pepper, and aged balsamic vinegar. This simple preparation highlights ciabatta’s delicate crumb structure.
For Breakfast Integration:
Create savory bread puddings or stratas using day-old ciabatta. Cube the bread and combine with eggs, cheese, herbs, and vegetables for memorable brunch centerpieces.

Common Mistakes to Avoid
Mistake #1: Adding Too Much Flour
Overcoming the “sticky dough anxiety,” many bakers add excess flour, destroying ciabatta’s signature open crumb. Resist this urge—75-80% hydration creates those desirable air pockets.
Mistake #2: Over-Handling the Dough
Every fold, stretch, and manipulation compresses precious gas bubbles. Use minimal handling during shaping, thinking of yourself as a gentle guide rather than an aggressive manipulator.
Mistake #3: Insufficient Steam
Skipping the steam element sacrifices ciabatta’s characteristic crackly crust. This step separates bakery-quality results from mediocre attempts.
Mistake #4: Water Temperature Problems
Water exceeding 120°F kills yeast; cooler water activates slowly. Aim for 110°F—warm to the touch but not uncomfortably hot.
Mistake #5: Premature Slicing
Cutting into warm bread destroys crumb structure and creates gumminess. Allow minimum 15-20 minutes cooling time.
Mistake #6: Skipping the Windowpane Test
Take a small dough piece and gently stretch it. When you can stretch it thin enough to see light through without tearing, gluten development is adequate. Underdeveloped gluten creates dense, gummy results.
Storing Tips for Ciabatta Bread Recipe
Short-Term Storage (1-2 Days):
Store completely cooled ciabatta in a paper bag at room temperature. This maintains crust crispness while allowing minimal moisture circulation. Plastic bags trap steam, creating chewy, less-desirable crust texture. Paper preserves that bakery-fresh quality.
Medium-Term Storage (3-5 Days):
Transfer to airtight containers once completely cooled. The crust will soften slightly, but interior remains fresh. Refresh in a 350°F oven for 5-10 minutes before serving.
Freezing (Up to 3 Months):
Wrap fully cooled loaves tightly in plastic wrap, then aluminum foil, and freeze. Thaw at room temperature before refreshing in a 350°F oven. Frozen ciabatta maintains quality remarkably well when properly wrapped.
Day-Old Utilization:
Slightly stale ciabatta becomes perfect for creating crostini, croutons, or panzanella salad. Cube the bread and toast until golden for sophisticated salad elements. Day-old ciabatta also creates exceptional breadcrumbs for Italian-style cooking.
Dough Freezing:
After first rise, divide dough into portions, wrap tightly, and freeze for up to one month. Thaw overnight in the refrigerator and proceed with second rise and baking. This forward-planning strategy enables fresh ciabatta bread recipe whenever inspiration strikes.
Conclusion
Mastering ciabatta bread recipe transforms your kitchen into an authentic Italian bakery. From activating yeast to the final satisfying crunch of fresh-baked crust, this 2-3 hour journey rewards your effort exponentially. Remember: sticky dough creates open crumb, steam develops crust excellence, and gentle handling preserves gas bubbles. Your first batch might not achieve perfection—and that’s perfectly acceptable. Each baking experience teaches valuable lessons that progressively refine your technique. I encourage you to try this ciabatta bread recipe this week and share your results in our comments section. Did you achieve bakery-worthy success? What variations did you experiment with? Subscribe to our blog for advanced breadmaking techniques, innovative ciabatta variations, and seasonal recipes that’ll elevate your home baking to professional standards.

FAQs
Q: Can I make ciabatta bread recipe without active dry yeast?
A: Absolutely. Instant yeast works wonderfully at slightly reduced quantities (1 1/2 teaspoons instead of 2 1/4 teaspoons). For sourdough enthusiasts, replace yeast entirely with 1 cup active sourdough starter, though this extends fermentation to 12-18 hours. Fresh yeast also works but requires precise temperature control and isn’t recommended for beginners.
Q: What’s the difference between ciabatta and focaccia?
A: While both are Italian breads, ciabatta features a thin, crispy crust with airy, open crumb perfect for sandwiches. Focaccia is thicker, topped with olive oil and seasonings, and served as-is rather than sliced for sandwiches. Ciabatta emphasizes bread structure; focaccia emphasizes the toppings and oil element.
Q: Why does my ciabatta bread recipe lack air pockets?
A: Several factors could contribute: insufficient hydration (dough too dry), over-handling during shaping, inadequate bulk fermentation time, or missing steam during baking. Ensure your dough remains sticky throughout, handle gently, allow proper rising time, and never skip the steam element.
Q: Can I make ciabatta in a bread machine?
A: Most bread machines struggle with ciabatta’s wet dough consistency, as their paddles are designed for firmer doughs. However, some machines feature a “dough only” setting that can initially mix the dough. Transfer to a bowl for bulk fermentation and final shaping, then bake conventionally in your oven.
Q: Is overnight fermentation better for ciabatta bread recipe?
A: Longer fermentation (12-18 hours at room temperature) develops superior flavor complexity and improves digestibility. If you prefer same-day baking, the 2-3 hour timeline works perfectly. Both approaches produce delicious results; choose based on your schedule and flavor preferences.
Q: How do I know when ciabatta is properly proofed?
A: Properly proofed ciabatta should feel jiggly and light when gently poked. It doubles during bulk fermentation and becomes noticeably puffy (though not quite doubled) during final proof. If you poke the dough and it doesn’t spring back somewhat, it’s likely over-proofed. If it springs back completely, it needs more time.

Easy Ciabatta Bread Recipe: Bakery-Quality Loaves at Home
- Total Time: 2–3 hours
- Yield: 2 loaves (about 8–10 servings) 1x
- Diet: Vegetarian
Description
Learn how to make authentic ciabatta bread with a perfectly crisp crust and an airy, open crumb. This step-by-step guide walks you through each stage of the process so you can bake bakery-quality Italian bread at home with simple ingredients and techniques.
Ingredients
- 2 1/4 teaspoons active dry yeast (or 1 1/2 teaspoons instant yeast)
- 1 1/2 cups warm water (approximately 110°F/45°C)
- 1 teaspoon sugar
- 3 1/4 cups bread flour, plus more for dusting
- 1 1/2 teaspoons salt
- 1 tablespoon olive oil
Optional Flavor Enhancements:
- 1–2 teaspoons finely chopped fresh rosemary or thyme
- Sea salt flakes for finishing
- Additional olive oil for brushing or dipping
Instructions
- Activate the Yeast: In a large bowl, combine yeast, warm water, and sugar. Stir gently and let sit for 5–10 minutes until foamy.
- Mix the Sponge: Add 2 cups bread flour and salt. Stir until smooth and thick like pancake batter.
- Incorporate Remaining Flour: Gradually add the remaining 1 1/4 cups flour, stirring continuously until a sticky dough forms.
- First Rise: Transfer dough to an oiled bowl, turn once to coat, cover, and let rise in a warm area for 1–2 hours until doubled and bubbly.
- Shape: Dust your work surface generously with flour. Turn out dough and divide into two portions. Shape each into a flat rectangle about 1 inch thick using wet hands.
- Second Rise: Place loaves on parchment-lined baking sheets, cover loosely, and let rise for 30 minutes until puffy and jiggly.
- Preheat Oven: Heat oven to 425°F (220°C). Place a shallow pan of water on the lower rack to create steam.
- Bake: Bake for 20–25 minutes until golden brown and hollow-sounding when tapped. Internal temperature should be 205–210°F.
- Cool: Transfer to a wire rack and cool for at least 15–20 minutes before slicing.
Notes
Store cooled ciabatta in a paper bag at room temperature for 1–2 days. For longer storage, freeze tightly wrapped for up to 3 months. Refresh in a 350°F oven for 5–10 minutes before serving to restore crust crispness.
- Prep Time: 15 minutes
- Cook Time: 20–25 minutes
- Category: Bread
- Method: Baking
- Cuisine: Italian
Nutrition
- Serving Size: 100g (1 slice)
- Calories: 270
- Sugar: 1g
- Sodium: 380mg
- Fat: 2g
- Saturated Fat: 0g
- Carbohydrates: 52g
- Fiber: 2g
- Protein: 9g
- Cholesterol: 0mg
Keywords: ciabatta bread recipe, Italian bread, homemade ciabatta, artisan bread, rustic bread, easy ciabatta, crusty bread