Creating a sourdough focaccia recipe brings together the rustic charm of artisan bread and the signature dimpled surface of classic Italian flatbreads. The result is a light, fluffy, and richly flavored centerpiece that pairs well with countless meals. From wild yeast fermentation to aromatic toppings, this guide will walk you through every detail so you can enjoy a homemade loaf that’s both elegant and approachable.
Table of Contents
The Allure of Sourdough Focaccia
Many bakers appreciate the complexity of tangy sourdough flavor that arises from naturally cultivated yeast. The sourdough starter—a simple combination of flour and water left to capture wild yeast—lends a distinctive depth that commercial yeast just can’t replicate. It involves a careful proofing process, where time and temperature work together to build flavor and a wonderfully airy crumb.
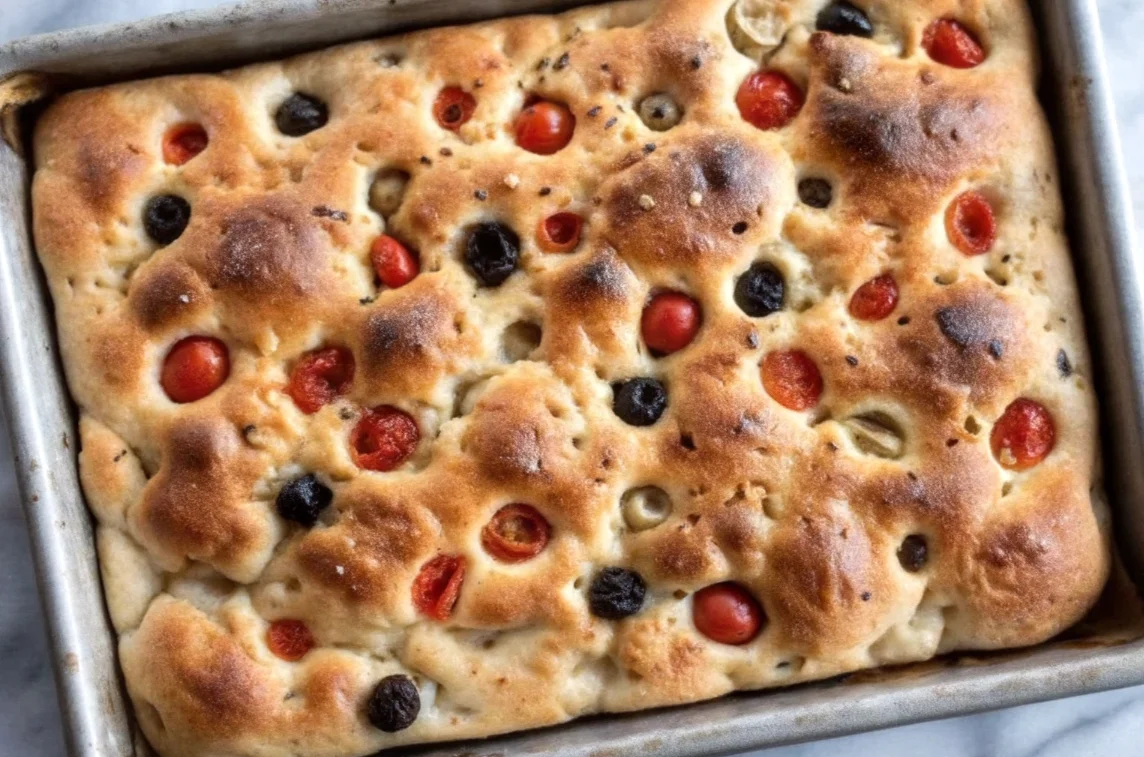
In addition to its wonderfully chewy interior, focaccia is known for its dimpled top. This surface traps pockets of olive oil, which bakes into the crust for a beautiful golden finish. If you’re curious about the broader context behind these transformations, you can learn more about the science of fermentation by visiting this resource. You’ll find an overview of how tiny organisms impact flavor and texture in various types of dough. For further exploration of different ways to use olive oil in bread-making, have a look at these guidelines.

Ingredients and Basic Preparations
Achieving an open crumb and a crisp exterior in sourdough focaccia depends heavily on ingredient quality and proper mixing techniques. The hallmark components include flour, water, salt, olive oil, and—of course—an active sourdough starter. If you’d like to delve into the different flour basics and how each type can affect your baking, check out this guide. Exploring flour varieties allows you to find the perfect blend that suits your taste preferences and supports optimal dough structure.
Below are the primary ingredients you’ll need:
- Flour: Typically all-purpose or bread flour, though a combination of flours is also possible.
- Water: Often room temperature or slightly warm to facilitate fermentation.
- Salt: Enhances the flavor of the dough and helps control fermentation.
- Olive Oil: Used generously for coating pans and drizzling over the dough.
- Active Sourdough Starter: Feeds on flour and water, producing the gases that give the bread its lift.
Equipment Essentials
To simplify your baking process and keep your focaccia dough manageable, gather a few key tools:
- Mixing Bowl: A large, sturdy bowl to handle the dough’s initial mixing and bulk fermentation.
- Dough Scraper: Helpful for handling sticky dough without over-flouring your work surface.
- Digital Scale: Ensures consistent measurements for flour, water, and sourdough starter.
- Rimmed Baking Sheet or Pan: Provides the dough room to expand and helps create the signature dimpled shape.
- Kitchen Thermometer (Optional): Useful for gauging dough or room temperature.
Step-by-Step Process for Sourdough Focaccia Recipe
Bringing your focaccia dough to life is part art and part science. The timeline can vary based on your kitchen’s climate, but patience is key for coaxing out that coveted aroma and structure.
- Feed and Activate Your Starter
- Feed your sourdough starter several hours before you begin mixing the final dough.
- Aim for a well-bubbled starter that has doubled in volume.
- Initial Mixing (Autolyse Optional)
- Combine your flour and water first. A brief rest (autolyse) allows the flour to hydrate.
- After the rest, blend in your sourdough starter and salt, mixing until the dough starts to come together.
- The dough might feel sticky at this stage, which is normal for high-hydration recipes.
- Bulk Fermentation
- Transfer the dough to a lightly oiled bowl.
- Perform a stretch-and-fold technique every 30 minutes for the first couple of hours. This method develops gluten structure without overworking the dough.
- Cover and let the dough sit until it has noticeably expanded, typically doubling in size.
- Shaping and Second Rise
- Gently ease the dough onto a generously oiled baking sheet or pan.
- Spread it out with your fingertips until it takes on an even thickness (it may spring back; let it rest and try again if needed).
- Cover the pan and allow a second rise until the dough appears puffed.
- Creating the Dimples
- Press your fingertips into the risen dough, forming rows of deep indentations.
- Drizzle olive oil over the surface, making sure to fill the dimples.
- Sprinkle salt or any selected herbs on top.
- Baking
- Preheat your oven to around 425°F (218°C).
- Slide the pan into the hot oven and bake for 20 to 25 minutes, or until the top develops a golden-brown hue.
- Let the focaccia rest on a cooling rack for a few minutes before slicing.
Toppings and Variations
One of the joys of a sourdough focaccia recipe is its versatility. Though classic focaccia often features just olive oil and salt, you can personalize your loaf with myriad toppings:
- Herbs: Common choices include rosemary, thyme, or oregano.
- Tomatoes: Slice fresh tomatoes or scatter halved cherry tomatoes for a pop of color.
- Onions or Garlic: Thinly sliced onions or roasted garlic bring additional flavor depth.
- Cheese: A savory twist can be achieved with grated Parmesan or crumbled feta.
- Olives: Green or black olives complement the dough’s tangy sourdough flavor nicely.
Feel free to experiment: the subtle sour notes of the dough can pair well with sweet or savory accents. A simple drizzle of olive oil and a sprinkling of sea salt is equally delightful if you prefer minimalism.
Serving Suggestions
Though sourdough focaccia has a character of its own, it also acts as a perfect blank canvas for your favorite accompaniments:
- As an Appetizer: Serve it alongside dips, spreads, or an assortment of olives.
- With Meals: Pair slices with soups or place them on the table to soak up sauces.
- Sandwich Base: Split the focaccia horizontally and layer on fresh ingredients like tomato, mozzarella, or prosciutto.
Use a sharp knife or pizza cutter to cut the focaccia into rectangular or square portions. The crisp edges and fluffy interior make each piece equally inviting.
Storage and Reheating
Retaining the characteristic texture of artisan bread requires the right storage methods. Once the loaf has cooled completely:
- Room-Temperature Storage: Wrap it in parchment or plastic wrap, then place it in a bread box or sealed container.
- Reheating: To restore some of the original crispness, lightly mist with water and warm in a preheated oven at about 350°F (175°C) for a few minutes.
If you plan on freezing leftover slices, wrap them tightly in foil or plastic and store in the freezer for up to a month. Thaw in the refrigerator or at room temperature before reheating.
Frequently Asked Questions
- Why is my dough so sticky?
Sourdough focaccia dough often has a higher water content, making it sticky. Lightly oil your hands or use a dough scraper for easier handling. - Can I incorporate different flour types?
Absolutely. You can blend whole-wheat, spelt, or other flours for a unique taste. Adjust the water ratio if you experiment with heavier flours. - How long should I let my dough rise?
Rise times vary based on temperature and starter activity. Generally, look for a noticeable increase in volume rather than a specific number of hours. - Can I add toppings before the second rise?
It’s typically best to add them after the dough has risen in the pan but before baking. This way, you’ll preserve the airy structure. - What’s the best way to keep the crust crispy?
Allow the focaccia to cool on a rack so moisture doesn’t get trapped underneath. A preheated baking surface also helps create a crisp bottom.
Troubleshooting Common Issues
- Dense Texture
If your loaf turns out dense, it may be under-proofed or need more stretches and folds to build gluten structure. - Flat or Deflated Dough
Over-proofing can cause the dough to lose strength, leading to a flat outcome. Keep an eye on your dough’s volume rather than relying solely on the clock. - Uneven Browning
Check your oven’s heat distribution. Rotating the pan halfway through baking can help achieve an even golden crust.
Conclusion
A homemade sourdough focaccia recipe offers a richly layered flavor profile and a delightfully airy crumb, all captured beneath a golden, olive-oil-laden crust. From nurturing a sourdough starter to experimenting with toppings, each step allows you to personalize the process to your taste. With time, practice, and attention to detail, you’ll master the art of creating an impressive, dimpled loaf ready to share at any table.


Sourdough Focaccia Recipe: A Step-by-Step Guide
- Total Time: 3 hours 25 minutes
- Yield: 1 large focaccia 1x
Description
A beautifully dimpled, golden-brown sourdough focaccia that boasts a light interior and a crisp crust. Crafted with a naturally fermented sourdough starter, this bread offers rich flavor and texture, perfect for sharing at any gathering.
Ingredients
500g all-purpose or bread flour (plus extra for dusting)
350ml water (room temperature)
10g salt
2 tablespoons olive oil (plus more for coating and drizzling)
100g active sourdough starter, well-fed and bubbly
Instructions
Feed Your Starter: Ensure your sourdough starter is active and bubbly by feeding it several hours before mixing.
Mix (Autolyse Optional): In a large bowl, combine flour and water. Let rest for 30 minutes, then add salt, olive oil, and your starter. Mix until incorporated.
Bulk Fermentation: Cover the bowl. Perform stretch-and-folds every 30 minutes for about 2 hours. The dough should become smoother and more elastic.
Second Rise: Lightly grease a rimmed baking sheet. Gently transfer the dough, spreading it out with your fingertips. Cover and let it rise until puffy (1–2 hours, depending on room temperature).
Dimple and Top: Press your fingertips into the risen dough to create dimples. Drizzle extra olive oil over the surface, letting it pool in the dimples. Optionally sprinkle sea salt, herbs, or other desired toppings.
Bake: Preheat the oven to 425°F (218°C). Bake for 20–25 minutes or until the focaccia is golden brown. Cool slightly on a rack before slicing and serving.
Notes
If the dough is very sticky, lightly oil your hands or use a dough scraper.
You can adjust the toppings to your preference; popular choices include rosemary, olives, and sliced tomatoes.
Rotate the pan halfway through baking for even browning.
- Prep Time: 3 hours
- Cook Time: 25 minutes
- Category: Bread
- Method: Baking
- Cuisine: Italian
Keywords: sourdough focaccia, artisanal bread, focaccia recipe, sourdough starter, wild yeast, dimpled bread