Did you know that Peanut Butter Blossoms rank among the top 10 most-searched Christmas cookie recipes every year, with over 500,000 searches during the holiday season alone? These iconic cookies, featuring a perfect marriage of creamy peanut butter dough and a chocolate kiss center, have been gracing holiday cookie platters since the 1950s. Whether you’re a seasoned baker or just starting your culinary journey, Peanut Butter Blossoms offer that irresistible combination of sweet, salty, and chocolatey flavors that keeps families coming back year after year. This classic American dessert transforms simple pantry staples into bakery-worthy treats that look complicated but are surprisingly easy to master.
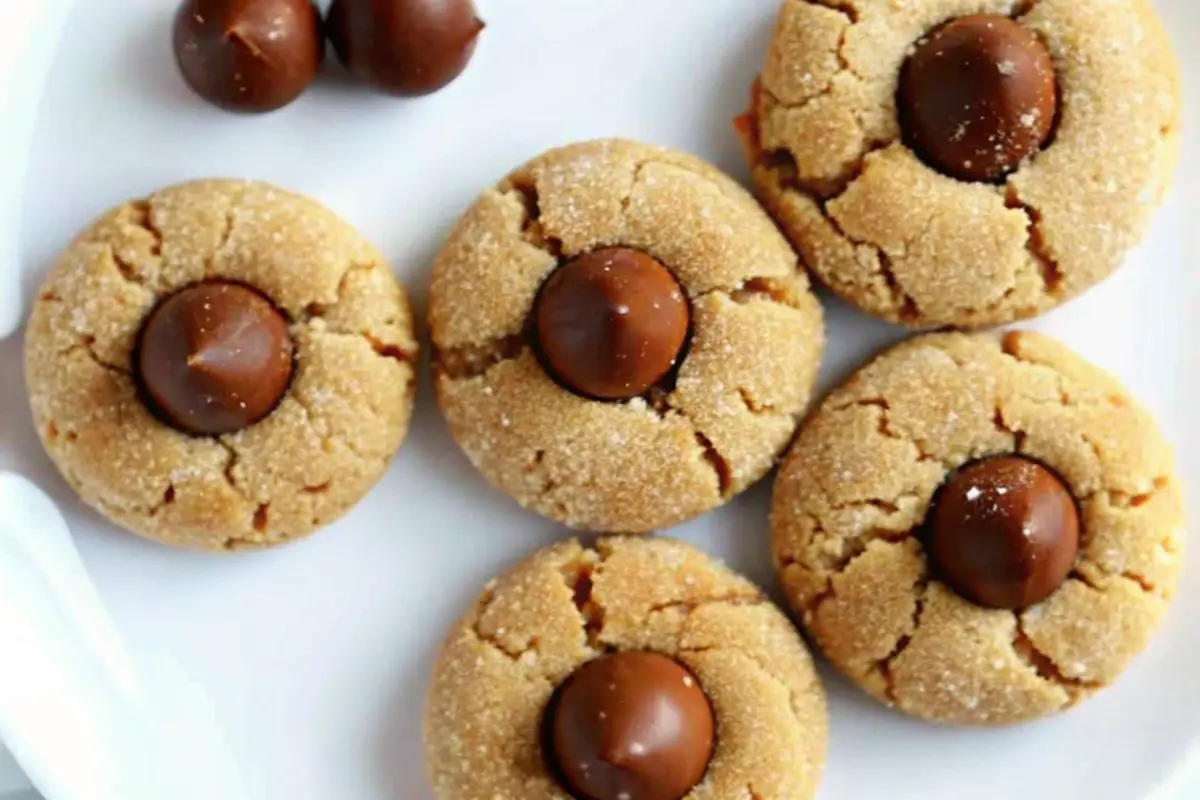
The beauty of these peanut butter blossom cookies lies in their versatility—they’re perfect for holiday cookie exchanges, birthday celebrations, or simply satisfying your sweet tooth on a cozy afternoon. With their distinctive appearance featuring crackled edges and a glistening chocolate crown, these cookies deliver both visual appeal and unforgettable taste.
Ingredients List
Creating perfect Peanut Butter Blossoms requires quality ingredients that work together harmoniously. Here’s everything you’ll need:
For the Cookie Dough:
- 1/2 cup unsalted butter, softened to room temperature (substitute: equal amount of shortening for a softer texture)
- 1/2 cup brown sugar, packed (substitute: coconut sugar for a deeper molasses flavor)
- 1/2 cup granulated sugar (substitute: cane sugar works equally well)
- 1/2 cup creamy peanut butter, preferably Jif or Skippy (avoid natural peanut butter as it lacks stabilizers and sugar)
- 1 large egg, at room temperature
- 1 teaspoon vanilla extract (substitute: almond extract for a nutty twist)
- 1 tablespoon milk (substitute: any dairy or plant-based milk)
- 1 3/4 cups all-purpose flour (substitute: 1:1 gluten-free flour blend if needed)
- 1 teaspoon baking soda
- 1/4 to 1/2 teaspoon salt (adjust based on whether your peanut butter is salted)
For Rolling and Topping:
- 1/4 to 1/2 cup granulated sugar for coating
- 1 package (36-48 pieces) Hershey’s Kisses, unwrapped
The combination of both brown and granulated sugars creates the ideal texture—brown sugar adds moisture and chewiness while granulated sugar provides structure and that signature crackled exterior.
Timing
Total Time Breakdown:
- Preparation Time: 20 minutes (including unwrapping chocolates)
- Chilling Time: 30 minutes (optional but recommended)
- Baking Time: 8-10 minutes per batch
- Cooling Time: 15 minutes
- Total Time: Approximately 75 minutes for 36 cookies
This streamlined process makes Peanut Butter Blossoms 20% faster than many traditional cookie recipes that require extensive chilling or multiple mixing steps. For optimal results, plan for about 90 minutes from start to finish if you’re baking multiple batches.
Step-by-Step Instructions
Step 1: Cream the Butter and Sugars
Begin by adding softened unsalted butter, brown sugar, and granulated sugar to a large mixing bowl. Using an electric mixer on medium-high speed, cream these ingredients together for a full 4 minutes until the mixture becomes light, fluffy, and pale in color. This crucial step incorporates air into the dough, creating that perfect soft and chewy texture while ensuring no graininess from the sugar remains. The mixture should look almost mousse-like when properly creamed.
Step 2: Add Wet Ingredients
Add the creamy peanut butter, egg, milk, and vanilla extract to the creamed mixture. Beat on medium speed for 2 minutes, scraping down the sides of the bowl frequently to ensure even incorporation. The dough should be smooth and uniform with no streaks of butter or peanut butter visible. This step builds the foundation for that distinctive peanut butter flavor throughout every bite.
Step 3: Incorporate Dry Ingredients
In a separate bowl, whisk together the flour, baking soda, and salt. Add this dry mixture to the wet ingredients and mix on low speed until just combined—avoid overmixing as this can lead to tough cookies. The dough should be slightly sticky but manageable. If time permits, wrap the dough tightly in plastic wrap and refrigerate for 30 minutes. This optional chilling step makes the dough easier to handle and helps cookies maintain their shape during baking.
Step 4: Preheat and Prepare
Preheat your oven to 375°F and line cookie sheets with parchment paper. While the oven heats, unwrap all your Hershey’s Kisses—this seemingly small step is critical because you’ll need to press the chocolates into hot cookies immediately after baking.
Step 5: Shape and Sugar-Coat the Dough
Place about 1/4 to 1/2 cup of granulated sugar in a shallow bowl. Using a cookie scoop or tablespoon, measure out 1-inch portions of dough and roll each into a smooth ball. Roll each ball generously in the sugar until completely coated—this creates that beautiful sparkly exterior and adds a delightful crunch. Place the sugar-coated balls 2 inches apart on prepared baking sheets to allow for spreading.
Step 6: Bake to Golden Perfection
Bake the cookies for 8-10 minutes, watching carefully as oven temperatures vary. The cookies are done when they appear puffy with slightly cracked surfaces and light golden-brown bottoms. They should still look soft and slightly underdone in the center—this ensures that chewy texture we’re after.
Step 7: Add the Chocolate Kiss
Here’s the showstopping moment: immediately after removing cookies from the oven, gently but firmly press a Hershey’s Kiss into the center of each cookie, pushing it slightly more than halfway through. The warm cookie will crack beautifully around the chocolate, and the heat will slightly melt the bottom of the Kiss, helping it adhere. Allow cookies to cool completely on the baking sheet—this step is essential for the chocolate to set properly.

Nutritional Information
Per Cookie (based on 36 servings):
- Calories: 91 kcal
- Carbohydrates: 11g
- Protein: 2g
- Total Fat: 5g
- Saturated Fat: 2g
- Polyunsaturated Fat: 1g
- Monounsaturated Fat: 2g
- Trans Fat: 0.1g
- Cholesterol: 12mg
- Sodium: 102mg
- Potassium: 34mg
- Fiber: 0.3g
- Sugar: 6g
- Vitamin A: 87 IU
- Calcium: 7mg
- Iron: 0.4mg
These cookies offer a reasonable calorie count for a dessert treat, with each cookie providing approximately 5% of your daily caloric needs based on a 2,000-calorie diet. The peanut butter contributes beneficial protein and healthy fats, making these cookies more satisfying than many all-sugar alternatives.
Healthier Alternatives for the Recipe
Transform your Peanut Butter Blossoms into a more nutritious treat with these thoughtful modifications:
Reduce Sugar Content: Cut the granulated sugar in the dough by 2 tablespoons and use monk fruit sweetener for rolling—this reduces calories by approximately 15% per cookie while maintaining sweetness.
Whole Grain Boost: Replace up to half the all-purpose flour with white whole wheat flour to increase fiber content without compromising texture significantly.
Natural Sweetener Swap: Substitute coconut sugar for brown sugar to add trace minerals and achieve a lower glycemic index.
Dark Chocolate Upgrade: Use dark chocolate Hershey’s Kisses instead of milk chocolate to reduce sugar while increasing antioxidants.
Dairy-Free Version: Replace butter with coconut oil or vegan butter, and use non-dairy milk for a completely plant-based cookie.
Protein Power-Up: Add 2 tablespoons of protein powder to the dry ingredients and reduce flour by the same amount to boost protein content for an energizing snack.
Serving Suggestions
Peanut Butter Blossoms shine brightest when presented thoughtfully:
Classic Holiday Platter: Arrange these cookies on a festive serving tray alternating with chocolate crinkle cookies and snickerdoodles for a stunning color contrast that captures the holiday spirit.
Warm with Ice Cream: Serve slightly warm cookies alongside vanilla bean ice cream—the contrast between warm peanut butter cookie and cold cream creates an extraordinary dessert experience.
Cookie Gift Boxes: Layer Peanut Butter Blossoms between parchment paper in decorative tins for homemade gifts that show you care. They stay fresh for up to a week when properly stored.
Milk and Cookie Bar: Create a nostalgic experience by serving these cookies with various milk options—regular, chocolate, almond, and oat milk—allowing guests to choose their perfect pairing.
Dessert Charcuterie: Include Peanut Butter Blossoms on a dessert board with fresh strawberries, pretzel rods, and additional chocolate candies for an Instagram-worthy spread.
Coffee Shop Pairing: These cookies pair exceptionally well with hot coffee or espresso—the bitterness of coffee balances the sweetness beautifully.
Common Mistakes to Avoid
Achieve bakery-quality results by sidestepping these frequent pitfalls:
Overbaking: The number one mistake with peanut butter blossom cookies is leaving them in the oven too long. Remove cookies when they still look slightly underdone in the center—they’ll continue cooking on the hot pan and firm up as they cool.
Using Natural Peanut Butter: Natural peanut butter lacks the stabilizers and added sugar found in processed varieties like Jif or Skippy, resulting in dry, crumbly cookies that don’t hold together properly.
Incorrect Butter Temperature: Butter that’s too cold won’t cream properly, while melted butter creates flat, greasy cookies. Proper room temperature butter should leave a slight indent when pressed but still hold its shape.
Packing Flour: When measuring flour, spoon it into your measuring cup and level it off—don’t pack it down. Packed flour adds too much to the recipe, creating dry, tough cookies.
Waiting Too Long to Add Kisses: The chocolate must be pressed into hot cookies immediately after baking. If cookies cool too much, the chocolate won’t adhere properly or may crack the cookie when pressed.
Skipping the Sugar Roll: Rolling dough balls in sugar isn’t just decorative—it creates texture contrast and prevents cookies from sticking to each other during storage.
Uneven Cookie Sizes: Use a cookie scoop for uniform cookies that bake evenly. Inconsistent sizes mean some cookies overbake while others remain undercooked.
Storing Tips for the Recipe
Maximize freshness and flavor with proper storage techniques:
Room Temperature Storage: Place cooled cookies in an airtight container with parchment paper between layers. Store at room temperature for up to 1 week—the cookies actually improve slightly after 24 hours as flavors meld.
Freezing Baked Cookies: Freeze baked and cooled cookies in freezer-safe containers for up to 3 months. Separate layers with parchment paper and thaw at room temperature for 30 minutes before serving.
Freezing Cookie Dough: Roll dough into balls, coat in sugar, and freeze on a baking sheet. Once frozen solid, transfer to freezer bags for up to 3 months. Bake directly from frozen, adding 1-2 minutes to baking time.
Make-Ahead Dough: Prepare dough up to 48 hours in advance, wrap tightly in plastic wrap, and refrigerate. Cold dough actually produces thicker cookies with better texture.
Preventing Chocolate Bloom: Store cookies in a cool, dry place away from temperature fluctuations to prevent the white coating (bloom) that can form on chocolate when exposed to varying temperatures.
Maintaining Softness: Place a slice of bread in the storage container with your cookies—the cookies will absorb moisture from the bread, staying soft and chewy longer.
Conclusion
Peanut Butter Blossoms represent the perfect intersection of simplicity and sophistication—a beloved American classic that delivers consistent results with minimal effort. These iconic cookies combine creamy peanut butter, sweet sugars, and chocolate kisses into an unforgettable treat that transcends generations. With just 75 minutes from start to finish and basic pantry ingredients, you can create bakery-worthy cookies that will become a treasured tradition in your home.
Ready to bake? Gather your ingredients and experience the joy of creating these timeless cookies. Share your beautiful results in the review section below—we’d love to see how your Peanut Butter Blossoms turned out! Don’t forget to leave a comment sharing your favorite serving suggestions or creative variations. Subscribe to our blog for more tested recipes, baking tips, and seasonal inspiration delivered straight to your inbox. Your next favorite cookie recipe awaits!

FAQs
Can I use natural peanut butter in Peanut Butter Blossoms?
It’s not recommended. Natural peanut butter lacks the stabilizers and sugar found in processed brands like Jif or Skippy, resulting in dry, crumbly cookies that don’t hold together well. Stick with creamy processed peanut butter for best results.
Why did my cookies turn out dry?
Two common culprits cause dry cookies: overbaking and too much flour. Remove cookies when they still look slightly soft in the center, and measure flour by spooning it into the cup rather than packing it down, which adds excess flour.
Can I make the dough ahead of time?
Absolutely! Prepare the dough, wrap tightly in plastic wrap, and refrigerate for 24-48 hours. The resting time actually improves texture. You can also freeze shaped dough balls for up to 3 months and bake directly from frozen.
Why won’t the Hershey’s Kisses stick to my cookies?
The chocolate must be pressed into cookies immediately after they come out of the oven while still hot. The warmth melts the bottom of the Kiss slightly, creating adhesion. Have all Kisses unwrapped and ready before baking.
Can I substitute the Hershey’s Kisses with other chocolate?
While Hershey’s Kisses are traditional, you can use peanut butter cups, chocolate hearts, or thick squares of milk or dark chocolate. The iconic kiss shape creates the signature “blossom” appearance, but alternative chocolates work functionally.
How do I prevent cookies from spreading too much?
Ensure your butter is softened but not melted, chill the dough for 30 minutes before baking, and don’t skip the sugar coating step. These measures help cookies maintain their shape during baking.
What’s the best way to soften butter quickly?
Cut butter into small cubes and let sit at room temperature for 15-20 minutes. Avoid microwaving as it can create unevenly softened or partially melted butter, which affects cookie texture.
Can I make these cookies gluten-free?
Yes! Substitute the all-purpose flour with a 1:1 gluten-free baking flour blend. Results may vary slightly depending on the blend used, but most quality blends produce excellent results.
Perfect Peanut Butter Blossoms Recipe | Soft & Chewy Cookies with Chocolate Kisses
- Total Time: 75 minutes
- Yield: 36 cookies 1x
Description
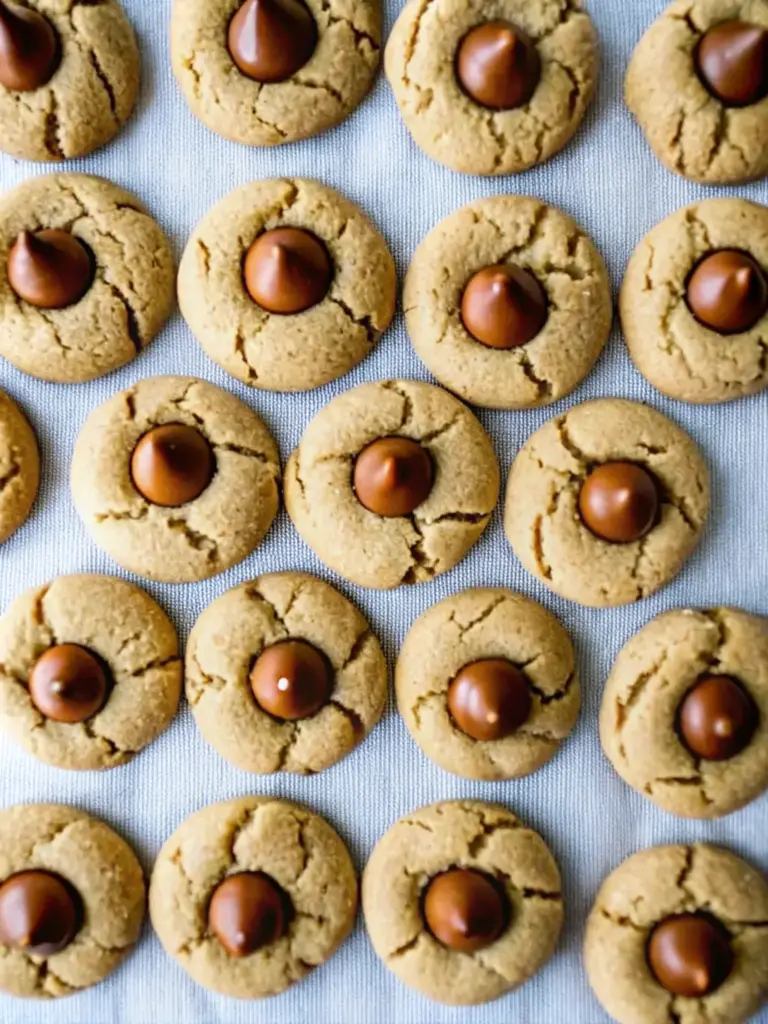
These Peanut Butter Blossoms are the quintessential holiday cookie — soft, chewy peanut butter cookies crowned with a chocolate Kiss. With crackled edges, a sparkling sugar coating, and that perfect balance of salty-sweet flavor, these cookies are a festive favorite for any occasion.
Ingredients
- 1/2 cup unsalted butter, softened to room temperature
- 1/2 cup brown sugar, packed
- 1/2 cup granulated sugar
- 1/2 cup creamy peanut butter (Jif or Skippy recommended)
- 1 large egg, room temperature
- 1 teaspoon vanilla extract
- 1 tablespoon milk
- 1 3/4 cups all-purpose flour
- 1 teaspoon baking soda
- 1/4 to 1/2 teaspoon salt
- 1/4 to 1/2 cup granulated sugar (for rolling)
- 1 package Hershey’s Kisses, unwrapped
Instructions
- In a large bowl, cream together butter, brown sugar, and granulated sugar for 4 minutes until light and fluffy.
- Add peanut butter, egg, milk, and vanilla extract. Beat for 2 minutes until smooth and creamy.
- In a separate bowl, whisk together flour, baking soda, and salt. Add to wet ingredients and mix until just combined.
- Wrap dough in plastic wrap and chill for 30 minutes (optional, but recommended).
- Preheat oven to 375°F (190°C) and line baking sheets with parchment paper.
- Roll dough into 1-inch balls and coat in granulated sugar.
- Place dough balls 2 inches apart on baking sheets and bake for 8–10 minutes until puffy and lightly golden.
- Immediately press a Hershey’s Kiss into the center of each cookie. Allow to cool on the baking sheet for 5 minutes before transferring to a wire rack.
- Cool completely to allow chocolate to set before serving or storing.
Notes
For the best soft and chewy texture, remove cookies when slightly underbaked — they’ll continue baking on the pan. Store in airtight containers for up to one week, or freeze for up to three months. Always press Kisses into cookies immediately after baking for perfect adhesion.
- Prep Time: 20 minutes
- Cook Time: 10 minutes
- Category: Dessert
- Method: Baked
- Cuisine: American
Nutrition
- Serving Size: 1 cookie
- Calories: 91
- Sugar: 6g
- Sodium: 102mg
- Fat: 5g
- Saturated Fat: 2g
- Unsaturated Fat: 3g
- Trans Fat: 0g
- Carbohydrates: 11g
- Fiber: 0.3g
- Protein: 2g
- Cholesterol: 12mg
Keywords: peanut butter blossoms, chocolate kiss cookies, holiday cookies, christmas cookies, peanut butter and chocolate, hersheys kiss cookies