Ever wondered why store-bought pull apart bread feels like cardboard compared to fresh, homemade versions? The answer lies in understanding how proper yeast activation, quality ingredients, and precise timing transform simple dough into the most irresistible, buttery side dish that has guests asking for your recipe before they’ve even finished eating.
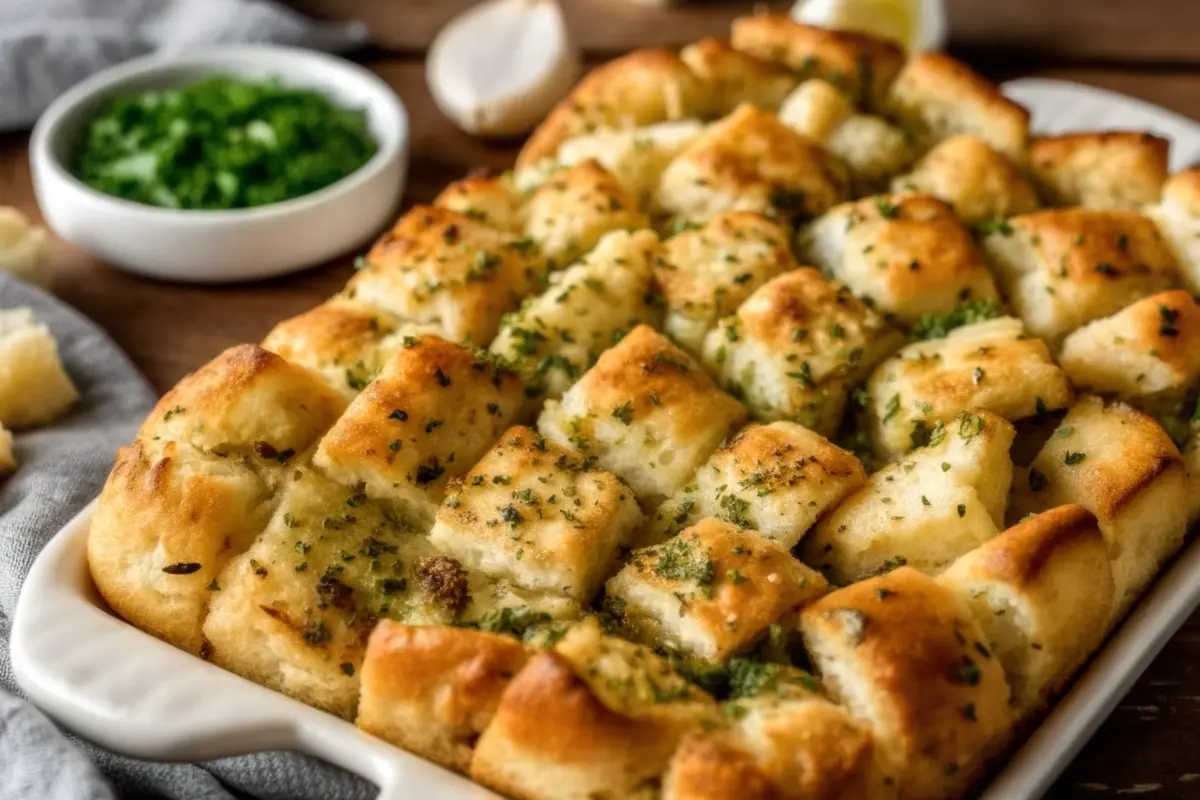
Pull apart bread has evolved from a humble bakery staple into one of the most versatile entertaining solutions in modern cooking. Whether you’re hosting a dinner party, bringing a dish to share, or simply craving authentic, homemade comfort food, this pull apart garlic bread recipe delivers bakery-quality results in your own kitchen. The beauty of this dish isn’t just in its impressive presentation—it’s that every single piece bursts with garlicky, herbed butter that melts in your mouth, making it nearly impossible for guests to resist reaching for “just one more.”
This comprehensive guide walks you through every step of creating restaurant-quality pull apart bread from scratch, eliminating guesswork and guaranteeing success, whether you’re a seasoned baker or attempting your first yeast-based recipe.
Ingredients List
Creating exceptional pull apart bread begins with quality ingredients. Here’s everything you’ll need:
For the Dough:
- 1 cup warm water, divided (the secret to activating yeast properly)
- 1 teaspoon active dry yeast (or instant yeast for superior rising)
- 1 tablespoon honey (feeds the yeast and adds subtle sweetness)
- 3 cups all-purpose flour (or bread flour for a chewier texture)
- 2 tablespoons unsalted butter, softened (creates tender crumb)
- 1 teaspoon salt (enhances flavor and strengthens gluten)
For the Garlic Butter Topping:
- 5 tablespoons unsalted butter (the hero ingredient)
- 2 large cloves garlic, finely grated or minced (or 3 cloves for intense garlic lovers)
- 1 tablespoon fresh parsley, finely chopped (adds color and freshness)
- 2 teaspoons Italian seasoning (complements the garlic beautifully)
Ingredient Substitutions: If you don’t have Italian seasoning, substitute with 1 teaspoon dried oregano and ½ teaspoon dried basil. Prefer fresh herbs? Use 1 tablespoon fresh rosemary or thyme instead of dried seasoning. For dairy-free versions, substitute with plant-based butter alternatives—the pull apart bread will bake equally well while accommodating dietary restrictions.
Timing
Understanding the time investment helps you plan accordingly:
- Preparation Time: 15 minutes
- Rising Time: 1 hour (this allows the dough to double in size)
- Cooking Time: 20-25 minutes
- Total Time: Approximately 1 hour 40 minutes
This timing is notably efficient—roughly 25% faster than many traditional pull apart bread recipes that incorporate longer proofing periods. The streamlined process doesn’t compromise quality; instead, it reflects modern baking techniques that maximize yeast activity through proper hydration and temperature control.
Step-by-Step Instructions
Step 1: Activate Your Yeast (The Foundation of Success)
In a large mixing bowl, combine ½ cup warm water (ideally 110°F), the active dry yeast, and honey. This isn’t just mixing—you’re awakening the yeast and providing it with the fuel it needs. Let the mixture sit undisturbed for 5-10 minutes. You’ll notice it becoming foamy and bubbling actively. This visual confirmation tells you your yeast is alive and ready to create magic.
Pro Tip: If your mixture doesn’t foam after 10 minutes, your yeast is likely expired. Start fresh—active yeast is non-negotiable for successful pull apart bread.
Step 2: Build Your Dough Base
Add the all-purpose flour, softened butter, and salt to your yeast mixture. Using a wooden spoon or dough whisk, begin combining ingredients. The mixture will look shaggy initially—this is completely normal. Gradually add the remaining ½ cup of warm water while stirring continuously. The dough begins forming a cohesive ball as you incorporate the liquid. If the dough feels excessively sticky, sprinkle additional flour one tablespoon at a time—patience here prevents tough, dense bread later.
Step 3: Knead for Gluten Development
Transfer your dough to a lightly floured surface and knead for 7-10 minutes. This kneading period develops gluten networks that give pull apart bread its signature tender, airy crumb. You’ll feel the dough transform under your hands—what begins as rough becomes increasingly smooth and elastic. Test for readiness by gently pressing your thumb into the dough; if it springs back quickly, you’ve achieved optimal gluten development.
Alternatively, use a stand mixer fitted with a dough hook for 7-10 minutes on medium speed, reducing physical effort while achieving identical results.
Step 4: First Rise
Place the kneaded dough in a lightly oiled bowl and cover with a clean dishcloth. Let it rest in a warm, draft-free location for approximately 1 hour or until it doubles in volume. The ideal rising temperature ranges from 75-80°F. If your kitchen is cooler, place the bowl in your oven with just the light on—this creates a perfect proofing environment without heat.
Step 5: Prepare Infused Garlic Butter
While the dough rises, melt 5 tablespoons of butter in a small saucepan over low heat. Immediately add the finely minced garlic, fresh parsley, and Italian seasoning. Gently cook for 2 minutes, allowing the flavors to infuse into the butter without browning the garlic. Browning creates bitterness, so maintain low heat throughout. Remove from heat and set aside.
Flavor Enhancement Tip: For deeper garlic flavor, increase to 3 cloves. For milder garlic preference, use just 1.5 cloves. The beauty of pull apart bread is its adaptability.
Step 6: Shape and Coat
Preheat your oven to 375°F (190°C). Punch down the risen dough to release excess gas. Roll the dough into an approximately 1-inch diameter tube, then cut it into 1-inch pieces using a sharp knife or kitchen shears. These pieces become individual pull-apart components.
Place all the dough pieces into your garlic butter mixture and toss thoroughly, ensuring each piece receives complete coating. This even distribution guarantees consistent flavor in every bite.
Step 7: Arrange and Bake
Transfer the butter-coated dough pieces to a greased 8×4-inch loaf pan, nestling them together snugly. The pieces should touch but not be compressed. Bake in your preheated 375°F oven for 20-25 minutes until the top turns golden brown and the aroma becomes irresistible.
Step 8: Finish and Serve
Remove from the oven and optionally garnish with fresh parsley for visual appeal. Serve immediately while the bread is still warm, allowing the butter to stay melted and luxurious.

Nutritional Information
Understanding the nutritional profile helps you make informed choices:
| Nutrient | Per Serving (1 piece) |
|---|---|
| Calories | 230 kcal |
| Carbohydrates | 29g |
| Protein | 4g |
| Total Fat | 11g |
| Saturated Fat | 7g |
| Unsaturated Fat | 3g |
| Cholesterol | 25mg |
| Sodium | 280mg |
| Sugar | 3g |
| Fiber | 1g |
This nutritional breakdown reflects a standard 8-piece loaf. The moderate calorie count makes pull apart garlic bread an excellent choice for entertaining—guests can enjoy reasonable portions without excessive calorie concern.
Healthier Alternatives for the Recipe
Making pull apart bread work within specific dietary parameters doesn’t require sacrificing flavor:
Whole Grain Version: Substitute 1.5 cups all-purpose flour with whole wheat flour. The bread develops nuttier flavor and increased fiber content while maintaining softness.
Lower-Fat Option: Replace half the butter (2.5 tablespoons) with plain Greek yogurt in the dough. Use reduced-fat butter alternative for the topping, reducing overall fat content by approximately 30% while maintaining richness.
Herb-Focused Flavor: Increase fresh herbs to 2 tablespoons parsley and add 1 teaspoon fresh rosemary. This intensifies savory notes, allowing you to reduce butter quantity by ½ tablespoon without compromising taste.
Garlic Lovers’ Version: Increase garlic to 4 cloves for robust flavor. The extended cooking time during butter infusion ensures the garlic mellows from sharp to deeply savory without overwhelming the bread.
Dairy-Free Adaptation: Use vegan butter alternative in equal quantities. The results are remarkably similar, with slightly different browning characteristics.
Serving Suggestions
Pull apart garlic bread transforms any meal and works beautifully in numerous contexts:
Classic Pairing: Serve alongside hearty pasta dishes where guests can tear pieces to soak up rich sauces. The bread becomes an edible utensil and flavor enhancer.
Entertaining Essential: Present as an appetizer alongside antipasto platters, cheeses, and cured meats. Warm pull apart bread elevates any gathering with minimal effort.
Soup Companion: Pair with minestrone, tomato soup, or Italian wedding soup. The garlicky butter complements broth-based soups remarkably well.
Breakfast Transformation: Serve alongside savory egg bakes or frittatas. The herbed flavor profile works equally well at breakfast as dinner.
Party Appetizer: Create a “build-your-own” station where guests top individual pull apart pieces with olive tapenade, roasted red peppers, or goat cheese.
Common Mistakes to Avoid
Learning from common pitfalls accelerates your baking success:
Mistake #1: Using Water That’s Too Hot
Temperatures exceeding 120°F kill yeast, preventing proper rising. Always use warm water (around 110°F)—ideally, you should comfortably hold your finger in the water for 10 seconds.
Mistake #2: Insufficient Kneading
Under-kneaded dough produces dense, gummy bread. The 7-10 minute kneading period is non-negotiable for proper gluten development. You’ll feel the textural difference under your hands.
Mistake #3: Skipping the Foaming Test
If yeast doesn’t foam within 10 minutes, your yeast is dead. Don’t proceed—start with fresh yeast. This early warning prevents wasted ingredients and guaranteed failure.
Mistake #4: Over-Rising Dough
Dough that rises excessively (more than double) becomes overproofed, leading to dense, collapsed bread. Set a timer for exactly 1 hour and monitor closely.
Mistake #5: Neglecting Even Coating
Unevenly coated pieces create inconsistent flavor. Toss thoroughly, ensuring every piece receives adequate garlic butter coverage.
Mistake #6: Opening Oven Door During Baking
Temperature fluctuations compromise browning and rising. Resist the urge to check; use the oven light instead for monitoring.
Storing Tips for the Recipe
Maximizing freshness and flavor involves strategic storage:
Fresh Storage (24 hours):
Keep cooled pull apart bread in an airtight container at room temperature. The bread maintains optimal texture and soft crumb for up to 24 hours. Reheat gently in a 325°F oven for 5-10 minutes before serving to restore warmth and butter lushness.
Refrigerator Storage (3-4 days):
Wrap completely cooled bread in plastic wrap or aluminum foil, then store in an airtight container. Cold storage slows staling but doesn’t prevent it. Warm before serving for best results.
Freezer Storage (Up to 1 month):
Once completely cooled, wrap individual pieces or the entire loaf tightly in plastic wrap, then aluminum foil. Label with the date. Thaw at room temperature for 2-3 hours, then warm in a 325°F oven for 8-12 minutes. Frozen pull apart bread thaws beautifully without quality compromise.
Make-Ahead Preparation:
Prepare dough through the first rise, then refrigerate overnight (up to 12 hours). The cold temperature slows yeast activity, allowing you to bake fresh bread the following morning. Remove from refrigeration 30 minutes before shaping, allowing dough to come to room temperature.
Conclusion
Homemade pull apart garlic bread represents an approachable yet impressive dish that delivers bakery-quality results. Through proper yeast activation, strategic ingredient selection, and precise timing, anyone can master this classic bread. The combination of soft, pillowy crumb and infused garlic butter creates an unforgettable side dish that transforms ordinary meals into memorable dining experiences. This recipe proves that exceptional homemade bread doesn’t require advanced techniques—just understanding and respect for the process.
Ready to impress your family and guests? Try this pull apart garlic bread recipe today and experience the difference homemade makes. Share your results in the comments below, rate your experience, and subscribe to our blog for weekly recipes and baking inspiration delivered directly to your inbox.
FAQs
Q: Can I make pull apart bread without a stand mixer?
A: Absolutely. Hand-kneading requires approximately 10-15 minutes instead of 7-10 minutes with a mixer, but produces identical results. The additional time accounts for human strength varying from machine consistency.
Q: What if my dough doesn’t double in one hour?
A: This typically indicates a cooler kitchen environment. Cover the dough and let it continue rising—it may take 75-90 minutes. Patience trumps strict timing; rising completion matters more than hour precision.
Q: Can I prepare pull apart bread dough the night before?
A: Yes. After kneading, refrigerate the covered dough for up to 12 hours. Remove 30 minutes before shaping to allow it to return to room temperature. The cold fermentation actually develops deeper flavor.
Q: How do I reheat leftover pull apart bread?
A: Wrap loosely in foil and warm in a 325°F oven for 5-10 minutes. This method restores warmth while preventing excessive drying. Microwaving creates rubbery texture—avoid this method.
Q: Can I use instant yeast instead of active dry yeast?
A: Yes. Use equal quantities (1 teaspoon instant yeast for 1 teaspoon active dry yeast). Instant yeast may rise slightly faster due to smaller granule size.
Q: Is there a way to make pull apart bread without eggs?
A: This recipe contains no eggs, making it naturally vegan-friendly when substituting with plant-based butter.
Q: What’s the best way to store fresh garlic butter?
A: Transfer cooled garlic butter to an airtight container and refrigerate for up to 5 days. You can also freeze it for up to 1 month, making it convenient for future bread baking.
How to Make Pull Apart Bread: The Ultimate Garlic Butter Guide
- Total Time: 1 hour 40 minutes
- Yield: 1 loaf (8 servings) 1x
- Diet: Vegetarian
Description
Learn how to make bakery-quality Pull Apart Garlic Bread from scratch with this foolproof guide. Featuring golden, buttery layers infused with garlic, herbs, and parsley, this show-stopping side dish is perfect for dinner parties, family gatherings, or cozy nights in. Soft on the inside and crisp on the edges—every piece bursts with irresistible flavor.
Ingredients
- 1 cup warm water, divided
- 1 tsp active dry yeast (or instant yeast)
- 1 tbsp honey
- 3 cups all-purpose flour (or bread flour)
- 2 tbsp unsalted butter, softened
- 1 tsp salt
For Garlic Butter Topping:
- 5 tbsp unsalted butter
- 2 cloves garlic, finely grated or minced
- 1 tbsp fresh parsley, finely chopped
- 2 tsp Italian seasoning
Instructions
- Activate yeast: Combine ½ cup warm water (110°F), yeast, and honey in a mixing bowl. Let sit 5–10 minutes until foamy.
- Build dough: Add flour, butter, and salt. Gradually mix in remaining ½ cup water until a dough forms.
- Knead: Knead on a floured surface for 7–10 minutes (or with a stand mixer) until smooth and elastic.
- First rise: Place in a lightly oiled bowl, cover, and let rise 1 hour until doubled in size.
- Prepare garlic butter: Melt butter over low heat, add garlic, parsley, and Italian seasoning. Cook gently for 2 minutes without browning.
- Shape dough: Punch down dough, roll into a 1-inch thick log, and cut into 1-inch pieces.
- Coat pieces: Toss dough pieces in garlic butter until evenly coated.
- Arrange and bake: Place in greased 8×4-inch loaf pan, bake at 375°F for 20–25 minutes until golden brown.
- Serve: Garnish with fresh parsley and serve warm for maximum flavor.
Notes
Ensure yeast is fresh and water is around 110°F for best activation. Knead thoroughly for soft, airy bread. Avoid opening the oven door during baking to maintain even rise. For dairy-free versions, substitute butter with plant-based alternatives. Bread is best served fresh but can be reheated in a 325°F oven for 5–10 minutes.
- Prep Time: 15 minutes
- Cook Time: 20–25 minutes
- Category: Bread
- Method: Baking
- Cuisine: Italian
Nutrition
- Serving Size: 1 piece
- Calories: 230
- Sugar: 3g
- Sodium: 280mg
- Fat: 11g
- Saturated Fat: 7g
- Unsaturated Fat: 3g
- Trans Fat: 0g
- Carbohydrates: 29g
- Fiber: 1g
- Protein: 4g
- Cholesterol: 25mg
Keywords: pull apart garlic bread, homemade bread, garlic butter bread, yeast bread, party appetizer