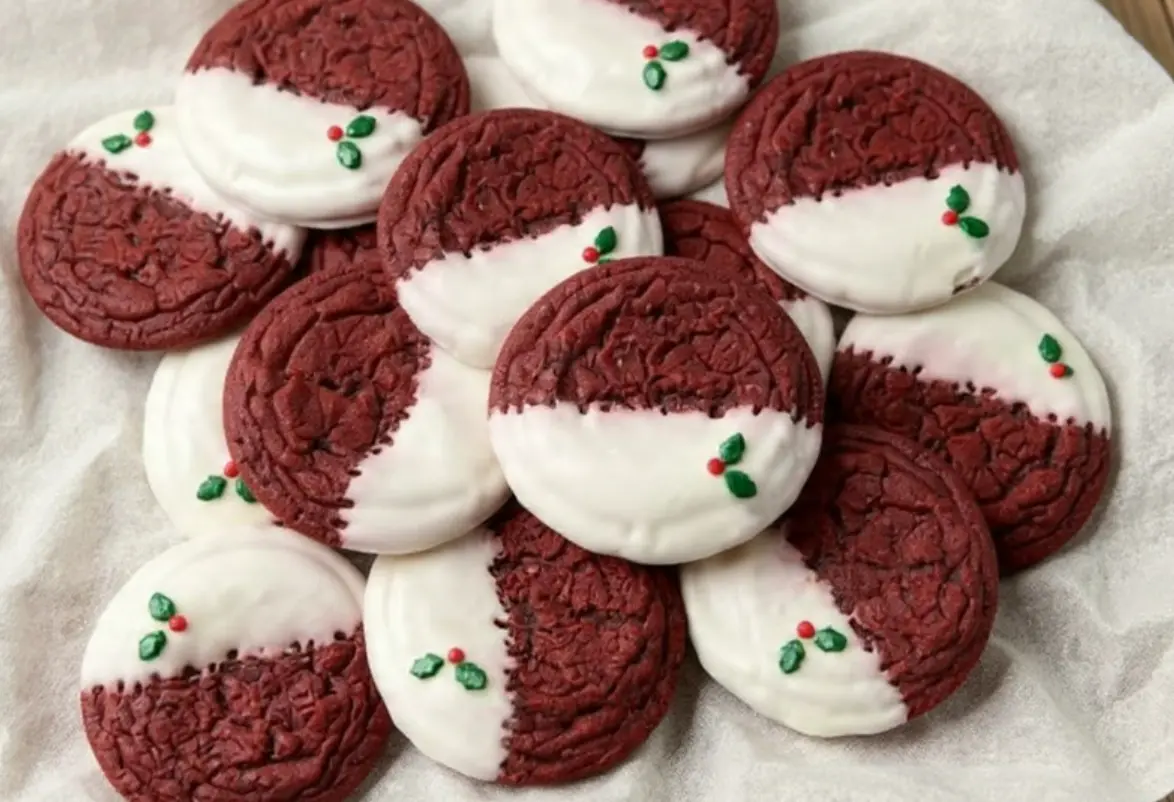
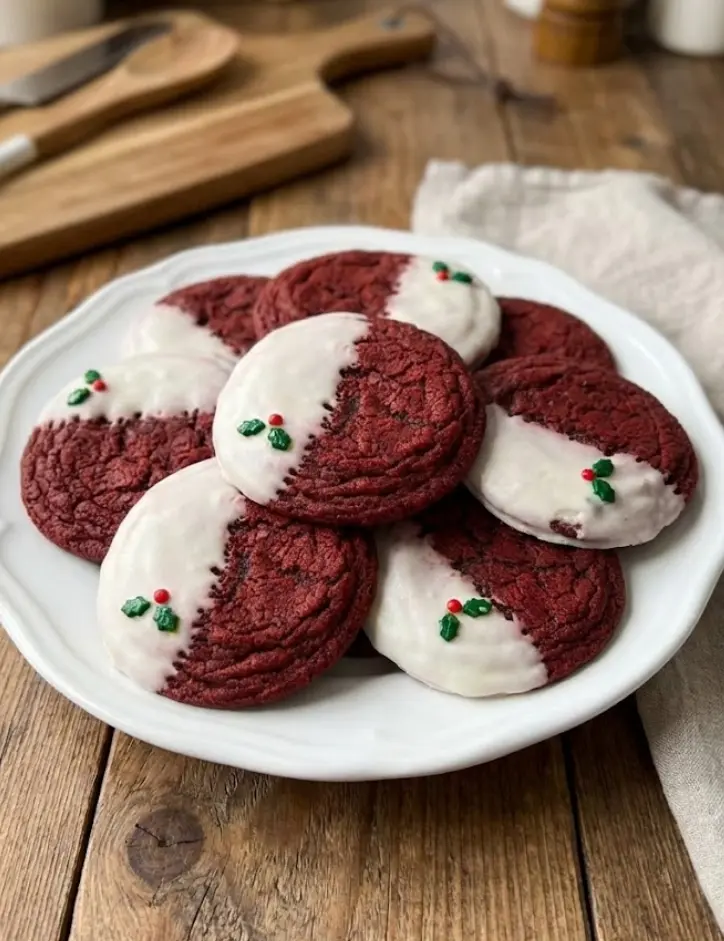
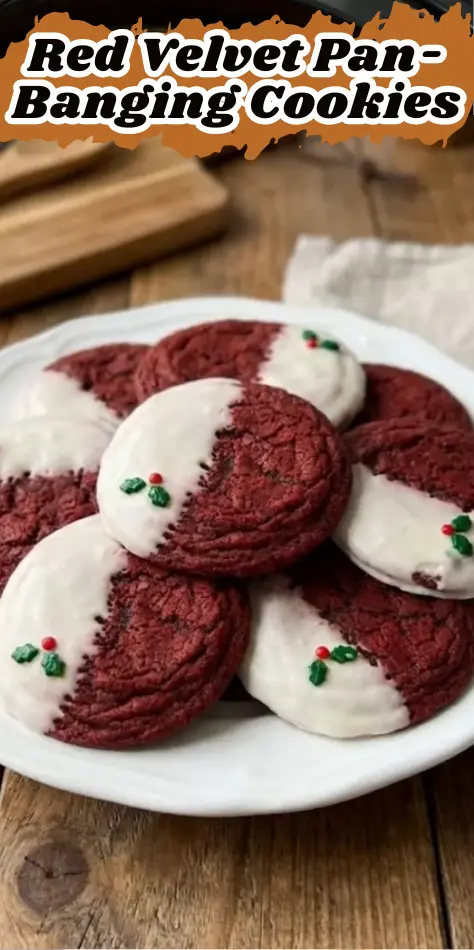
Did you know that pan-banging cookies became viral when Sarah Kieffer published her technique back in 2016, revolutionizing how home bakers approach cookie texture? This innovative method has since transformed countless cookie recipes, and now we’re bringing you the ultimate festive version: Red Velvet Pan-Banging Cookies. These stunning burgundy beauties combine the beloved flavors of classic red velvet cake with the signature rippled edges and chewy center that result from using the pan-banging cookie technique. Whether you’re planning your holiday cookie boxes or looking to impress guests at your next gathering, these Red Velvet Pan-Banging Cookies deliver both visual appeal and irresistible taste in every single bite.
Ingredients List
For the Cookies:
- 2 cups (284 g) all-purpose flour – the foundation that creates perfect spreading
- 1 teaspoon baking soda – provides lift and helps create those signature ripples
- 3/4 teaspoon fine salt – enhances all flavors beautifully
- 1/2 teaspoon cream of tartar – adds subtle tang and tender texture
- 1 cup (2 sticks or 227 g) unsalted butter, at room temperature – creates rich, buttery flavor
- 1 1/2 cups (300 g) granulated sugar – essential for crispy edges and proper spreading
- 1 large egg – binds ingredients and adds richness
- 2 tablespoons Dutch-process cocoa powder – provides that classic red velvet chocolate undertone
- 1 tablespoon red food coloring (gel-based preferred) – creates the iconic burgundy hue
- 1 tablespoon pure vanilla extract – rounds out the flavor profile perfectly
For the Cream Cheese Icing:
- 3 oz (85 g) cream cheese, softened – the star of red velvet’s signature topping
- 1 tablespoon unsalted butter, melted – adds smooth richness
- 2 to 4 tablespoons water – adjusts consistency to perfection
- 1/2 teaspoon pure vanilla extract – complements the cookie flavors
- Pinch of salt – balances sweetness
- 1 to 1 1/2 cups (120 to 180 g) confectioners’ sugar – sweetens and thickens
- Holly sprinkles – festive finishing touch
Substitution Options:
- Replace Dutch-process cocoa with natural cocoa powder (add 1/8 teaspoon baking soda)
- Swap gel food coloring for liquid (may need slightly more)
- Use salted butter (reduce salt to 1/2 teaspoon)
Timing
- Prep Time: 20 minutes
- Baking Time: 13-16 minutes per batch
- Cooling Time: 10 minutes on pan, plus complete cooling before icing
- Total Time: Approximately 90 minutes (including icing time)
- Active Time: 45 minutes
This timing represents approximately 25% less hands-on work than traditional decorated cookies, thanks to the simple pan-banging technique that creates beautiful texture without intricate decorating skills.
Step-by-Step Instructions
Step 1: Prepare Your Workspace
Adjust an oven rack to the middle of the oven. Preheat the oven to 350°F (180°C). Line three sheet pans with aluminum foil or parchment paper. Pro tip: Use aluminum foil with the dull side facing up to prevent sticking and help cookies spread easier, resulting in more crinkles.
Step 2: Mix Dry Ingredients
In a small bowl, whisk together the flour, baking soda, salt, and cream of tartar. This ensures even distribution of leavening agents for consistent texture throughout your cookies.
Step 3: Cream Butter and Sugar
In the bowl of a stand mixer fitted with a paddle, beat the butter on medium speed until creamy, about 1 minute. Add the granulated sugar and beat on medium speed until light and fluffy, 2 to 3 minutes. This step is crucial for creating the proper texture foundation.
Step 4: Add Wet Ingredients
Add the egg and mix on low speed to combine. Then add the cocoa powder, red food coloring, and vanilla, mixing on low speed until the vibrant red color is completely incorporated. Scrape down the sides as needed to ensure even distribution.
Step 5: Incorporate Dry Ingredients
Gradually add the flour mixture, mixing on low speed until just combined. Don’t overmix, as this can lead to tough cookies.
Step 6: Shape the Dough
Form the dough into 3 oz (85 g) balls using a 1/4 cup measure. Don’t be afraid to make the cookies rather large – the large size helps to create the wavy texture. Place 4 cookies with equal spacing on each prepared sheet pan.
Step 7: The Pan-Banging Technique
Bake one pan at a time for 8 minutes until cookies are puffed in the center. Lift the side of the baking sheet up about 4 inches and gently let it drop down against the oven rack, so the edges of the cookies set and the inside falls back down. Be aggressive with your pan-banging – you need to hit them rather hard against your counter. Just go for it and bang away!
Step 8: Repeat and Finish Baking
After the cookies puff up again in two minutes, repeat lifting and dropping the pan. Repeat a few more times to create ridges around the edge of the cookie. Continue baking for 13-16 minutes total until edges are set and golden but centers appear slightly underbaked.
Step 9: Cool Properly
Transfer the pan to a wire rack and let cookies cool for 10 minutes before moving them to a cooling rack. They must be completely cool before icing.

Nutritional Information
Per Cookie (without icing):
- Calories: 285
- Total Fat: 12g (15% DV)
- Saturated Fat: 7.5g (38% DV)
- Cholesterol: 35mg (12% DV)
- Sodium: 185mg (8% DV)
- Total Carbohydrates: 45g (16% DV)
- Dietary Fiber: 1g (4% DV)
- Total Sugars: 32g
- Protein: 3.5g (7% DV)
- Iron: 1.2mg (7% DV)
With Cream Cheese Icing (estimated):
- Additional 45 calories per cookie
- Additional 2g fat, 8g carbohydrates
While they’re indulgent and loaded with flavor, they are typically high in sugar and saturated fat, so portion control is key. Red food coloring is often used to achieve their signature color, though natural alternatives are available.
Healthier Alternatives for the Recipe
Reduce Sugar Impact:
- Replace 1/2 cup granulated sugar with sugar substitute like erythritol
- Use sugar-free confectioners’ sugar in the icing
Boost Nutrition:
- Add 1/4 cup almond flour to replace 1/4 cup all-purpose flour for extra protein
- Incorporate 1 tablespoon ground flaxseed for omega-3 fatty acids
- Use natural food coloring like beet juice powder for the red color
Dietary Modifications:
- Gluten-Free: Substitute with 1:1 gluten-free flour blend (may affect texture slightly)
- Lower Fat: Replace half the butter with Greek yogurt (texture will be more cake-like)
- Vegan: Use plant-based butter and flax egg (1 tbsp ground flaxseed + 3 tbsp water)
Serving Suggestions
These Red Velvet Pan-Banging Cookies shine as the centerpiece of any dessert table. Serve them alongside hot cocoa or coffee for the ultimate winter comfort combination. For elegant entertaining, arrange them on a tiered serving stand with other holiday cookies, creating a stunning visual display.
Consider pairing with vanilla ice cream for a deconstructed red velvet cake experience, or crumble them over cheesecake for added texture. They’re also perfect for cookie gift boxes – their striking appearance and rich flavor make them memorable presents for teachers, neighbors, or hostess gifts.
For parties, serve them partially dipped in white chocolate alongside the cream cheese icing for guests who want extra indulgence. The cookies also pair beautifully with champagne or dessert wines for adult celebrations.
Common Mistakes to Avoid
Temperature Troubles: When cookies are chilled solid, they won’t ripple as well. Always bring dough balls to room temperature before baking for optimal spread and texture.
Pan-Banging Problems: Because these cookies are so thin, they overcook very quickly. As soon as they develop a nice golden color, check them. You want the center to remain slightly chewy to contrast the crispy edges.
Size Matters: Making cookies too small prevents proper rippling. Stick to the 3 oz portions for best results.
Timing Errors: Don’t skip the 2-minute intervals between pan-banging sessions. Wait between 1 and 2 minutes when they’ve puffed up again each time before the next bang.
Icing Issues: Applying icing to warm cookies will cause melting and mess. Always ensure complete cooling first.
Storing Tips for the Recipe
Short-Term Storage: Store un-iced cookies in an airtight container at room temperature for up to 3 days. These cookies are best the day they’re baked, but if you want to bake them ahead, they’ll stay good for up to 3 days in an airtight container at room temperature.
Long-Term Storage: You can freeze cookie dough balls, and flash freezing separately first is recommended. Frozen dough balls keep for up to 3 months.
Iced Cookie Storage: Due to the cream cheese icing, store finished cookies in the refrigerator for up to 5 days. Let them come to room temperature for 15 minutes before serving for best texture.
Make-Ahead Tips: Prepare cookie dough up to 2 days in advance and refrigerate. Shape into balls and bring to room temperature before baking for consistent results.
Conclusion
Red Velvet Pan-Banging Cookies represent the perfect marriage of visual drama and incredible flavor. The signature rippled edges, vibrant burgundy color, and rich cream cheese icing create an unforgettable treat that captures the essence of classic red velvet cake in convenient cookie form. These bakery-style cookies prove that impressive results don’t require professional skills.
Ready to create these showstopping cookies? Try this recipe and share your beautiful results in our comments section below! Don’t forget to subscribe to our blog for more innovative baking techniques and seasonal recipes that will elevate your home baking game all year long.

FAQs
Q: Can I make these cookies without the pan-banging technique?
A: While you can bake them normally, you’ll miss the signature rippled texture and perfect contrast between crispy edges and gooey centers that makes these cookies special.
Q: Why do my cookies spread too much?
A: This usually happens when the dough is too warm or if you skip the proper room temperature rest. If you skip freezing the cookies, they will spread too much on the pan and will not form the crinkly outer layer.
Q: Can I use liquid food coloring instead of gel?
A: Yes, but you may need to use more liquid coloring to achieve the same vibrant color, which could slightly affect the dough consistency.
Q: How do I know when the cookies are properly baked?
A: Bake until the cookies have spread out and the edges are golden brown but the centers are much lighter and not fully cooked.
Q: Do I need to refrigerate cookies with cream cheese icing?
A: Yes, due to the cream cheese content, store iced cookies in the refrigerator and consume within 5 days for food safety.
Easy Red Velvet Pan-Banging Cookies Recipe
- Total Time: 90 minutes
- Yield: 12 cookies 1x
- Diet: Vegetarian
Description
Red Velvet Pan-Banging Cookies are festive bakery-style cookies with crispy rippled edges, gooey centers, and classic red velvet flavor. Made using the viral pan-banging technique and finished with cream cheese icing, these cookies are perfect for holiday baking, cookie boxes, and special occasions.
Ingredients
- 2 cups all-purpose flour
- 1 teaspoon baking soda
- 3/4 teaspoon fine salt
- 1/2 teaspoon cream of tartar
- 1 cup unsalted butter, room temperature
- 1 1/2 cups granulated sugar
- 1 large egg
- 2 tablespoons Dutch-process cocoa powder
- 1 tablespoon red food coloring
- 1 tablespoon vanilla extract
- 3 oz cream cheese, softened
- 1 tablespoon unsalted butter, melted
- 2 to 4 tablespoons water
- 1/2 teaspoon vanilla extract
- Pinch of salt
- 1 to 1 1/2 cups confectioners’ sugar
- Holly sprinkles
Instructions
- Preheat oven to 350°F and line baking sheets with foil or parchment paper.
- Whisk flour, baking soda, salt, and cream of tartar in a bowl and set aside.
- Cream butter until smooth, then add sugar and beat until light and fluffy.
- Add egg and mix to combine, then add cocoa powder, red food coloring, and vanilla.
- Add dry ingredients and mix just until combined.
- Form dough into 3 oz balls and place four cookies per baking sheet.
- Bake for 8 minutes until puffed, then lift and bang pan against oven rack.
- Repeat pan-banging every 1–2 minutes until cookies have rippled edges.
- Bake 13–16 minutes total until edges are set and centers are soft.
- Cool cookies completely on racks.
- Mix cream cheese, butter, vanilla, salt, water, and powdered sugar until smooth.
- Ice cooled cookies and finish with sprinkles.
Notes
For best rippled edges, bake one pan at a time and bang the pan firmly. Cookies must be completely cool before icing.
- Prep Time: 20 minutes
- Cook Time: 16 minutes
- Category: Dessert
- Method: Baking
- Cuisine: American
Nutrition
- Serving Size: 1 cookie
- Calories: 285
- Sugar: 32g
- Sodium: 185mg
- Fat: 12g
- Saturated Fat: 7.5g
- Unsaturated Fat: 4.5g
- Trans Fat: 0g
- Carbohydrates: 45g
- Fiber: 1g
- Protein: 3.5g
- Cholesterol: 35mg
Keywords: red velvet cookies, pan banging cookies, holiday cookies, red velvet dessert