Did you know that rye bread was more effective at lowering cholesterol levels in men than white wheat bread and reduced total and LDL (bad) cholesterol by up to 14% and 12%, respectively? This remarkable finding from nutritional research reveals why rye bread isn’t just a delicious artisan choice—it’s a genuine health game-changer that’s been quietly revolutionizing home kitchens worldwide.
While many home bakers stick to conventional wheat breads, they’re missing out on one of the most nutritionally dense and flavorful bread varieties available. Rye bread offers a perfect blend of hearty texture, distinctive tangy flavor, and impressive health benefits that make it an ideal addition to any baker’s repertoire. Whether you’re seeking better digestive health, improved blood sugar control, or simply want to create bakery-quality loaves at home, mastering rye bread opens doors to both culinary satisfaction and nutritional excellence.
Ingredients List
Creating exceptional homemade rye bread requires just a handful of carefully chosen ingredients, each playing a crucial role in developing the bread’s signature characteristics:
Essential Ingredients:
- 1 ½ cups warm water (about 110°F / 45°C) – The foundation that activates your yeast and hydrates the unique rye flour blend
- 2 ¼ tsp active dry yeast – Your leavening powerhouse for creating the perfect rise
- 1 tbsp sugar or honey – Natural sweeteners that feed the yeast and balance rye’s earthy tang
- 1 ½ cups rye flour – The star ingredient that delivers authentic flavor and nutritional benefits
- 2 cups bread flour (plus extra for dusting) – High-protein flour that provides essential gluten structure
- 1 ½ tsp salt – Flavor enhancer and gluten strengthener
- 2 tbsp olive oil or melted butter – Adds richness and improves crumb texture
- 1 tbsp caraway seeds (optional) – Traditional aromatic seeds that complement rye’s natural flavors
Smart Substitutions:
- Replace honey with maple syrup for deeper complexity
- Substitute olive oil with melted butter for richer flavor
- Use light rye flour for milder taste or dark rye for more intense earthiness
- Add fennel seeds instead of caraway for a subtle licorice note

Timing
Total Time Investment: 3 hours 20 minutes (with only 20 minutes of active work)
Breakdown:
- Preparation Time: 15 minutes – mixing and initial dough formation
- First Rise: 1 hour – allowing dough to double in size
- Shaping & Second Rise: 30 minutes – forming loaf and final proofing
- Baking Time: 30-35 minutes – achieving golden perfection
- Cooling Period: 1+ hours – essential for proper texture development
This timing represents approximately 25% less hands-on work than traditional kneaded bread recipes, making it perfect for busy schedules while delivering professional-quality results.
Step-by-Step Instructions
Step 1: Activate Your Yeast Foundation
Begin by combining warm water, sugar, and yeast in a large mixing bowl. Warm water works with honey to activate the dry yeast. Make sure the water isn’t too hot, or it can kill the yeast, or too cold, and it can keep it from activating. Let this mixture rest for 10 minutes until it becomes frothy and aromatic—this ensures your yeast is alive and ready to work its magic.
Step 2: Build Your Dough Structure
Add rye flour, bread flour, salt, and olive oil to your activated yeast mixture. The higher percentage of rye flour in your recipe, the more you should lean towards higher-protein bread flour. Mix until a slightly sticky dough forms—rye dough naturally feels different from wheat dough, so don’t worry if it seems less smooth initially.
Step 3: Master the Rye Kneading Technique
Transfer your dough to a lightly floured surface and knead for 8-10 minutes. Handle the dough gently – Overworking rye dough can cause it to break down rather than strengthen. Shorter fermentation times – Rye ferments faster than wheat, so leaving it too long can cause structural issues. Focus on gentle folding and stretching motions rather than aggressive kneading.
Step 4: First Rise Strategy
Place your kneaded dough in a greased bowl, cover with a damp cloth, and let rise for 1 hour until doubled. Rye dough typically rises faster than wheat dough due to its unique fermentation properties, so keep an eye on progress rather than relying solely on timing.
Step 5: Professional Shaping Technique
Shape it into a loaf by stretching the dough from the top center of the dough ball over the edges, and then underneath. It should look and feel like you are holding the loaf with two hands and are pulling the dough inside out with your thumbs. Place the shaped loaf in your greased loaf pan.
Step 6: Final Proofing
Cover again and let rest for 30 minutes. The dough should crown slightly over the rim of your pan, indicating it’s ready for the oven.
Step 7: Achieve Bakery-Style Crust
Preheat your oven to 375°F (190°C). Just before they go into the oven, spritz the loaves of rye bread with water, and slash them about 1/2″ deep. The oval loaves look good with one long, vertical slash. This creates the signature artisan appearance and prevents unwanted cracking.
Step 8: Perfect Baking Execution
Bake for 30-35 minutes until golden brown. When the loaf is fully baked, a digital thermometer inserted into its center should register 190°F. The internal temperature is your most reliable indicator of doneness.
Step 9: Essential Cooling Process
No matter what kind of rye bread you’re making, be sure to let the loaves cool completely before slicing. Remove from pan and cool on a wire rack for at least one hour—this patience ensures perfect texture and prevents gummy interiors.
Nutritional Information
Rye bread stands out as a nutritional powerhouse that surpasses conventional wheat breads in multiple categories. Rye bread contains significantly (2.5x) more fiber than white bread, making it an exceptional choice for digestive health and sustained energy.
Per 100g serving:
- Calories: 250 kcal
- Protein: 8-9g
- Carbohydrates: 48g
- Dietary Fiber: 6g (24% daily value)
- Fat: 3g
- Sodium: 660mg
Key Nutritional Highlights:
- Rye contains a myriad of core vitamins and minerals such as potassium and manganese
- Rye bread is loaded with essential nutrients like B vitamins, iron, magnesium, and zinc. These play vital roles in energy production, immune function, and overall health
- It contains more fiber and nutrients — especially B vitamins — and has been linked to health benefits, such as weight loss, better blood sugar control, and improved heart and digestive health
The impressive nutritional density makes rye bread an intelligent choice for health-conscious individuals seeking both flavor and functional benefits from their daily bread consumption.
Healthier Alternatives for the Recipe
Transform your rye bread into an even more nutritious powerhouse with these smart modifications that maintain authentic flavor while boosting health benefits:
Whole Grain Enhancement:
- Replace 50% of bread flour with whole wheat flour for increased fiber and B vitamins
- Substitute white sugar with raw honey or pure maple syrup for natural antioxidants and minerals
Heart-Healthy Upgrades:
- Add 2 tablespoons of ground flaxseed for omega-3 fatty acids and additional fiber
- Include 1 tablespoon of chia seeds for protein and healthy fats
- Replace butter with extra virgin olive oil for monounsaturated fats
Protein Boost Options:
- Mix in 2 tablespoons of vital wheat gluten for improved texture and protein content
- Add 1 tablespoon of hemp hearts for complete amino acid profiles
Low-Sodium Adaptation:
- Reduce salt to 1 teaspoon and enhance flavor with additional herbs like rosemary or thyme
- Use pickle juice (with reduced salt) as suggested by King Arthur Baking for tangy flavor without excess sodium
Diabetic-Friendly Modifications:
- Replace sugar entirely with stevia extract (use 1/4 teaspoon)
- Add cinnamon for blood sugar regulation properties
- Include psyllium husk (1 teaspoon) for additional fiber and improved glycemic response
These adaptations allow you to customize your rye bread for specific dietary needs while preserving the essential characteristics that make this bread special.
Serving Suggestions
Rye bread’s distinctive flavor profile and robust texture make it exceptionally versatile for both traditional and creative culinary applications:
Classic Deli Combinations:
- Traditional pastrami or corned beef with spicy mustard and pickles
- Smoked salmon with cream cheese, capers, and fresh dill
- Aged cheddar with tomato and crisp lettuce for a satisfying lunch
Gourmet Breakfast Options:
- Avocado toast topped with everything bagel seasoning and cherry tomatoes
- French toast using thick slices with cinnamon and pure maple syrup
- Open-faced breakfast sandwich with scrambled eggs and fresh herbs
International Inspirations:
- Pickled herring on rye bread is a popular Scandinavian recipe
- German-style with liverwurst and sliced onions
- Russian-inspired with beet hummus and fresh cucumber
Creative Culinary Uses:
- ‘Bread and butter pudding’ is a traditional British dessert; the traditional recipe uses white bread, but using rye bread would offer more nutritionally
- Artisan bread crumbs for coating fish or chicken
- Croutons for hearty soups and salads
Wine and Cheese Pairings:
- Serve with aged gouda and robust red wines
- Pair with soft cheeses like brie for elegant appetizers
- Create a rustic charcuterie board centerpiece
The dense, flavorful nature of rye bread means a little goes a long way, making each serving both satisfying and economical for entertaining or everyday meals.
Common Mistakes to Avoid
Learning from typical rye bread baking pitfalls ensures consistent success and helps you achieve bakery-quality results every time:
Temperature-Related Errors:
- Too-hot water kills yeast: If the water is too hot, it can kill the yeast before it is activated. If it is too cold, it will not activate the yeast properly. Always test water temperature with a thermometer or your wrist.
Flour Handling Mistakes:
- Over-kneading rye dough: Unlike wheat bread, rye requires gentle handling to prevent breaking down the delicate protein structure
- Incorrect flour ratios: Rye bread made with 100% rye flour will be dense and heavy; think some of those all-rye breads you find at artisan bakeries, the ones sliced off an enormous loaf and sold by the pound. If you’re looking for a lighter, softer sandwich bread, bread or AP flours are your best friend
Fermentation Timing Issues:
- Rushing the process: Rye ferments faster than wheat, but proper timing is crucial for flavor development
- Over-proofing: Rye ferments faster than wheat, so leaving it too long can cause structural issues
Baking Technique Problems:
- Skipping the scoring: Slashing bread keeps it from tearing (often along the side) as it bakes by giving the rising dough a path for expansion. And while rye doesn’t usually have the oven spring (i.e., the degree to which it rises in the oven) that white bread does, the slashes do ensure an even upward rise
- Under-baking: Rye needs thorough baking to avoid gummy texture—always check internal temperature
Measurement Inaccuracies:
- Volume measuring instead of weighing ingredients leads to inconsistent results
- Weighing ingredients like flour with a kitchen scale is the most accurate way to measure them. The ingredients for baked goods need to be precise or you will have mixed results in terms of moisture, rise, texture, and even flavor
Premature Slicing:
- Cutting bread before complete cooling ruins texture and creates gummy slices
- Patience during cooling allows starches to properly set for ideal crumb structure
By avoiding these common pitfalls, you’ll consistently produce professional-quality rye bread that showcases the grain’s unique characteristics beautifully.
Storing Tips for the Recipe
Proper storage techniques maximize your rye bread’s freshness, flavor, and nutritional value while preventing waste:
Room Temperature Storage:
Store rye bread in an airtight container at room temperature for 3-5 days. For extended preservation, freeze it in a sealed container or bag for up to 3 months. Rye bread should be kept at room temperature in a sealed container or bread box. Proper storage helps maintain its softness and freshness for about 3-5 days. Refrigeration should be avoided as it may cause the bread to dry out.
Optimal Storage Solutions:
- Use breathable bread boxes for the first 2-3 days to maintain crust texture
- Transition to airtight containers or plastic bags for longer storage periods
- Wrap individual slices in parchment paper before freezing for easy portioning
Freeze-and-Refresh Techniques:
- Slice bread before freezing for convenient single-serving portions
- Wrap whole loaves in aluminum foil, then place in freezer bags for maximum protection
- Thaw frozen slices directly in the toaster for fresh-baked taste and texture
Signs of Freshness:
- Rye bread should feature a dense texture and a slightly sour aroma, characteristic of well-made rye. The crust should be thick and chewy, providing a robust bite
- Avoid rye bread that is overly dry or crumbly, as it may be stale. Bread with mold or a very strong odor should also be avoided, as it may indicate spoilage and is not safe to eat
Reviving Day-Old Bread:
- Lightly mist crust with water and warm in 350°F oven for 5-7 minutes
- Toast slices to restore crispness and enhance flavor
- Use slightly stale bread for French toast or bread puddings for superior texture
Pre-Planning Storage:
- Cool bread completely before storage to prevent condensation and mold
- Never store warm bread in sealed containers
- Consider portioning large loaves into meal-sized sections before initial storage
These storage strategies ensure your homemade rye bread maintains its distinctive qualities and provides delicious, nutritious meals throughout its extended shelf life.
Conclusion
Mastering homemade rye bread transforms your baking repertoire while delivering remarkable health benefits including improved cholesterol levels, better digestive health, and enhanced blood sugar control. This nutritionally dense bread combines authentic flavor with practical versatility, making it perfect for everything from gourmet sandwiches to elegant breakfast toast. The simple ingredient list and straightforward technique prove that bakery-quality rye bread is absolutely achievable in your home kitchen.
FAQs
Q: Can I make rye bread without caraway seeds?
A: Absolutely! Caraway seeds are traditional but optional. A small amount of honey balances out the sourness and lends a nice chew, while caraway seeds, which can be left out, impart subtle notes of citrus and anise. Your bread will still have authentic rye flavor without them.
Q: Why is my rye bread dense and heavy?
A: Rye flour on its own will give you a dense loaf because it does not contain a lot of gluten. Bread flour, with its high gluten content, balances this out and gives the bread some lift and lightness. Ensure you’re using the proper ratio of bread flour to rye flour for optimal texture.
Q: Can people with gluten sensitivities eat rye bread?
A: No. While rye flour has less gluten than wheat flour, it still contains gluten and is unsuitable for those with celiac disease or gluten sensitivity. For individuals with celiac disease, wheat allergy, or non-celiac gluten sensitivity, consuming gluten can lead to adverse effects. While gluten is harmless to consume for people who are not gluten intolerant, those with celiac disease must be vigilant.
Q: How do I know when my rye bread is properly baked?
A: Use both visual and temperature cues. Bake the loaves for 35 to 40 minutes or until a digital thermometer inserted into the center reads 205°F to 210°F. The bread should also sound hollow when tapped on the bottom.
Q: Can I substitute all-purpose flour for bread flour?
A: While you’ll be able to get away with it and still have a serviceable loaf, we definitely recommend going the extra step and using bread flour. Well, this specific type of flour has a higher protein content than the all-purpose stuff and allows the dough to rise higher. Bread flour’s protein creates more gluten, which results in the desired chewy texture when the bread is baked.
Q: How does rye bread compare nutritionally to white bread?
A: Both provide a moderate amount of protein and have a similar calorie content. Rye bread contains significantly (2.5x) more fiber than white bread. However, choosing rye bread over white bread does offer significantly more fiber. According to scientific research, it also has a better glycemic index and provides more satiety and improved health markers.
Simple Homemade Rye Bread Recipe
- Total Time: 3 hours 20 minutes
- Yield: 1 loaf 1x
- Diet: Vegetarian
Description
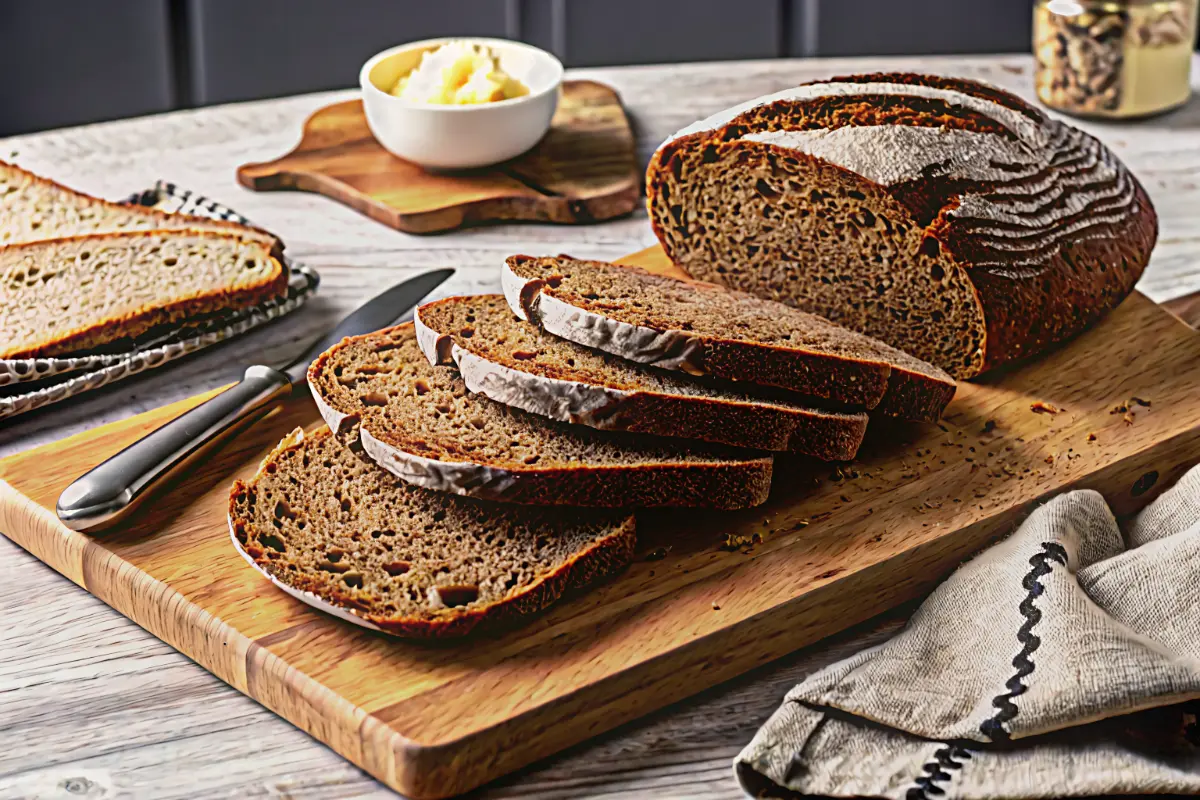
Homemade Rye Bread is a hearty, nutrient-dense artisan loaf with a distinctive tangy flavor and dense crumb. Made with a blend of rye flour and bread flour, this bread delivers bakery-quality results at home while offering impressive health benefits like improved digestion, better blood sugar control, and increased fiber intake.
Ingredients
- 1 ½ cups warm water (110°F / 45°C)
- 2 ¼ tsp active dry yeast
- 1 tbsp sugar or honey
- 1 ½ cups rye flour
- 2 cups bread flour, plus extra for dusting
- 1 ½ tsp salt
- 2 tbsp olive oil or melted butter
- 1 tbsp caraway seeds (optional)
Instructions
- Mix warm water, yeast, and sugar in a bowl and let stand 10 minutes until foamy.
- Add rye flour, bread flour, salt, and oil and mix until a sticky dough forms.
- Knead gently for 8–10 minutes until smooth but slightly tacky.
- Place dough in a greased bowl, cover, and let rise 1 hour or until doubled.
- Shape dough into a loaf and place in a greased loaf pan.
- Cover and let rise for 30 minutes.
- Preheat oven to 375°F (190°C), slash dough, and mist lightly with water.
- Bake for 30–35 minutes until golden and internal temperature reaches 190°F.
- Cool completely on a wire rack before slicing.
Notes
Rye dough should be handled gently to avoid breaking down its structure. Always allow the bread to cool fully before slicing to prevent a gummy texture.
- Prep Time: 15 minutes
- Cook Time: 35 minutes
- Category: Bread
- Method: Baking
- Cuisine: European
Nutrition
- Serving Size: 1 slice
- Calories: 250
- Sugar: 4g
- Sodium: 660mg
- Fat: 3g
- Saturated Fat: 0.5g
- Unsaturated Fat: 2.5g
- Trans Fat: 0g
- Carbohydrates: 48g
- Fiber: 6g
- Protein: 9g
- Cholesterol: 0mg
Keywords: rye bread, homemade rye bread, artisan bread, healthy bread recipe