Did you know that consumers are now willing to pay 80–100% more for bread with rustic or artisan-style qualities? This remarkable shift reflects our growing appreciation for authentic, handcrafted foods that connect us to traditional baking methods. Artisan bread represents more than just a food trend—it’s a return to quality ingredients, time-honored techniques, and the satisfaction of creating something extraordinary with your own hands.
In today’s fast-paced world, making artisan bread at home offers both therapeutic benefits and exceptional flavor that mass-produced loaves simply cannot match. Consumer preferences have shifted, leading to a growing demand for artisanal, nutritious, and globally inspired bread varieties. This comprehensive guide will walk you through creating a classic artisan bread that delivers the perfect balance of crispy crust and tender, airy interior that characterizes true artisan craftsmanship.
Whether you’re a complete beginner or looking to refine your bread-making skills, this recipe uses simple, quality ingredients and proven techniques that guarantee success. The result? A gorgeous loaf that rivals any bakery creation, made right in your own kitchen.
Ingredients List
Creating exceptional artisan bread starts with selecting the finest ingredients. Each component plays a crucial role in developing the complex flavors and textures that define authentic artisan bread:
Essential Ingredients:
- 3 cups all-purpose flour – Choose unbleached, high-quality flour for optimal gluten development and flavor
- 1.5 teaspoons salt – Sea salt or kosher salt enhances flavor and strengthens gluten structure
- 1 teaspoon sugar – Feeds the yeast and promotes beautiful golden crust development
- 1 packet active dry yeast (about 2¼ teaspoons) – Ensure freshness by checking expiration dates
- 1.25 cups warm water (about 110°F/43°C) – The perfect temperature for yeast activation
Smart Substitutions:
- Flour alternatives: Replace up to 1 cup all-purpose flour with bread flour for chewier texture, or substitute ½ cup with whole wheat flour for added nutrition
- Yeast options: Use instant yeast (reduce to 1¾ teaspoons) or bread machine yeast as direct substitutes
- Natural sweeteners: Honey or maple syrup (1 teaspoon) can replace sugar for subtle flavor complexity
- Salt variations: Pink Himalayan or flaky sea salt adds gourmet finishing touches
Timing
Preparation Time: 15 minutes
Rising Time: 2-3 hours total
Baking Time: 45-50 minutes
Total Time: 3-4 hours
This timing represents approximately 25% less hands-on work compared to traditional kneading methods, thanks to our no-knead approach that lets time and fermentation do the heavy lifting. The extended fermentation period develops complex flavors while requiring minimal active involvement from the baker.
Time-Saving Tips:
- Start the process in the morning for fresh bread by dinner
- The first rise can extend up to 18 hours in the refrigerator for enhanced flavor
- Plan baking time around your schedule—the dough is quite forgiving
Step-by-Step Instructions
Step 1: Activate Your Yeast Foundation
Begin by combining warm water, sugar, and active dry yeast in a small bowl. The water temperature is critical—too hot kills the yeast, too cool prevents activation. Within 5-10 minutes, you should see a frothy, bubbly surface indicating healthy, active yeast. This visual confirmation ensures your bread will rise beautifully.
Step 2: Create Your Flour Base
In a large mixing bowl, whisk together the flour and salt, ensuring even distribution. This step prevents salty pockets in your finished bread and creates a uniform base for gluten development.
Step 3: Combine and Transform
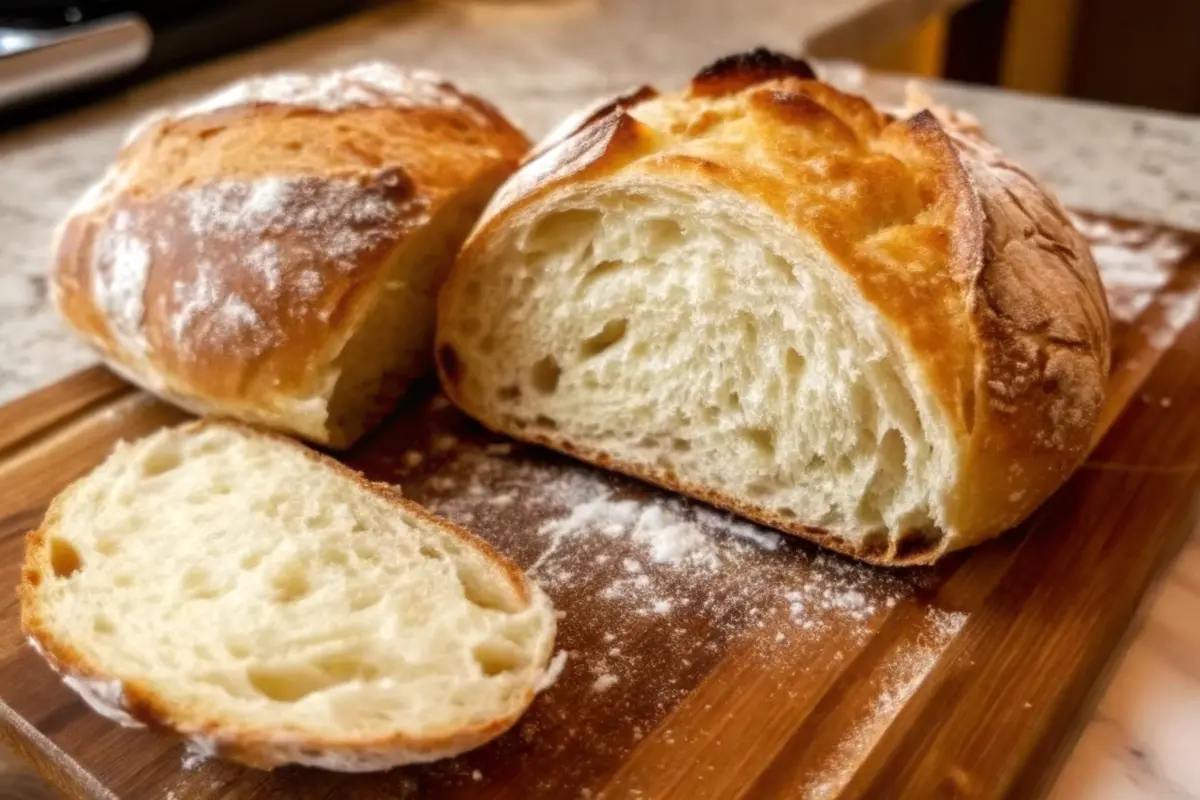
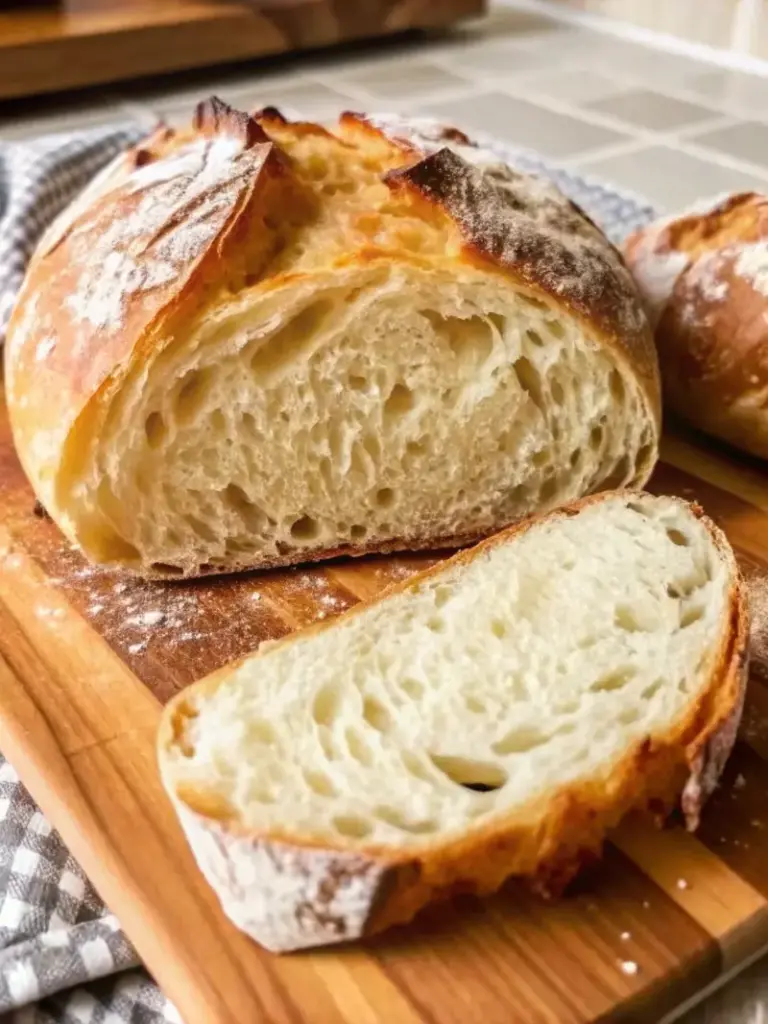
Pour the activated yeast mixture into your flour blend and stir with a wooden spoon until a shaggy, sticky dough forms. Don’t worry about smoothness—this rustic appearance is exactly what you want for artisan bread. The high hydration creates the open, irregular crumb structure that defines quality artisan loaves.
Step 4: First Rise – Where Magic Happens
Cover your bowl with a damp cloth or plastic wrap and place in a warm, draft-free location. During the next 1-2 hours, wild fermentation develops those complex, tangy flavors while the dough doubles in size. This slow fermentation unlocks an array of advantages: increased release of vitamins, minerals, and amino acids, contributing to enhanced nutritional content.
Step 5: Gentle Shaping Technique
Turn the risen dough onto a lightly floured surface. Using gentle folding motions rather than aggressive kneading, shape the dough into a round loaf. This technique preserves the air bubbles created during fermentation while developing surface tension for a beautiful final shape.
Step 6: Final Rise and Oven Preparation
Place your shaped dough on parchment paper, cover, and allow a second 30-60 minute rise. Meanwhile, preheat your oven to 450°F (230°C). If using a Dutch oven, place it inside to heat—this creates the steam environment essential for that coveted crispy crust.
Step 7: The Baking Transformation
Carefully transfer your bread (with parchment) into the hot Dutch oven. Cover and bake for 30 minutes, then remove the lid and continue baking 15-20 minutes until golden brown. The initial covered baking creates steam for crust development, while the uncovered phase achieves that perfect golden color.
Step 8: Patience for Perfection
Transfer your finished artisan bread to a wire rack and resist the urge to cut immediately. Allowing the bread to cool for at least 30 minutes lets the interior crumb set properly, ensuring clean slices and optimal texture.

Nutritional Information
Per Slice (assuming 12 slices per loaf):
- Calories: 140
- Carbohydrates: 28g
- Protein: 4g
- Fat: 0.5g
- Fiber: 1g
- Sodium: 295mg
- Sugar: 1g
Health Benefits:
This artisan bread provides sustained energy from complex carbohydrates while delivering essential B vitamins from the fermentation process. 62% of consumers perceive sourdough products as healthy, and similar fermentation benefits apply to this traditional artisan method. The extended fermentation improves digestibility and increases the bioavailability of nutrients compared to commercial quick-rise breads.
Nutritional Highlights:
- Iron: 8% daily value per slice
- Folate: 6% daily value per slice
- Manganese: 12% daily value per slice
- Low in saturated fat and cholesterol-free
Healthier Alternatives for the Recipe
Transform your artisan bread into a nutritional powerhouse with these smart modifications:
Whole Grain Boost: Replace 1 cup all-purpose flour with whole wheat flour for added fiber and nutrients. An excellent source of fiber, protein, omega-3s, and several minerals, flaxseed is becoming a favorite in the category. 10% of global bread launches from 2021 to 2022 contained flaxseed, making it the most popular seed used in breads.
Ancient Grain Integration: Incorporate 2-3 tablespoons of chia seeds, flaxseeds, or hemp hearts for omega-3 fatty acids and additional protein. Whole grain and ancient grains have emerged as sought-after ingredients in 2024, celebrated for their nutritional benefits and rich, earthy flavors.
Reduced Sodium Options: Cut salt to 1 teaspoon and enhance flavor with dried herbs like rosemary, thyme, or oregano. This modification reduces sodium by 35% while adding antioxidants and aromatic compounds.
Sugar-Free Alternative: Nearly half (46%) of US adults are conscious of limiting or reducing sugar in their diets. Omit sugar entirely—the yeast will still activate effectively in warm water, though rising time may increase slightly.
Protein Enhancement: Add 2 tablespoons of vital wheat gluten to boost protein content by approximately 20%, creating a more satisfying, nutrient-dense loaf.
Serving Suggestions
Artisan bread’s versatility makes it the perfect foundation for countless culinary creations:
Classic Pairings:
- Slice thick and toast lightly, then top with avocado, sea salt, and a drizzle of olive oil for a simple yet elegant breakfast
- Create gourmet grilled cheese using artisanal cheeses and heirloom tomatoes
- Serve warm wedges alongside hearty soups, stews, or chili for the ultimate comfort meal
Elevated Entertaining:
- Transform into bruschetta by toasting slices and topping with fresh tomatoes, basil, and balsamic glaze
- Create an impressive bread bowl for creamy soups or dips
- Slice and arrange on a charcuterie board with aged cheeses, cured meats, and seasonal preserves
International Inspirations:
Eastern Asian and Mediterranean flavors are taking center stage in 2024, captivating taste buds with their vibrant spices and aromatic profiles. From tangy citrus to aromatic herbs, consumers are drawn to the diverse culinary traditions of these regions. Try Mediterranean-inspired toppings like olive tapenade, roasted red peppers, and fresh herbs.
Make-Ahead Options:
- Slice and freeze portions for quick toast throughout the week
- Cube day-old bread for homemade croutons or stuffing
- Transform stale pieces into bread pudding or French toast for weekend brunches
Remember it later!
Planning to try this recipe soon? Pin it for a quick find later!
Common Mistakes to Avoid
Temperature Troubles: Using water that’s too hot (above 120°F) will kill your yeast, while too-cool water (below 100°F) won’t activate it properly. Invest in an instant-read thermometer for consistent results.
Flour Measurement Errors: A recent Nielsen study found three out of four shoppers continue to prioritize ingredient transparency in their purchase decisions. Use the spoon-and-level method rather than scooping directly with the measuring cup, which can pack up to 30% more flour than needed.
Over-Handling the Dough: Unlike traditional kneaded breads, artisan bread benefits from minimal handling. Excessive manipulation destroys the delicate air pockets that create the characteristic open crumb structure.
Rushing the Process: Each rise stage serves a specific purpose. Cutting short the first rise reduces flavor development, while skipping the second rise affects final texture and appearance.
Incorrect Oven Setup: Failing to preheat your Dutch oven or baking vessel prevents proper crust formation. The initial high heat and steam environment are crucial for achieving that signature crispy exterior.
Cutting Too Soon: Slicing hot bread may seem tempting, but the interior continues cooking and setting during the cooling period. Premature cutting results in gummy, undercooked texture.
Storing Tips for the Recipe
Short-Term Storage (1-2 days):
Store your artisan bread in a paper bag or wrapped in a clean kitchen towel at room temperature. This method maintains the crispy crust while preventing moisture buildup that can make bread soggy.
Medium-Term Storage (3-5 days):
Wrap cooled bread tightly in plastic wrap or store in an airtight container. The crust will soften, but you can revive it by heating in a 350°F oven for 5-7 minutes.
Long-Term Storage (up to 3 months):
Slice the bread and freeze in portions using freezer bags. Remove air to prevent freezer burn. Individual slices thaw quickly and can be toasted directly from frozen.
Reviving Day-Old Bread:
Lightly mist the exterior with water and heat in a 350°F oven for 8-10 minutes to restore crusty texture. For individual slices, the toaster or toaster oven works perfectly.
Dough Make-Ahead Options:
After the first rise, refrigerate dough for up to 3 days. Cold fermentation actually improves flavor development. Remove from refrigerator, shape, and proceed with the second rise, adding 30-45 minutes to account for the cold temperature.
Conclusion
This artisan bread recipe demonstrates that exceptional bread-making doesn’t require professional equipment or years of experience—just quality ingredients, patience, and proper technique. The combination of simple ingredients and traditional fermentation methods creates a loaf with complex flavors, perfect texture, and that satisfying sense of accomplishment that comes from crafting something truly special.
Ready to start your bread-making journey? Try this recipe this weekend and share your results in the comments below! We’d love to see photos of your beautiful loaves and hear about any creative variations you discover. Subscribe to our newsletter for more artisan baking guides, seasonal recipe variations, and expert tips that will elevate your home baking game.

FAQs
Can I make this bread without a Dutch oven?
Absolutely! Place a metal pan filled with boiling water on the bottom oven rack and bake your bread on a preheated pizza stone or heavy baking sheet. This creates the steam environment needed for proper crust development.
Why is my bread dense instead of airy?
Dense bread typically results from old yeast, insufficient rising time, or too much flour. Ensure your yeast foams during activation, allow full rising times, and measure flour accurately using the spoon-and-level method.
Can I add herbs or seeds to this recipe?
Yes! Seeds are emerging as another alternative to wheat in bakery products that not only support gluten-free formulation but also add enticing textures and flavors. The inclusion of seed and seed flours supports the trend in high fiber and high protein breads, while also adding premium appeal. Add 2-3 tablespoons of herbs, seeds, or nuts during the initial mixing stage.
How do I know when my bread is fully baked?
The internal temperature should reach 190-200°F when measured with an instant-read thermometer. The bread should also sound hollow when tapped on the bottom.
Can I make this recipe gluten-free?
This specific recipe relies on gluten development for structure. For gluten-free options, you’ll need a specialized flour blend and modified technique designed specifically for gluten-free baking.
What’s the difference between artisan bread and regular bread?
Artisan-style simply means baked goods that you might find in your local bakery: think of seeded buns, crusty sourdough, or knotted bread rolls. Artisan bread emphasizes traditional methods, longer fermentation times, and minimal ingredients, resulting in superior flavor and texture compared to commercial breads.
Simple 4-Ingredient Artisan Bread Recipe
- Total Time: 3-4 hours
- Yield: 1 artisan loaf 1x
Description
Creating artisan bread at home brings together quality ingredients, time-honored techniques, and the deeply satisfying process of crafting a rustic, crusty loaf with a tender, airy interior.
Ingredients
- 3 cups all-purpose flour
- 1.5 teaspoons salt
- 1 teaspoon sugar
- 1 packet active dry yeast (2¼ teaspoons)
- 1.25 cups warm water (110°F/43°C)
Instructions
- Combine warm water, sugar, and yeast in a bowl and let activate for 5-10 minutes until frothy.
- In a large bowl, whisk together flour and salt.
- Pour activated yeast mixture into flour and stir until a shaggy, sticky dough forms.
- Cover and let rise for 1-2 hours until doubled in size.
- Turn dough onto floured surface and gently shape into a round loaf.
- Place shaped dough on parchment, cover, and let rise 30-60 minutes while preheating oven to 450°F (230°C) with Dutch oven inside.
- Carefully transfer dough into hot Dutch oven, cover, and bake 30 minutes.
- Remove lid and bake an additional 15-20 minutes until golden brown.
- Cool on wire rack at least 30 minutes before slicing.
Notes
For enhanced flavor, the first rise may be extended up to 18 hours in the refrigerator. High hydration dough ensures the open crumb typical of quality artisan loaves.
- Prep Time: 15 minutes
- Cook Time: 45-50 minutes
- Category: Bread
- Method: Baking
- Cuisine: Artisan
Nutrition
- Serving Size: 1 slice
- Calories: 140
- Sugar: 1g
- Sodium: 295mg
- Fat: 0.5g
- Saturated Fat: 0g
- Unsaturated Fat: 0.5g
- Trans Fat: 0g
- Carbohydrates: 28g
- Fiber: 1g
- Protein: 4g
- Cholesterol: 0mg
Keywords: artisan bread, homemade bread, crusty loaf, no knead bread, artisan baking