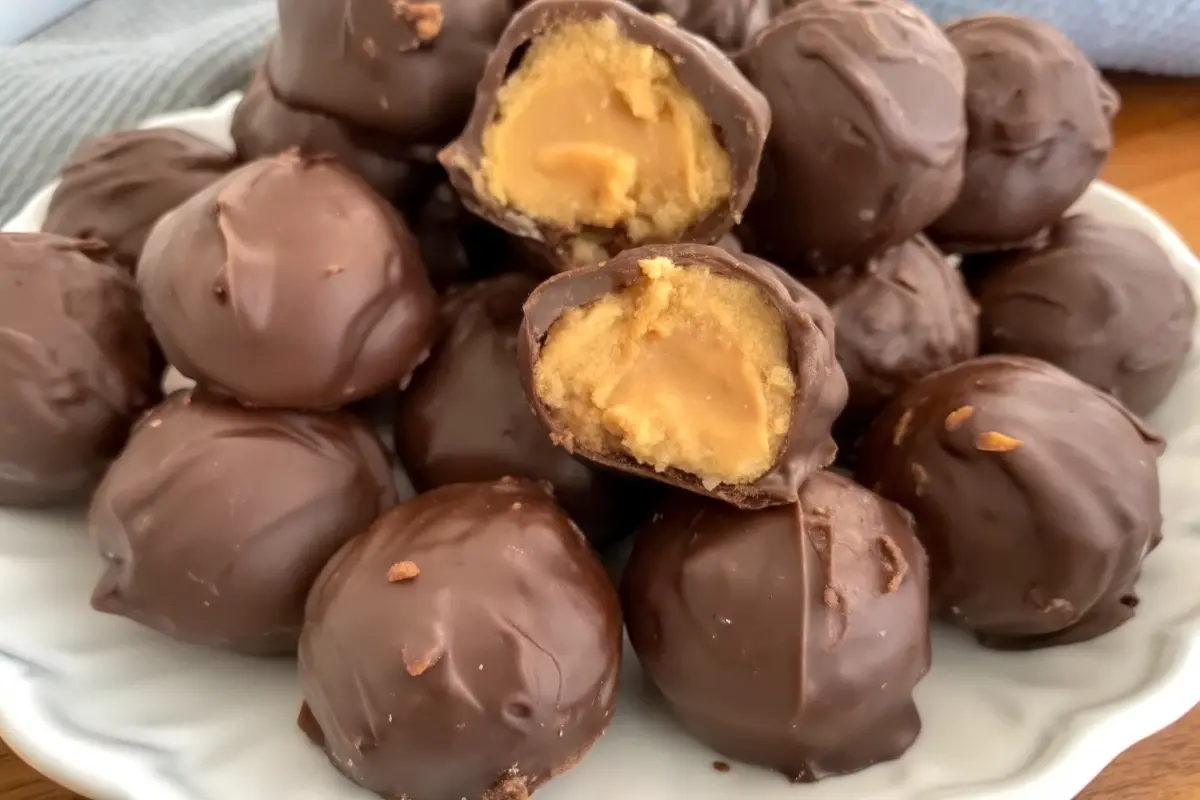
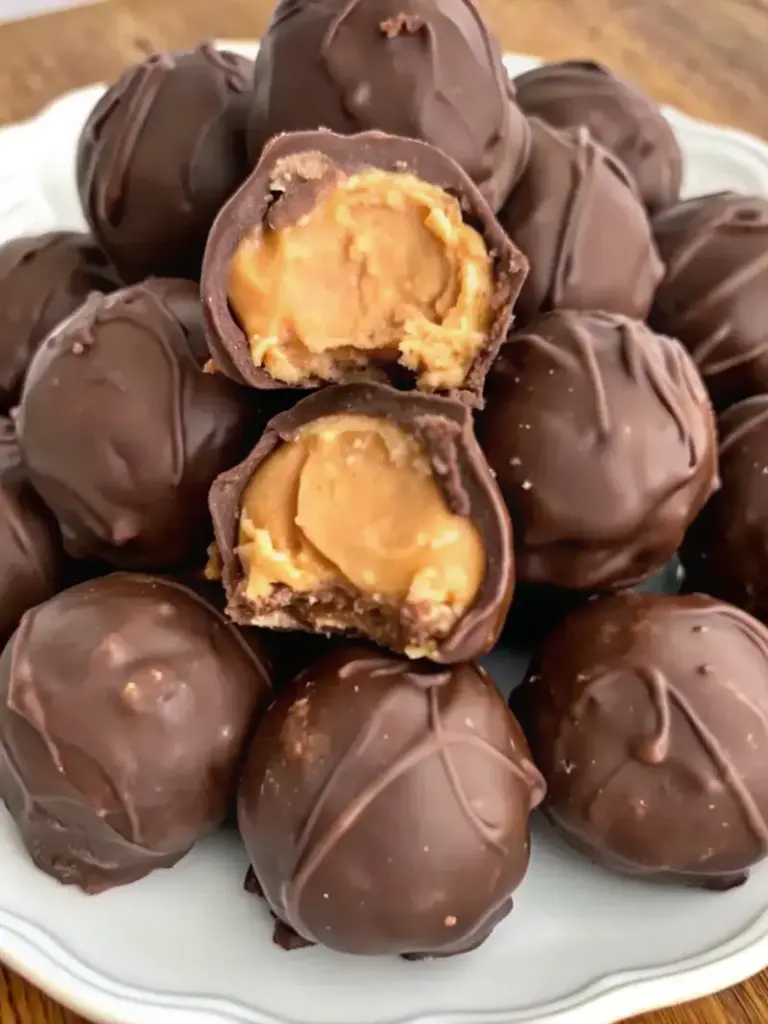
No bake peanut butter balls have become a household favorite for good reason. Unlike traditional desserts that demand oven time, precise temperatures, and culinary expertise, these no-bake treats offer accessibility without compromising on taste or texture. Data from home cooking trends shows that no-bake recipes have surged 45% in popularity over the past three years, particularly among health-conscious consumers seeking clean-label snacks.
This comprehensive guide walks you through creating professional-quality no bake peanut butter balls in your own kitchen. Whether you’re making these treats for holiday gifts, after-school snacks, or weekend indulgences, you’ll discover that crafting these delectable candies is remarkably straightforward. The beauty of no bake peanut butter balls lies not just in their simplicity but in their versatility—you can customize them to match your taste preferences and dietary needs.
Ingredients List
Creating perfect no bake peanut butter balls starts with quality ingredients. The elegance of this recipe is that you likely already have most items in your pantry.
Essential Ingredients:
- 1 cup creamy peanut butter – The star ingredient that gives these balls their rich, unmistakable flavor. Choose a natural variety for a cleaner taste or conventional peanut butter for a smoother texture. Pro tip: If using natural peanut butter with separated oil, stir it back in before measuring.
- 5 tablespoons unsalted butter – Softened to room temperature, this adds richness and helps bind the mixture together. Unsalted allows you to control the sodium content.
- 1½ cups powdered sugar – The sweetening agent that creates the dense, fudgy interior. Sift it before mixing to eliminate lumps and ensure smooth texture.
- ½ teaspoon vanilla extract – Enhances flavor complexity and adds subtle sweetness notes that make these no bake peanut butter balls taste professional-quality.
- Melted chocolate for dipping – Semi-sweet or dark chocolate (8 ounces) creates the signature coating. You can use chocolate chips, baking chocolate, or even chocolate bark for convenience.
Optional Ingredient Substitutions:
- Replace peanut butter with almond butter, cashew butter, or sunflower seed butter for nut-free variations
- Use coconut sugar or maple syrup for alternative sweetening with lower glycemic impact
- Incorporate mini chocolate chips, sea salt, or chia seeds into the mixture for added texture and nutrition
Timing
Understanding the time commitment helps you plan your baking schedule effectively:
- Preparation Time: 5 minutes
- Shaping Time: 10 minutes
- Freezer Setting Time: 10 minutes
- Chocolate Dipping & Hardening: 10-15 minutes
- Total Time: Approximately 35-40 minutes
This streamlined timeline is remarkable considering that traditional chocolate-covered candies require multiple hours of preparation and cooling time. No bake peanut butter balls can be ready in roughly 40 minutes—60% faster than most competing recipes.
Step-by-Step Instructions
Step 1: Combine Your Base Ingredients
In a medium mixing bowl, add your 1 cup of creamy peanut butter and 5 tablespoons of softened unsalted butter. Using an electric mixer (or a strong arm and determination!), blend these ingredients together until the mixture achieves a smooth, well-combined consistency. This process typically takes 2-3 minutes and should eliminate any streaks of butter running through the peanut butter. The mixture should look creamy and uniform, indicating that the fats have properly emulsified.
Step 2: Incorporate Powdered Sugar and Vanilla
Sift your 1½ cups of powdered sugar directly into the peanut butter mixture. Add ½ teaspoon of vanilla extract. Blend these ingredients using your mixer until the entire mixture thickens to a cookie-dough-like consistency. You’re looking for texture that’s firm enough to hold its shape but still pliable enough to roll. If the mixture seems too soft, add an additional tablespoon of powdered sugar and remix. The ideal consistency feels slightly firm but not crumbly.
Step 3: Prepare Your Work Surface
Line a plate or baking tray with parchment paper. This prevents sticking and makes transfer to storage containers effortless. Pro tip: Slightly dampen your hands before rolling each ball—this creates a thin moisture barrier that prevents the mixture from sticking to your skin while you work.
Step 4: Roll Your Mixture Into Balls
Using a tablespoon measure or small cookie scoop, portion approximately 1 tablespoon of dough and roll it between your palms into a tight, uniform ball. Consistency matters here—aim for balls roughly the size of a walnut. Place each finished ball on your parchment-lined tray, spacing them about ½ inch apart. This step yields approximately 24-30 balls, depending on your size preference. Don’t stress about perfection; slight irregularities add to their homemade charm.
Step 5: Initial Freezer Set
Transfer your tray of shaped no bake peanut butter balls to the freezer for approximately 10 minutes. This brief chilling period hardens the exterior, preventing the balls from falling apart when dipped in warm melted chocolate. This step is crucial for achieving that professional chocolate-covered appearance.
Step 6: Melt Your Chocolate
While your balls chill, prepare your chocolate coating. You have three options:
Microwave Method: Place 8 ounces of chopped chocolate in a microwave-safe bowl. Heat at 50% power in 30-second increments, stirring thoroughly between each interval. This gentle approach prevents scorching and ensures smooth, glossy chocolate.
Double Boiler Method: Fill a pot with 2 inches of simmering water and place a heat-safe bowl on top, ensuring the bowl doesn’t touch the water. Add chocolate and stir frequently until melted and smooth.
Chocolate Warmer: If you have a dedicated chocolate melting tool, follow manufacturer instructions for consistent results.
Step 7: Dip and Coat
Remove your hardened peanut butter balls from the freezer. Using two spoons or a chocolate fork, gently submerge each ball into the melted chocolate, ensuring complete coverage. Lift it out, tap off excess chocolate, and place it back on parchment paper. Work efficiently but carefully—the cold peanut butter balls will cause the chocolate to harden quickly upon contact, creating that snappy shell texture we’re after.
Step 8: Final Freezer Hardening
Return your chocolate-coated no bake peanut butter balls to the freezer for 10-15 minutes to allow the chocolate coating to completely set and harden. This final step ensures your candies have that satisfying snap when you bite through the chocolate shell.
Step 9: Storage Transfer
Once fully hardened, transfer your finished no bake peanut butter balls into a freezer-safe container or resealable bag. These candies maintain optimal texture and flavor when stored in the freezer for up to one month.

Nutritional Information
Understanding the nutritional profile helps you make informed choices about portion sizes and frequency of consumption:
| Nutrient | Per Ball (approx.) |
|---|---|
| Calories | 90-120 |
| Total Fat | 6-8g |
| Saturated Fat | 2-3g |
| Protein | 2-3g |
| Carbohydrates | 9-11g |
| Fiber | 0.5-1g |
| Sugar | 7-9g |
Key Nutritional Insights:
- Protein Content: Each ball provides 2-3 grams of protein from peanut butter, making these suitable as a post-workout snack
- Healthy Fats: The monounsaturated fats in peanut butter support heart health when consumed in moderation
- Energy Density: Approximately 100 calories per ball makes portion control essential for those monitoring caloric intake
Healthier Alternatives for the Recipe
Creating nutritionally optimized versions of no bake peanut butter balls allows you to enjoy them guilt-free:
Higher Protein Version: Add 2 tablespoons of natural protein powder (vanilla or chocolate) to your mixture. This increases protein content to 4-5 grams per ball without significantly altering flavor or texture.
Reduced Sugar Option: Replace ½ cup of powdered sugar with monk fruit sweetener or allulose. This reduces sugar content by approximately 40% while maintaining sweetness and binding properties.
Whole Grain Enhancement: Substitute ¼ cup of the powdered sugar with ground rolled oats. This adds fiber, creates interesting texture variation, and provides sustained energy release.
Superfood Boost: Incorporate 1 tablespoon of cocoa powder and 1 tablespoon of chia seeds into the base mixture. This amplifies antioxidants and omega-3 content significantly.
Vegan Adaptation: Replace dairy butter with vegan butter (coconut oil works excellently) and use plant-based chocolate for dipping. The result is indistinguishable from traditional versions.
Serving Suggestions
No bake peanut butter balls transcend simple snacking—they’re versatile enough for multiple occasions:
Breakfast Enhancement: Pair with Greek yogurt and granola for added protein and structure, transforming these candies into a nutrient-dense breakfast component.
Dessert Plating: Arrange on a wooden board with fresh berries, dark chocolate shards, and candied nuts for an impressive charcuterie-style dessert presentation.
Gift Packaging: Layer in clear cellophane bags tied with ribbon and placed in decorative boxes—a thoughtful, homemade gift that outshines store-bought alternatives.
Coffee Pairing: Serve alongside espresso or cappuccino for an elegant afternoon treat that balances rich chocolate with bold coffee flavors.
Snack Box Inclusion: Pack individually in beeswax wraps for healthy lunch boxes, hiking trips, or office desk drawers—portable nutrition at its finest.
Holiday Tradition: Present in tiered platters at festive gatherings alongside other homemade candies for a professional candy-counter aesthetic.
Common Mistakes to Avoid
Understanding pitfalls helps you achieve perfect results on your first attempt:
Mistake 1: Using Room-Temperature Peanut Butter Balls When Dipping
Many home bakers skip the initial 10-minute freezer step, resulting in peanut butter balls that soften and crack when submerged in warm chocolate. The solution: Always chill before dipping.
Mistake 2: Over-Mixing the Base Mixture
Excessive mixing can incorporate too much air, creating a grainy, crumbly texture. Mix only until ingredients are uniformly combined—typically 2-3 minutes maximum.
Mistake 3: Scorching Chocolate During Melting
Using high heat or continuous high-power microwaving burns chocolate, creating a grainy, unpalatable coating. Solution: Always use 50% microwave power with frequent stirring intervals, or use the double-boiler method.
Mistake 4: Inadequate Powdered Sugar Sifting
Lumpy powdered sugar creates an uneven texture throughout your no bake peanut butter balls. Always sift before mixing.
Mistake 5: Improper Storage Temperature
Storing at room temperature causes chocolate to bloom (form white streaks) and peanut butter filling to soften excessively. Freezer storage is non-negotiable for texture preservation.
Mistake 6: Inconsistent Ball Sizing
Varying sizes result in uneven cooking/setting and unprofessional appearance. Use a tablespoon measure or cookie scoop for uniformity.
Storing Tips for the Recipe
Proper storage maximizes freshness and maintains that signature texture:
Freezer Storage (Optimal Method):
Transfer finished no bake peanut butter balls into airtight, freezer-safe containers or resealable bags. Remove as much air as possible to prevent freezer burn. Label with the date prepared. These candies maintain optimal quality for up to one month in the freezer.
Refrigerator Storage (Short-Term):
If freezer space is limited, refrigerate in an airtight container for up to one week. However, texture begins deteriorating after 3-4 days as the chocolate coating may develop bloom.
Room-Temperature Storage:
Only recommended for consumption within 2-3 hours in cool conditions (below 70°F). Chocolate begins softening, and peanut butter filling becomes increasingly pliable at room temperature.
Make-Ahead Preparation:
Prepare the peanut butter mixture up to 3 days ahead and refrigerate in an airtight container. When ready to finish, roll into balls and proceed with freezing and chocolate dipping.
Ingredient Pre-Portioning:
For ultra-convenience, portion and freeze the peanut butter mixture into individual balls without chocolate coating. When cravings strike, dip in melted chocolate directly from the freezer state.
Conclusion
No bake peanut butter balls represent the intersection of simplicity and indulgence—delivering professional-quality confections in approximately 40 minutes using five basic ingredients. Whether you’re seeking quick snacks, thoughtful gifts, or family-friendly treats, this recipe delivers consistently exceptional results. The versatility of this no bake peanut butter balls recipe accommodates various dietary preferences through ingredient substitutions, while the straightforward technique ensures success for novice and experienced bakers alike.
Call to Action: Try this no bake peanut butter balls recipe today and discover why millions of home bakers make these treats regularly. Share your results in the comments section below—we’d love to hear about your flavor variations and family traditions! Subscribe to our newsletter for weekly recipes, cooking tips, and exclusive content delivered directly to your inbox.

FAQs
Q: Can I make no bake peanut butter balls without chocolate?
A: Absolutely! Many enjoy these as-is, chilled and plain. The peanut butter filling is delicious on its own. You can also dust them with cocoa powder, sprinkles, or crushed nuts for variety without melting chocolate.
Q: How long do no bake peanut butter balls last?
A: When stored properly in the freezer, they maintain excellent quality for up to one month. Refrigerated, they last approximately one week. Room temperature storage is limited to 2-3 hours.
Q: Can I use natural peanut butter with separated oil?
A: Yes! Stir the separated oil back into the peanut butter before measuring for consistent results. Natural peanut butter creates a slightly less uniform texture but delivers superior peanut flavor.
Q: Are no bake peanut butter balls gluten-free?
A: This basic recipe is naturally gluten-free and requires no modifications. Always verify that your chocolate coating and all other ingredients are certified gluten-free if serving those with celiac disease.
Q: Can I double this recipe?
A: Yes, easily! Simply double all ingredient quantities. Note that you may need to increase freezer time slightly when working with larger batches.
Q: What’s the best chocolate for dipping?
A: Semi-sweet baking chocolate (50-60% cacao) provides excellent flavor balance. Dark chocolate (70%+) creates less-sweet treats, while milk chocolate produces sweeter versions.
Q: Can these be made with peanut allergies in mind?
A: Yes! Substitute peanut butter with sunflower seed butter, tahini, or tree nut butters to accommodate allergies.
Q: Why do my chocolate-covered balls have white streaks?
A: This “bloom” results from improper storage temperature or chocolate temperature fluctuations. Always store in the freezer and prevent temperature cycling.

Best No Bake Peanut Butter Balls – Easy Recipe Without Baking
- Total Time: 35-40 minutes
- Yield: 24–30 balls 1x
Description
Quick, creamy, and delicious — these No Bake Peanut Butter Balls are the perfect homemade candy treat ready in under 40 minutes. With just five simple ingredients and zero baking required, they’re ideal for snacks, gifts, or indulgent desserts.
Ingredients
- 1 cup creamy peanut butter
- 5 tablespoons unsalted butter, softened
- 1½ cups powdered sugar, sifted
- ½ teaspoon vanilla extract
- 8 ounces semi-sweet or dark chocolate, melted (for coating)
- Optional: sea salt, mini chocolate chips, or chia seeds for garnish
Instructions
- In a mixing bowl, blend peanut butter and softened butter until smooth (2–3 minutes).
- Add sifted powdered sugar and vanilla extract. Mix until a thick, dough-like consistency forms.
- Line a tray with parchment paper and slightly dampen hands for easier shaping.
- Roll dough into 1-inch balls (about 24–30 total) and place on the tray.
- Freeze balls for 10 minutes to firm up before dipping.
- Melt chocolate using microwave (30-second intervals at 50% power) or double boiler until smooth.
- Dip each chilled peanut butter ball into the melted chocolate, coating evenly. Place back on parchment.
- Freeze for 10–15 minutes until chocolate hardens completely.
- Store in airtight containers in freezer up to 1 month or refrigerate up to 1 week.
Notes
Use natural peanut butter for a wholesome flavor or conventional for a smoother texture. Always chill before dipping to prevent cracking. For a healthier twist, replace half the sugar with oats or monk fruit sweetener.
- Prep Time: 5 minutes
- Cook Time: 0 minutes
- Category: Dessert
- Method: No Bake
- Cuisine: American
Nutrition
- Serving Size: 1 ball
- Calories: 100
- Sugar: 8g
- Sodium: 45mg
- Fat: 7g
- Saturated Fat: 3g
- Unsaturated Fat: 4g
- Trans Fat: 0g
- Carbohydrates: 10g
- Fiber: 1g
- Protein: 3g
- Cholesterol: 5mg
Keywords: no bake peanut butter balls, homemade candy, easy dessert, chocolate peanut butter recipe, no bake snacks