Have you ever wondered why mini banana bread loaves have become the go-to choice for home bakers seeking portion control, beautiful presentation, and that coveted moist texture? The truth is, these adorable little loaves offer far more than just aesthetic appeal—they’re revolutionizing how we think about classic banana bread. Mini banana bread loaves deliver individual-sized perfection in just 30-35 minutes of baking time, making them 40% faster than traditional 9×5 loaves. Whether you’re a seasoned baker or a kitchen novice, mastering mini banana bread loaves is simpler than you think. In this comprehensive guide, we’ll explore everything you need to know to create bakery-quality results at home, from ingredient selection to storage solutions that keep your loaves fresh for days.
Ingredients List
Creating exceptional mini banana bread loaves starts with quality ingredients. Here’s what you’ll need, along with smart substitution options:
Base Ingredients:
- 1¼ cups sugar (or substitute with coconut sugar for a lower glycemic option)
- ½ cup butter, softened (or use coconut oil for a dairy-free version)
- 2 large eggs (or 3 tablespoons applesauce + 1 tablespoon water per egg for a vegan alternative)
- 4 very ripe bananas, peeled and mashed (look for bananas with brown speckles—these contain more natural sweetness and moisture)
- ½ cup buttermilk (or mix ½ cup milk with ½ tablespoon lemon juice)
- 1 teaspoon vanilla extract (pure vanilla provides superior flavor compared to imitation)
Dry Ingredients:
- 2½ cups all-purpose flour (or 2¼ cups for a slightly denser crumb; alternatively, use 2 cups all-purpose + ½ cup whole wheat flour for added nutrition)
- 1 teaspoon baking soda
- 1 teaspoon salt
Mix-Ins:
- 1 cup walnuts, chopped (or substitute with pecans, chocolate chips, or a combination of both for variety)
The choice of ripe bananas cannot be overstated—they’re the foundation of your loaves’ moisture and natural sweetness, eliminating the need for excessive added sugar.
Timing
Understanding the time investment helps you plan your baking day effectively:
Preparation Time: 15 minutes (includes gathering ingredients, mashing bananas, and measuring)
Baking Time: 30-35 minutes (significantly less than traditional banana bread, which takes 50-60 minutes)
Cooling Time: 5-10 minutes in pans, then complete cooling on wire racks (approximately 30 minutes)
Total Time: Approximately 50-60 minutes from start to serving
This timeline makes mini banana bread loaves perfect for weeknight baking sessions or weekend brunch preparations. The shorter baking time means you can enjoy warm bread with afternoon coffee or prepare multiple batches for gifting.
Step-by-Step Instructions
Step 1: Prepare Your Pans
Start by greasing the bottoms of your 4 mini loaf pans with butter or cooking spray. This technique is crucial—greasing only the bottoms allows the batter to climb the sides naturally, creating that beautiful golden crown. If you don’t have dedicated mini loaf pans, disposable aluminum pans are excellent alternatives and widely available at grocery stores.
Step 2: Cream Sugar and Butter
In a large mixing bowl, combine 1¼ cups sugar with ½ cup softened butter. Using an electric mixer, beat on medium speed for 2-3 minutes until the mixture becomes light, fluffy, and pale in color. This creaming process incorporates air into your batter, creating a tender crumb structure. Don’t skip this step—it’s foundational to achieving the perfect texture.
Step 3: Incorporate Wet Ingredients
Add your 2 eggs one at a time, beating well after each addition. Pour in the mashed bananas (approximately 1½ cups when mashed), buttermilk, and vanilla extract. Continue beating on medium speed until the mixture is smooth and well-blended, about 1-2 minutes. The batter should have a homogeneous appearance with no visible streaks of egg white.
Step 4: Add Dry Ingredients Carefully
In a separate bowl, whisk together 2½ cups flour, 1 teaspoon baking soda, and 1 teaspoon salt. Add this dry mixture to your wet ingredients, stirring just until the flour is barely incorporated. This step is critical—overmixing activates gluten development, resulting in dense, chewy loaves rather than the tender crumb we’re after. Stop stirring the moment you see no white flour streaks.
Step 5: Fold In Mix-Ins
Gently fold in your 1 cup chopped walnuts using a rubber spatula. For added flavor complexity, consider combining walnuts with chocolate chips or cranberries. If using chocolate chips, toss them lightly in a tablespoon of flour before folding to prevent them from sinking to the bottom.
Step 6: Fill Your Pans
Divide the batter evenly among your 4 mini loaf pans, filling each approximately ¾ full. Use a small ice cream scoop or measuring cup for consistent portions. The batter should be fairly thick and not spread itself—if it does, your liquid-to-flour ratio may be off.
Step 7: Bake to Perfection
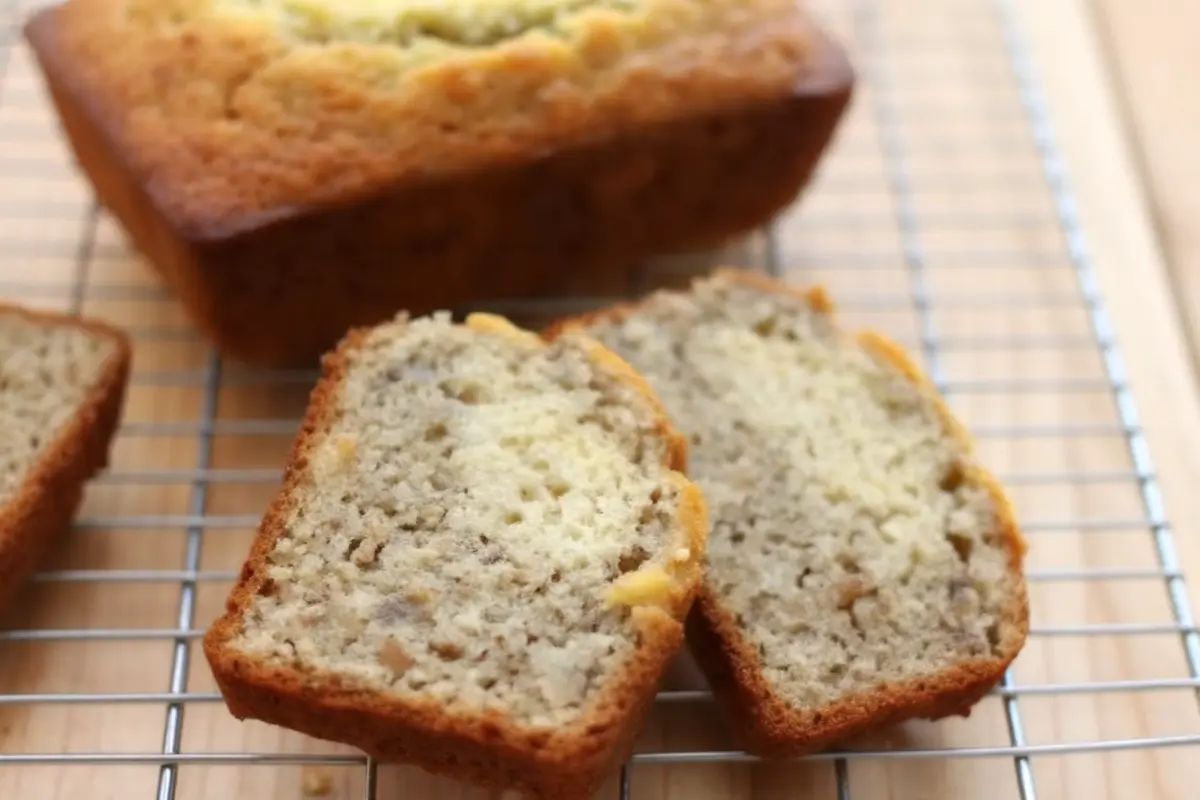
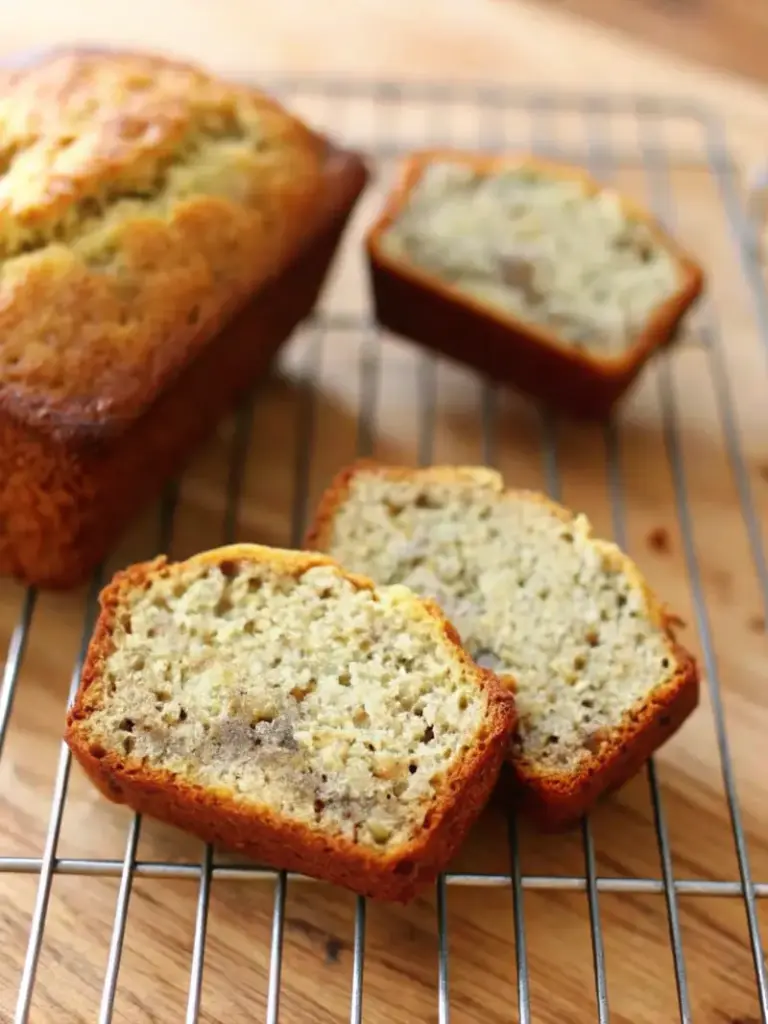
Place your filled pans in a preheated 350°F oven and bake for 30-35 minutes. The loaves are done when a wooden toothpick inserted into the center comes out clean with just a few moist crumbs clinging to it. The tops should be golden brown and spring back slightly when touched.
Step 8: Cool Properly
Remove the pans from the oven and let them cool for 3-5 minutes on a wire rack. Run a thin knife around the edges of each loaf, then turn them out onto the rack to cool completely. Cooling in the pan too long creates condensation that makes the bottom soggy; removing them too quickly risks structural collapse.

Nutritional Information
Understanding the nutritional profile helps you incorporate these delightful loaves into a balanced diet:
Per serving (calculated at 4 servings per mini loaf):
- Calories: 178
- Carbohydrates: 17g
- Protein: 3g
- Total Fat: 11g
- Saturated Fat: 4g
- Cholesterol: 36mg
- Sodium: 280mg
- Potassium: 163mg
- Fiber: 1g
- Sugar: 7g
- Vitamin A: 240 IU
- Vitamin C: 2.6mg
- Calcium: 23mg
- Iron: 0.8mg
The natural fruit sugars in bananas provide quick energy, while walnuts contribute heart-healthy omega-3 fatty acids and additional fiber.
Healthier Alternatives for the Recipe
Creating nutritious versions of mini banana bread loaves doesn’t mean sacrificing flavor or texture:
Lower-Sugar Version: Replace half the granulated sugar with unsweetened applesauce, and add an extra ½ teaspoon of vanilla extract to enhance sweetness perception. This reduces sugar content by approximately 25%.
Greek Yogurt Enhancement: Substitute ¼ cup of buttermilk with Greek yogurt to increase protein content by 50%. This creates a denser, more satisfying crumb.
Whole Grain Option: Use 1¾ cups all-purpose flour combined with ¾ cup whole wheat flour or oat flour for added fiber and sustained energy release.
Oil-Based Version: Replace butter with avocado oil or coconut oil for a dairy-free alternative that maintains moisture while reducing saturated fat content.
Gluten-Free Adaptation: Use a 1:1 gluten-free flour blend, adding ¼ teaspoon xanthan gum to improve structure.
Added Superfood Ingredients: Incorporate ¼ cup ground flaxseed or chia seeds mixed into the batter for omega-3 fatty acids and additional fiber.
Serving Suggestions
Mini banana bread loaves are incredibly versatile:
- Breakfast Companion: Serve warm with a pat of butter and a drizzle of raw honey
- Brunch Centerpiece: Accompany with Greek yogurt and fresh berries for a nutritious spread
- Coffee Shop Style: Toast slices lightly and serve with cream cheese frosting for an indulgent treat
- Gift-Worthy Presentation: Wrap individual loaves in parchment paper and place in decorative boxes for stunning presents
- Dessert Reimagined: Top with whipped cream and crushed walnuts for an elevated dessert experience
- Portable Nutrition: Perfect for lunch boxes, hiking trips, or work snacks—wrapping adds portability without compromising freshness
Common Mistakes to Avoid
Understanding these pitfalls helps you achieve consistent results:
Overmixing the Batter: This is the #1 mistake leading to dense, chewy loaves. Mix only until flour disappears—approximately 10-15 seconds.
Using Under-Ripe Bananas: Pale, firm bananas lack sufficient sugar and moisture. Always choose bananas with brown speckles throughout.
Filling Pans Unevenly: Uneven filling causes some loaves to finish baking before others. Use an ice cream scoop for consistency.
Opening the Oven Door Frequently: Every oven check drops internal temperature 25°F, potentially resulting in underbaked loaves. Wait until the final 5 minutes before checking doneness.
Skipping the Cooling Process: Removing loaves too early compromises structure; leaving them too long creates soggy bottoms. Aim for the 3-5 minute window.
Using Melted Butter Instead of Softened: This changes the batter’s hydration balance. Softened butter incorporates air more effectively during creaming.
Neglecting to Grease Pans Properly: Inadequate greasing causes sticking and breaks in the finished product. A light butter coating on the bottom surface is sufficient.
Storing Tips for the Recipe
Proper storage extends the enjoyment of your mini banana bread loaves:
Room Temperature Storage: Place cooled loaves in an airtight container, separating layers with parchment paper. They’ll stay fresh for 3-4 days, perfect for gradual consumption.
Refrigeration: Store covered containers in the refrigerator for up to one week. The cold actually intensifies flavor complexity as oils redistribute.
Freezing: Wrap individual loaves tightly in plastic wrap, then place in freezer bags. They’ll maintain quality for 2-3 months. Thaw at room temperature for 2-3 hours before consuming.
Make-Ahead Prep: Prepare the dry ingredients in advance, storing them in an airtight container for up to two weeks. Mix wet ingredients fresh on baking day for optimal results.
Ingredient Preparation: Mash bananas and measure dry ingredients the morning of baking for the freshest flavor profile.
Conclusion
Mini banana bread loaves represent the perfect intersection of convenience, nutrition, and indulgence. With their abbreviated baking time, individual portions, and versatile applications, they’ve earned their place in modern home baking. By following these detailed instructions, understanding proper technique, and avoiding common pitfalls, you’ll consistently produce golden, moist loaves that rival any bakery. Start with this foundational recipe, then experiment with mix-ins and variations to make it uniquely yours.
Ready to bake? Try this recipe today and share your results in the comments section below—we’d love to see your golden creations! Subscribe to our blog for weekly recipes, baking tips, and kitchen innovations that transform your cooking experience. Your feedback inspires us to create more content tailored to your baking adventures.
FAQs
Q: Can I make mini banana bread loaves without nuts?
A: Absolutely! Omit the walnuts entirely, or replace them with chocolate chips, dried cranberries, or coconut flakes. Each addition provides unique texture and flavor profiles.
Q: What’s the difference between mini banana bread loaves and regular banana bread?
A: Mini loaves bake in 30-35 minutes versus 50-60 minutes for regular loaves. They’re perfect for portion control and create beautiful individual servings ideal for gifting.
Q: Can I use a bread machine for mini banana bread loaves?
A: Most bread machines aren’t designed for loaf pans, but you can use the dough cycle to mix ingredients, then transfer to pans for oven baking.
Q: Are mini banana bread loaves suitable for freezing?
A: Yes! Wrap cooled loaves individually in plastic wrap and freeze for up to 3 months. Thaw at room temperature before serving.
Q: How can I make mini banana bread loaves more moist?
A: Add Greek yogurt, use very ripe bananas, avoid overmixing, and don’t overbake. These elements collectively create that desirable moist texture.
Q: Can I use oil instead of butter?
A: Yes! Replace butter with equal amounts of coconut oil or avocado oil. This creates a slightly different texture but equally delicious results.
Q: What’s the best way to gift mini banana bread loaves?
A: Wrap individual loaves in parchment paper, place in decorative boxes, and include storage instructions. They’re perfect for hostess gifts or holiday presents.
How to Make Moist Mini Banana Bread Loaves: Complete Recipe + Pro Tips
- Total Time: 50 minutes
- Yield: 4 mini loaves 1x
Description
Moist, fluffy, and perfectly portioned mini banana bread loaves that bake in just 35 minutes—ideal for gifting, breakfast, or snacks with a touch of homemade goodness.
Ingredients
- 1¼ cups sugar
- ½ cup butter, softened
- 2 large eggs
- 4 ripe bananas, mashed
- ½ cup buttermilk
- 1 teaspoon vanilla extract
- 2½ cups all-purpose flour
- 1 teaspoon baking soda
- 1 teaspoon salt
- 1 cup chopped walnuts (or pecans, chocolate chips, or mix-ins of choice)
Instructions
- Preheat oven to 350°F (175°C) and grease 4 mini loaf pans.
- Cream sugar and butter together until light and fluffy.
- Add eggs one at a time, then mix in mashed bananas, buttermilk, and vanilla until smooth.
- In a separate bowl, whisk flour, baking soda, and salt.
- Combine wet and dry ingredients just until flour disappears—do not overmix.
- Fold in chopped walnuts or desired mix-ins.
- Divide batter evenly into prepared pans, filling each ¾ full.
- Bake 30–35 minutes or until a toothpick inserted in the center comes out clean.
- Cool 5–10 minutes in pans, then remove and let cool completely on wire racks.
Notes
For extra moist loaves, use very ripe bananas and avoid overbaking. Substitute butter with coconut oil for a dairy-free version or add chocolate chips for a sweeter twist. Loaves freeze well for up to 3 months.
- Prep Time: 15 minutes
- Cook Time: 35 minutes
- Category: Baked Goods
- Method: Baked
- Cuisine: American
Nutrition
- Serving Size: 1 slice (1/4 mini loaf)
- Calories: 178
- Sugar: 7g
- Sodium: 280mg
- Fat: 11g
- Saturated Fat: 4g
- Unsaturated Fat: 6g
- Trans Fat: 0g
- Carbohydrates: 17g
- Fiber: 1g
- Protein: 3g
- Cholesterol: 36mg
Keywords: mini banana bread loaves, banana bread, easy baking, snack, homemade gifts