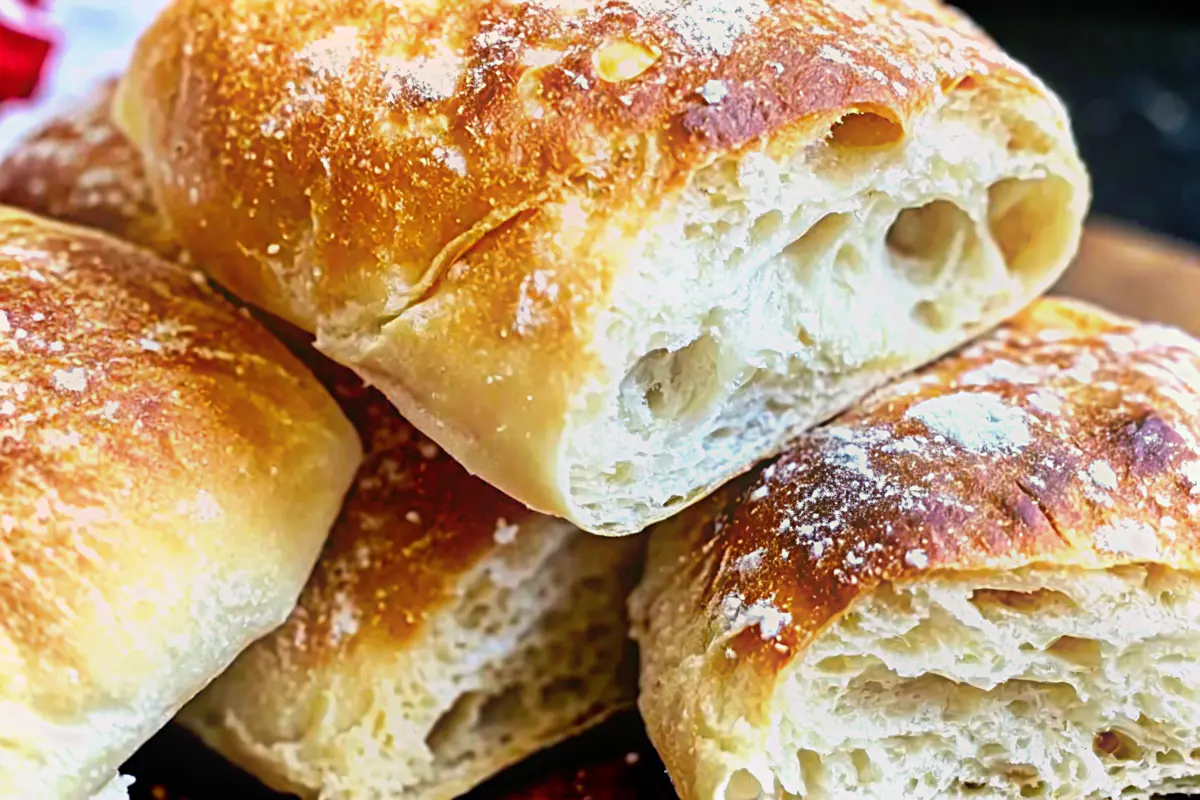
Did you know that authentic ciabatta bread achieves its signature open crumb structure through a surprisingly high 75-80% hydration ratio, making it one of the wettest doughs in traditional bread baking? This Italian masterpiece, whose name literally translates to “slipper bread” due to its flat, elongated shape, has captivated home bakers worldwide with its rustic charm and incredible versatility. If you’ve been intimidated by professional bakery-quality bread, this ciabatta bread recipe will transform your kitchen into an artisan bread haven with just four simple ingredients: flour, water, yeast, and salt.
The beauty of this homemade ciabatta bread recipe lies in its simplicity and the science behind its structure. Unlike traditional kneaded breads, ciabatta relies on time, hydration, and gentle handling to develop those coveted irregular holes and chewy texture. Whether you’re crafting the perfect sandwich base, serving it alongside olive oil and balsamic vinegar, or creating bruschetta, mastering this easy ciabatta bread recipe will elevate your baking repertoire and impress everyone at your table.
Ingredients
Creating the perfect ciabatta bread starts with quality ingredients and understanding their roles. Here’s everything you’ll need:
For the Dough:
- 2.25 tsp Active Dry Yeast – Your leavening powerhouse that creates the magical rise and airy texture. Ensure it’s fresh and active for best results. Substitution: Use instant yeast at a 1:1 ratio, though active dry provides slightly better flavor development.
- 4 cups All-Purpose Flour – The structural foundation of your bread. All-purpose flour works beautifully for ciabatta’s characteristic texture. Substitution: Swap up to 1/4 cup with whole wheat flour for a nuttier, more complex flavor profile.
- 2 tsp Salt – Essential for flavor enhancement and gluten structure. Don’t skip this crucial ingredient. Substitution: Use kosher salt or sea salt; if using table salt, reduce slightly to 1.5 tsp.
- 2 tbsp Olive Oil – Adds richness to the crumb and contributes to crust development. Extra virgin olive oil offers the best flavor. Substitution: Any neutral oil works, though olive oil provides authentic Italian character.
- 1.5 cups Water – Warm water (105-115°F/40-46°C) activates the yeast. This high-hydration formula is the secret to ciabatta’s open structure.
The ingredient list may be minimal, but the magic happens in the technique and fermentation process.
Timing
Total Time: 3 hours 30 minutes to 26 hours (depending on fermentation method)
Active Preparation Time: 20 minutes
First Rest (Bulk Fermentation): 1-2 hours at room temperature OR 12-24 hours refrigerated (recommended)
Second Rest (Proofing): 30-60 minutes
Baking Time: 20-25 minutes
Cooling Time: 30 minutes minimum
The extended fermentation time might seem lengthy, but it’s mostly hands-off. The cold fermentation method (12-24 hours in the fridge) delivers 30% more complex flavor compared to quick room-temperature rises and makes the sticky dough significantly easier to handle. This same-day ciabatta bread recipe variation takes approximately 3.5 hours, while the overnight method produces superior results with minimal active work.
Step-by-Step Instructions
Step 1: Activate Your Yeast
Begin by whisking together the warm water (105-115°F) and active dry yeast in a large bowl. Let this mixture sit undisturbed for 5-10 minutes until it becomes foamy and fragrant. This crucial step, called proofing, confirms your yeast is alive and ready to create the rise your ciabatta bread needs. If your mixture doesn’t foam, your yeast may be expired—start over with fresh yeast to avoid disappointment.
Step 2: Combine Dry Ingredients
Once your yeast mixture is bubbly and active, add the flour and salt directly to the bowl. The salt shouldn’t kill the yeast at this stage, despite common baking myths. This streamlined approach saves time and works perfectly for high-hydration doughs.
Step 3: Create Your Shaggy Dough
Drizzle in the olive oil, then use a wooden spoon, sturdy spatula, or your hands to mix everything until just combined into a wet, shaggy dough. The texture will be sticky and somewhat loose—this is exactly what you want. Resist any urge to add more flour or knead extensively. The ciabatta dough should look rough and barely cohesive at this stage, which feels counterintuitive but creates the perfect structure.
Step 4: First Rest – Bulk Fermentation
Cover your bowl tightly with plastic wrap or a clean kitchen towel. For the quick ciabatta bread recipe method, let it rest at room temperature for 1-2 hours until doubled in size and visibly bubbly. For superior results, refrigerate the dough for 12-24 hours. The cold fermentation develops deeper, more complex flavors and makes the wet dough much easier to handle during shaping.
Step 5: Prepare Your Work Surface
Generously flour a clean work surface—don’t be shy here. Ciabatta bread dough is wet by design, and proper flouring prevents sticking while preserving the delicate bubble structure. Keep extra flour nearby for dusting your hands.
Step 6: The Gentle Turn Out
Carefully scrape or pour your risen dough onto the floured surface using a bowl scraper or spatula. Handle it gently to preserve those precious air pockets that create ciabatta’s signature open crumb. The dough should feel soft, extensible, and full of life.
Step 7: Shape with Care
Pat the dough gently into a rough rectangle or square about 1 inch thick, using a bench scraper or well-floured hands. Avoid stretching, pulling, or deflating the dough. For two smaller loaves, use a bench scraper to divide the rectangle in half with one decisive cut. The shapes will be rustic and irregular—that’s authentic ciabatta character.
Step 8: Second Rest – Final Proofing
Transfer your shaped loaf or loaves onto parchment paper or a well-floured baking sheet. You can nestle floured kitchen towels alongside the loaves to help maintain their shape during proofing. Let rest for 30-60 minutes while the dough puffs up slightly. During this time, preheat your oven.
Step 9: Preheat for Success
Heat your oven to 450°F (230°C), placing a baking stone or baking sheet inside to preheat. For professional-quality crust development, position a shallow pan on the bottom oven rack for steam generation. A properly preheated oven and baking surface creates the dramatic oven spring that gives ciabatta bread its characteristic height and crispy exterior.
Step 10: Bake with Steam
Carefully slide the parchment paper with your dough onto the preheated baking surface. Immediately pour about one cup of hot water into the shallow pan on the bottom rack, being cautious of the sudden steam release. Quickly close the oven door to trap the humidity, which keeps the crust soft initially, allowing maximum expansion before the exterior sets.
Step 11: Golden Perfection
Bake for 20-25 minutes until the crust achieves a deep golden-brown color and the loaf sounds hollow when tapped on the bottom. The internal temperature should reach approximately 200-210°F. Your kitchen will fill with an irresistible, yeasty aroma that signals success.
Step 12: Cool Completely
Transfer your homemade ciabatta bread to a wire rack and let it cool for at least 30 minutes before slicing. This crucial cooling period allows the crumb structure to set properly. Cutting too early results in a gummy texture, so practice patience for optimal results.

Nutritional Information
Per Serving (1/8 of recipe):
- Calories: 245 kcal
- Carbohydrates: 48g
- Protein: 7g
- Fat: 3.5g
- Saturated Fat: 0.5g
- Sodium: 585mg
- Fiber: 2g
- Sugar: 0.5g
Nutritional Highlights:
- Low in fat while providing sustained energy from complex carbohydrates
- Good source of protein from wheat flour
- Moderate sodium content essential for flavor and gluten development
- Minimal added sugars compared to commercial breads
This ciabatta bread recipe provides wholesome energy without unnecessary additives or preservatives found in store-bought versions. The olive oil contributes heart-healthy monounsaturated fats, while the natural fermentation process may enhance digestibility.
Healthier Alternatives for the Recipe
Transform your ciabatta bread recipe to align with various dietary preferences without sacrificing the beloved texture and flavor:
Whole Grain Boost: Replace up to 1 cup of all-purpose flour with whole wheat or spelt flour for increased fiber content (4-5g per serving) and additional B vitamins. Note that whole grain flours absorb more water, so you may need to add an extra 1-2 tablespoons of water.
Ancient Grains: Substitute 1/2 cup of flour with ancient grain flours like einkorn or kamut for enhanced nutritional profile and nutty complexity.
Reduced Sodium: Cut salt to 1.5 teaspoons if monitoring sodium intake. While this slightly affects gluten structure, the bread remains delicious with proper fermentation time.
Enriched Version: Add 2 tablespoons of ground flaxseed or chia seeds to boost omega-3 fatty acids and fiber content by 15%.
Olive Oil Quality: Use high-quality extra virgin olive oil rich in polyphenols and antioxidants for maximum health benefits and superior flavor.
Herb Infusion: Incorporate 2 tablespoons of chopped fresh rosemary or 1 teaspoon of dried Italian herbs to add antioxidants without extra calories.
Garlic Enhancement: Mix in 1 teaspoon of garlic powder or roasted garlic cloves for added anti-inflammatory compounds and savory depth.
Serving Suggestions
The versatility of homemade ciabatta bread makes it perfect for countless culinary applications:
Classic Italian Style: Slice horizontally and toast lightly, then brush with extra virgin olive oil and rub with fresh garlic for authentic bruschetta. Top with diced tomatoes, fresh basil, and a drizzle of balsamic glaze.
Gourmet Sandwiches: The sturdy crust and open crumb structure make ciabatta bread ideal for panini. Layer with fresh mozzarella, tomatoes, basil, and prosciutto, then press in a panini maker for melted perfection.
Soup Accompaniment: Serve warm slices alongside minestrone, tomato soup, or Italian wedding soup for dipping and soaking up delicious broths.
Breakfast Delight: Transform leftover ciabatta into French toast by slicing thick, soaking in egg mixture with cinnamon and vanilla, then pan-frying until golden. The open crumb absorbs the custard beautifully.
Appetizer Board: Cube day-old ciabatta and toast with olive oil and herbs for homemade croutons perfect for salads or bread salads like panzanella.
Party Pleaser: Slice thinly, toast until crispy, and top with various spreads, cheeses, and cured meats for an impressive crostini platter.

Common Mistakes to Avoid
Master your ciabatta bread recipe by sidestepping these frequent pitfalls:
Over-Handling the Dough: The number one mistake is trying to knead or overwork this high-hydration dough. Ciabatta’s signature open crumb comes from preserving air pockets through gentle handling. Studies show that minimal manipulation preserves up to 40% more air bubbles compared to traditional kneading methods.
Adding Too Much Flour: While the sticky dough feels uncomfortable, resist adding excessive flour during shaping. This compromises hydration levels and results in dense, tight crumb structure. Generously flour only your work surface and hands.
Skipping the Rest Periods: Rushing fermentation produces bland, dense bread. The long rest times allow flavor development and gluten structure formation without mechanical kneading.
Incorrect Water Temperature: Water that’s too hot (above 120°F) kills yeast, while too cool water (below 95°F) slows activation significantly. Aim for that sweet spot of 105-115°F for optimal results.
Inadequate Oven Preheating: Placing dough in an insufficiently heated oven prevents proper oven spring. Allow a full 30-45 minutes of preheating with your baking surface inside.
Cutting Too Soon: Slicing hot bread releases steam and moisture, creating a gummy texture. Though difficult, waiting at least 30 minutes ensures proper crumb structure.
Using Old Yeast: Expired or improperly stored yeast is the culprit behind flat, dense loaves. Always proof your yeast to confirm viability before committing to the full recipe.
Storing Tips for the Recipe
Maximize the shelf life and quality of your homemade ciabatta bread with proper storage techniques:
Room Temperature Storage (1-2 days): For maintaining crust crispiness, wrap cooled bread loosely in a paper bag and store at room temperature. The paper allows air circulation while preventing excessive drying. For a softer crust, wrap tightly in plastic wrap or store in a bread bag.
Refrigeration (Not Recommended): Avoid refrigerating bread, as temperatures between 35-50°F accelerate staling through a process called retrogradation, making your ciabatta tough and dry up to 6 times faster than room temperature storage.
Freezing for Long-Term (up to 3 months): Slice cooled bread completely before freezing, placing parchment paper between slices for easy separation. Store in a freezer-safe bag with air pressed out. This method preserves quality for up to three months and allows you to toast individual slices as needed.
Reviving Day-Old Bread: Preheat your oven to 350°F, lightly mist the crust with water, and warm for 5-7 minutes to refresh the texture. This technique restores approximately 80% of the original crusty exterior.
Dough Storage: The prepared dough (before shaping) stores beautifully in the refrigerator for up to 3 days in an airtight container. Longer cold fermentation continues developing flavor complexity. Allow refrigerated dough to come to room temperature for 30 minutes before shaping.
Freezing Unbaked Dough: Shape the dough into loaves, wrap tightly in plastic wrap and aluminum foil, then freeze for up to 2 months. Thaw overnight in the refrigerator, proof at room temperature, and bake as directed.
Conclusion
This ciabatta bread recipe transforms four humble ingredients into artisan bakery-quality bread through the magic of time, hydration, and gentle technique. The wet dough, patient fermentation, and careful handling create that signature open crumb structure and crispy crust that makes ciabatta irresistible. Whether you choose the quick 3.5-hour method or the superior overnight fermentation, you’ll achieve rustic Italian bread perfection in your home kitchen.
Ready to bake? Try this easy ciabatta bread recipe today and share your beautiful loaves in the comments below! Don’t forget to leave a review telling us how your bread turned out. Subscribe to our blog for more artisan bread recipes, baking tips, and kitchen inspiration delivered straight to your inbox. Your journey to bread-baking mastery starts here!

FAQs
Q: Can I use instant yeast instead of active dry yeast in this ciabatta bread recipe?
Yes, you can substitute instant yeast at a 1:1 ratio. The main difference is that instant yeast can be mixed directly with the flour without proofing, though proofing first helps confirm yeast viability. Both types produce excellent results in this ciabatta bread recipe.
Q: Why is my ciabatta dough so sticky compared to other bread recipes?
High hydration (75-80% water-to-flour ratio) is the defining characteristic of authentic ciabatta bread. This wet, sticky dough is essential for creating the large, irregular holes in the crumb. Embrace the stickiness and use generous flour on your work surface rather than adding more flour to the dough.
Q: How do I get those big holes in my ciabatta bread?
Large holes result from three factors: high hydration, gentle handling that preserves air bubbles, and extended fermentation time. The overnight cold fermentation method produces the most dramatic open crumb structure. Avoid deflating the dough during shaping.
Q: Can I make this ciabatta bread recipe in a bread machine?
While bread machines can mix and knead the dough, they’re not ideal for ciabatta’s wet, minimally-kneaded dough. You can use a bread machine’s dough cycle for mixing, but shape and bake manually for best results. The gentle handling required for ciabatta doesn’t translate well to machine kneading.
Q: My ciabatta is flat rather than tall. What went wrong?
Flat ciabatta typically results from over-proofing, insufficient oven heat, or excessive handling during shaping. Ensure your oven is fully preheated to 450°F, handle the dough gently, and watch proofing time carefully. The dough should be puffy but not collapsed when it goes into the oven.
Q: How do I create a crispier crust on my ciabatta bread?
Maximize crust crispiness by preheating a baking stone or steel, adding steam to the oven during the first 10 minutes of baking, and cooling completely on a wire rack (which prevents trapped moisture from softening the bottom crust). Baking at a high temperature (450°F) also promotes better crust development.
Q: Can I add mix-ins like olives or cheese to this ciabatta bread recipe?
Absolutely! Fold in additions like chopped olives, sun-dried tomatoes, shredded Parmesan, or roasted garlic after the initial mixing stage. Limit mix-ins to about 1/2 to 3/4 cup total to avoid interfering with gluten development and crumb structure.
Q: What’s the difference between ciabatta and sourdough bread?
While both feature open crumb structures, ciabatta bread uses commercial yeast for faster fermentation (3-24 hours), whereas sourdough ciabatta relies on wild yeast cultures requiring 12-48 hours. Sourdough offers tangier flavor and potentially better digestibility, while traditional ciabatta provides milder taste and more predictable results for beginners.
Homemade Ciabatta Bread Recipe – Perfect for Sandwiches & Panini (Quick & Overnight Methods)
- Total Time: 3 hours 30 minutes – 26 hours
- Yield: 1 large ciabatta loaf (8 servings) 1x
- Diet: Vegan
Description
An easy, authentic Italian ciabatta bread recipe with a perfectly crisp crust, light airy crumb, and bakery-quality flavor — all from your home kitchen.
Ingredients
- 2.25 tsp active dry yeast
- 4 cups all-purpose flour
- 2 tsp salt
- 2 tbsp olive oil
- 1.5 cups warm water (105–115°F/40–46°C)
Instructions
- In a large bowl, whisk warm water and yeast. Let sit 5–10 minutes until foamy.
- Add flour and salt directly to the bowl, then drizzle in olive oil. Mix until a wet, shaggy dough forms.
- Cover and let rest 1–2 hours at room temperature, or refrigerate 12–24 hours for deeper flavor.
- Generously flour your work surface and gently turn out the dough, preserving air bubbles.
- Pat lightly into a rectangle about 1 inch thick and divide if desired into smaller loaves.
- Transfer to parchment-lined baking sheet and proof 30–60 minutes while preheating oven to 450°F (230°C).
- Slide parchment onto preheated baking stone or sheet. Add 1 cup hot water to a pan on the oven bottom for steam.
- Bake 20–25 minutes until golden and hollow-sounding when tapped. Cool at least 30 minutes before slicing.
Notes
Use minimal handling and avoid adding extra flour — stickiness is key to ciabatta’s airy texture. For best flavor, refrigerate overnight for slow fermentation.
- Prep Time: 20 minutes
- Cook Time: 25 minutes
- Category: Bread
- Method: Baking
- Cuisine: Italian
Nutrition
- Serving Size: 1 slice
- Calories: 245
- Sugar: 0.5g
- Sodium: 585mg
- Fat: 3.5g
- Saturated Fat: 0.5g
- Unsaturated Fat: 3g
- Trans Fat: 0g
- Carbohydrates: 48g
- Fiber: 2g
- Protein: 7g
- Cholesterol: 0mg
Keywords: ciabatta bread, Italian bread, artisan bread, homemade ciabatta, crispy crust